Building Authentication in SwiftUI using Firebase Auth SDK & Sign in with Apple
Published at Mar 23, 2020
When we build a mobile app, we might need to authenticate and save the identity of our users so we can provide a unique experience to each of the users. As mobile developers, building an authentication system by ourselves is not a pretty straightforward task. We have to create our backend and database, as well as to make sure our authentication system is secure and safe. We also need to handle third party federated identities provides like Google, Apple, Facebook, and many more using OAuth 2.0.
Luckily we have Firebase, which is a mobile platform by Google that we can integrate into our app with services ranging from authentication, database, analytics, and many more. Google manages the services, so we don’t have to worry about provisioning and to scale our infrastructure as well as handling the security manually. It’s a timesaver for us, so we can focus on building our product experience. For this tutorial, we will be focusing on integrating Firebase Auth SDK into an iOS app.
Firebase Auth SDK provides many features such as:
- Signup and Sign in with email and password.
- The third-party federated social OAuth2 authentication such as Google, Apple, Facebook, GitHub, and Twitter.
- SMS phone number authentication.
- User management via a web dashboard.
- Backend authentication integration using Firebase Admin SDK for nodeJS, Go, Ruby, PHP, C++, Java, and many more.
- The ability for the client to retrieve and refresh token using the web and mobile SDK.
What We Will Build
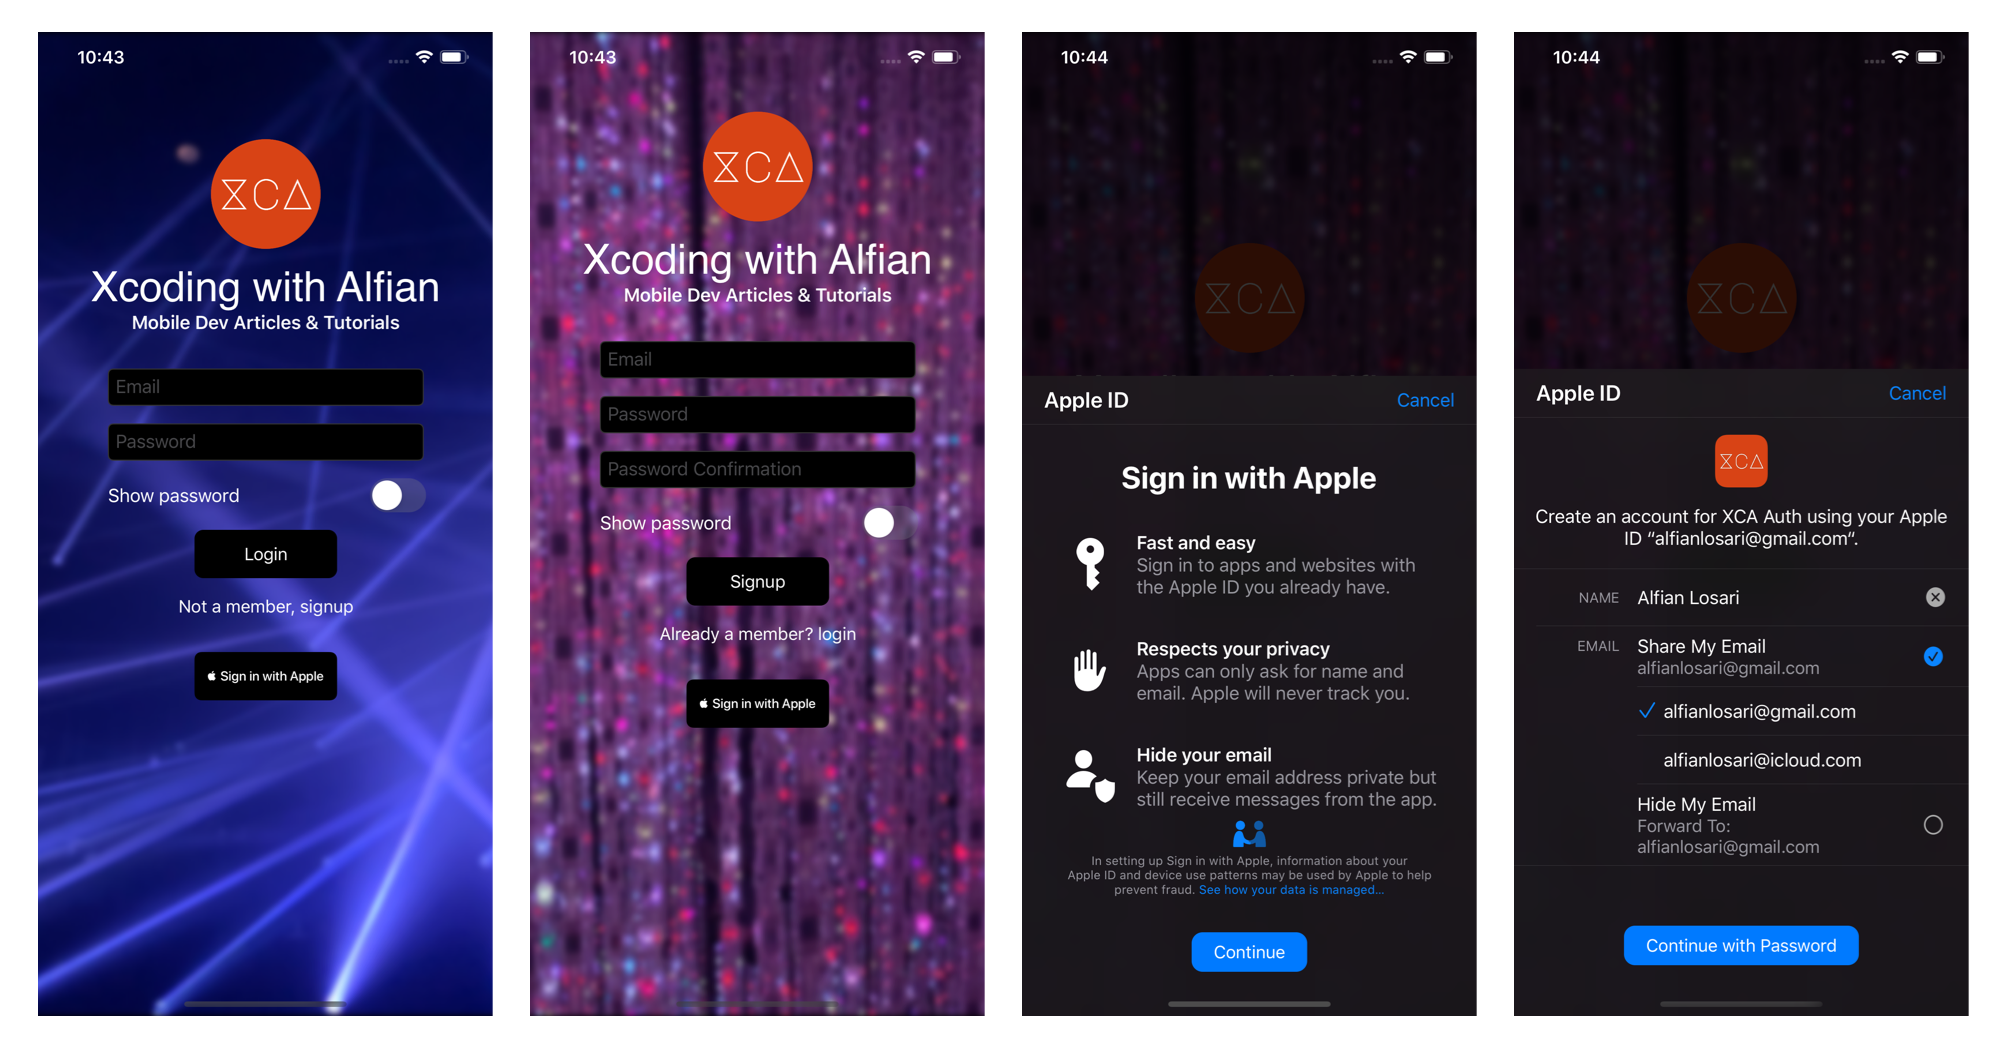
In this tutorial, we will use SwiftUI to build an authentication screen where the user can signup and login via email and password as well as login using the new iOS 13 Sign in with Apple. We will be utilizing Firebase Auth SDK to implement those features. Also, we will make sure our app show screen based on the authentication state of the user. You can download the completed project repository from the GitHub repository.
Starter Project and Dependencies Setup
To begin the project, you can clone or download the starter project repository from the GitHub repository. The starter project provides several components and resources that we can use to build the app, such as:
Assets, such as icons and background images.ProgressView. SwiftUI view to render loading indicator backed by UIKitUIActivityIndicatorView.WebView. SwiftUI view to render web content backed byWKWebView. It will be displayed in theHomeView.SignInWithAppleButton. SwiftUI view to render Sign in with Apple button usingAuthenticationServicesAPI styling.- String extension that uses Swift
CryptoKitto generate randomnoncetoken andSHA256hashing for authentication using Sign in With Apple. XCAButtonStyle. SwiftUI custom button style implementation to render button with custom styling.
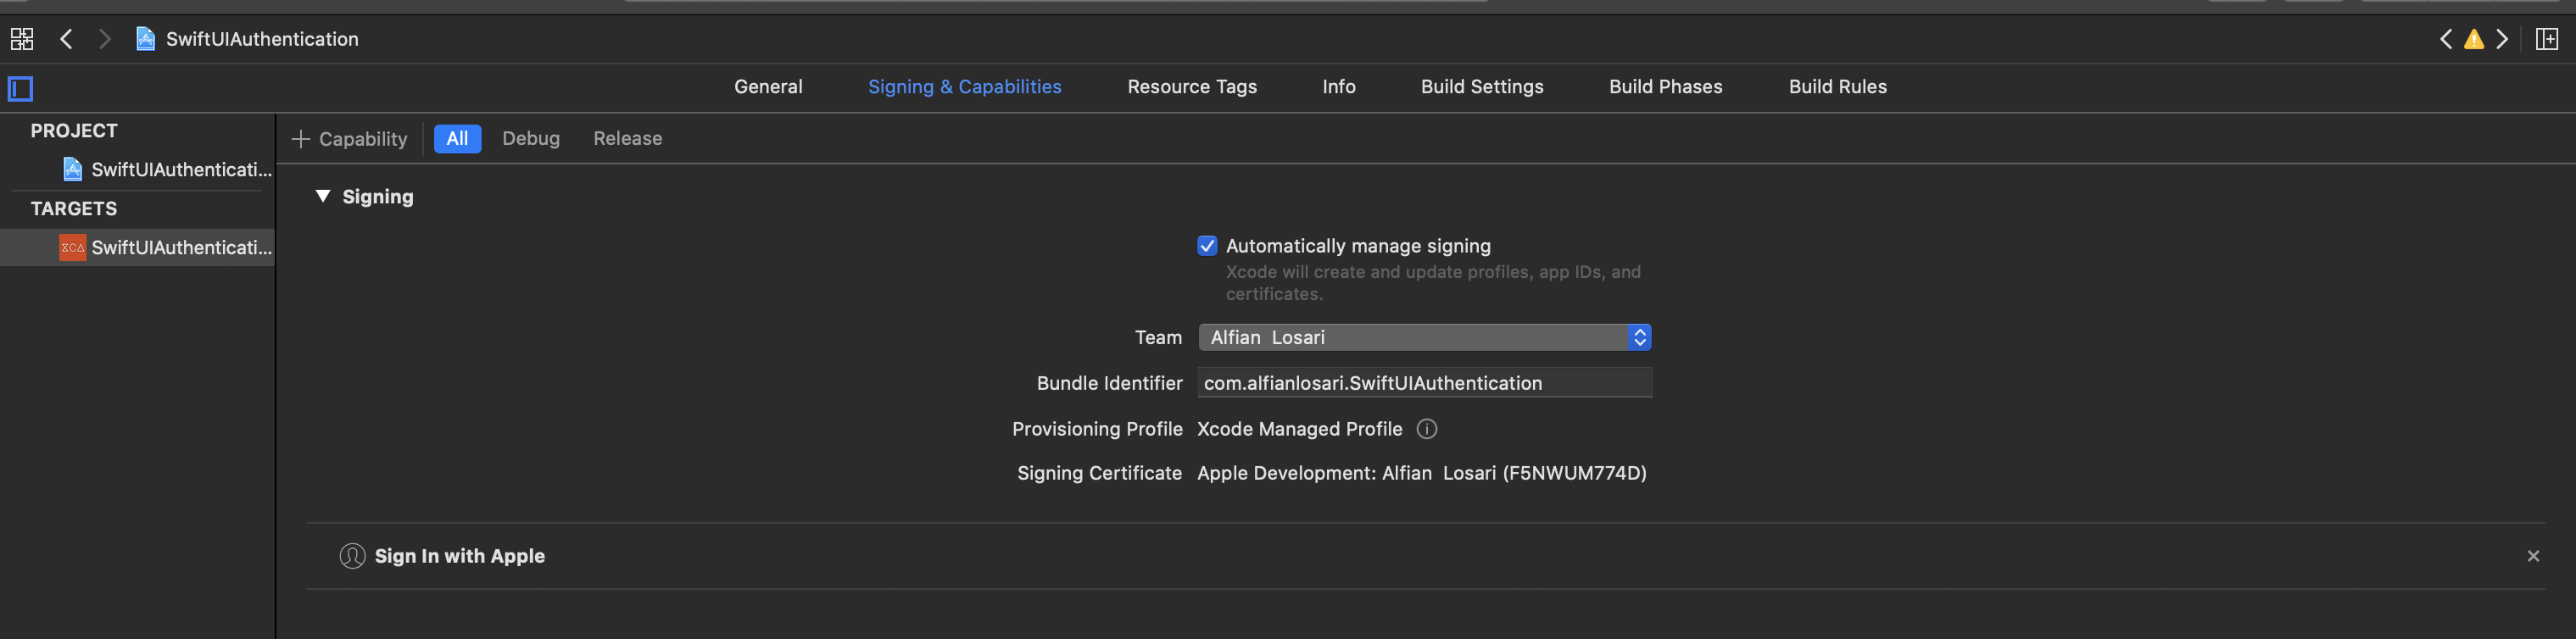
After you download the project, make sure to run pod install to download FirebaseAuth dependency. Last, open the project from .xcworkspace, go to the target signing and capabilities tab, then update the bundle identifier using your custom identifier. We will use this token on the next section when we add a new iOS app to the Firebase project.
Configure Firebase Auth & iOS app with Firebase Web Console

In this part, we will create a new Firebase project from the website dashboard. You can sign in with your Google Account and create a new project from the console. Give the project any name you want to. From the dashboard, click on Authentication from the side panel. From the list, click on email/password sign in and enable it. Also, click ok sign in with Apple and enable it.
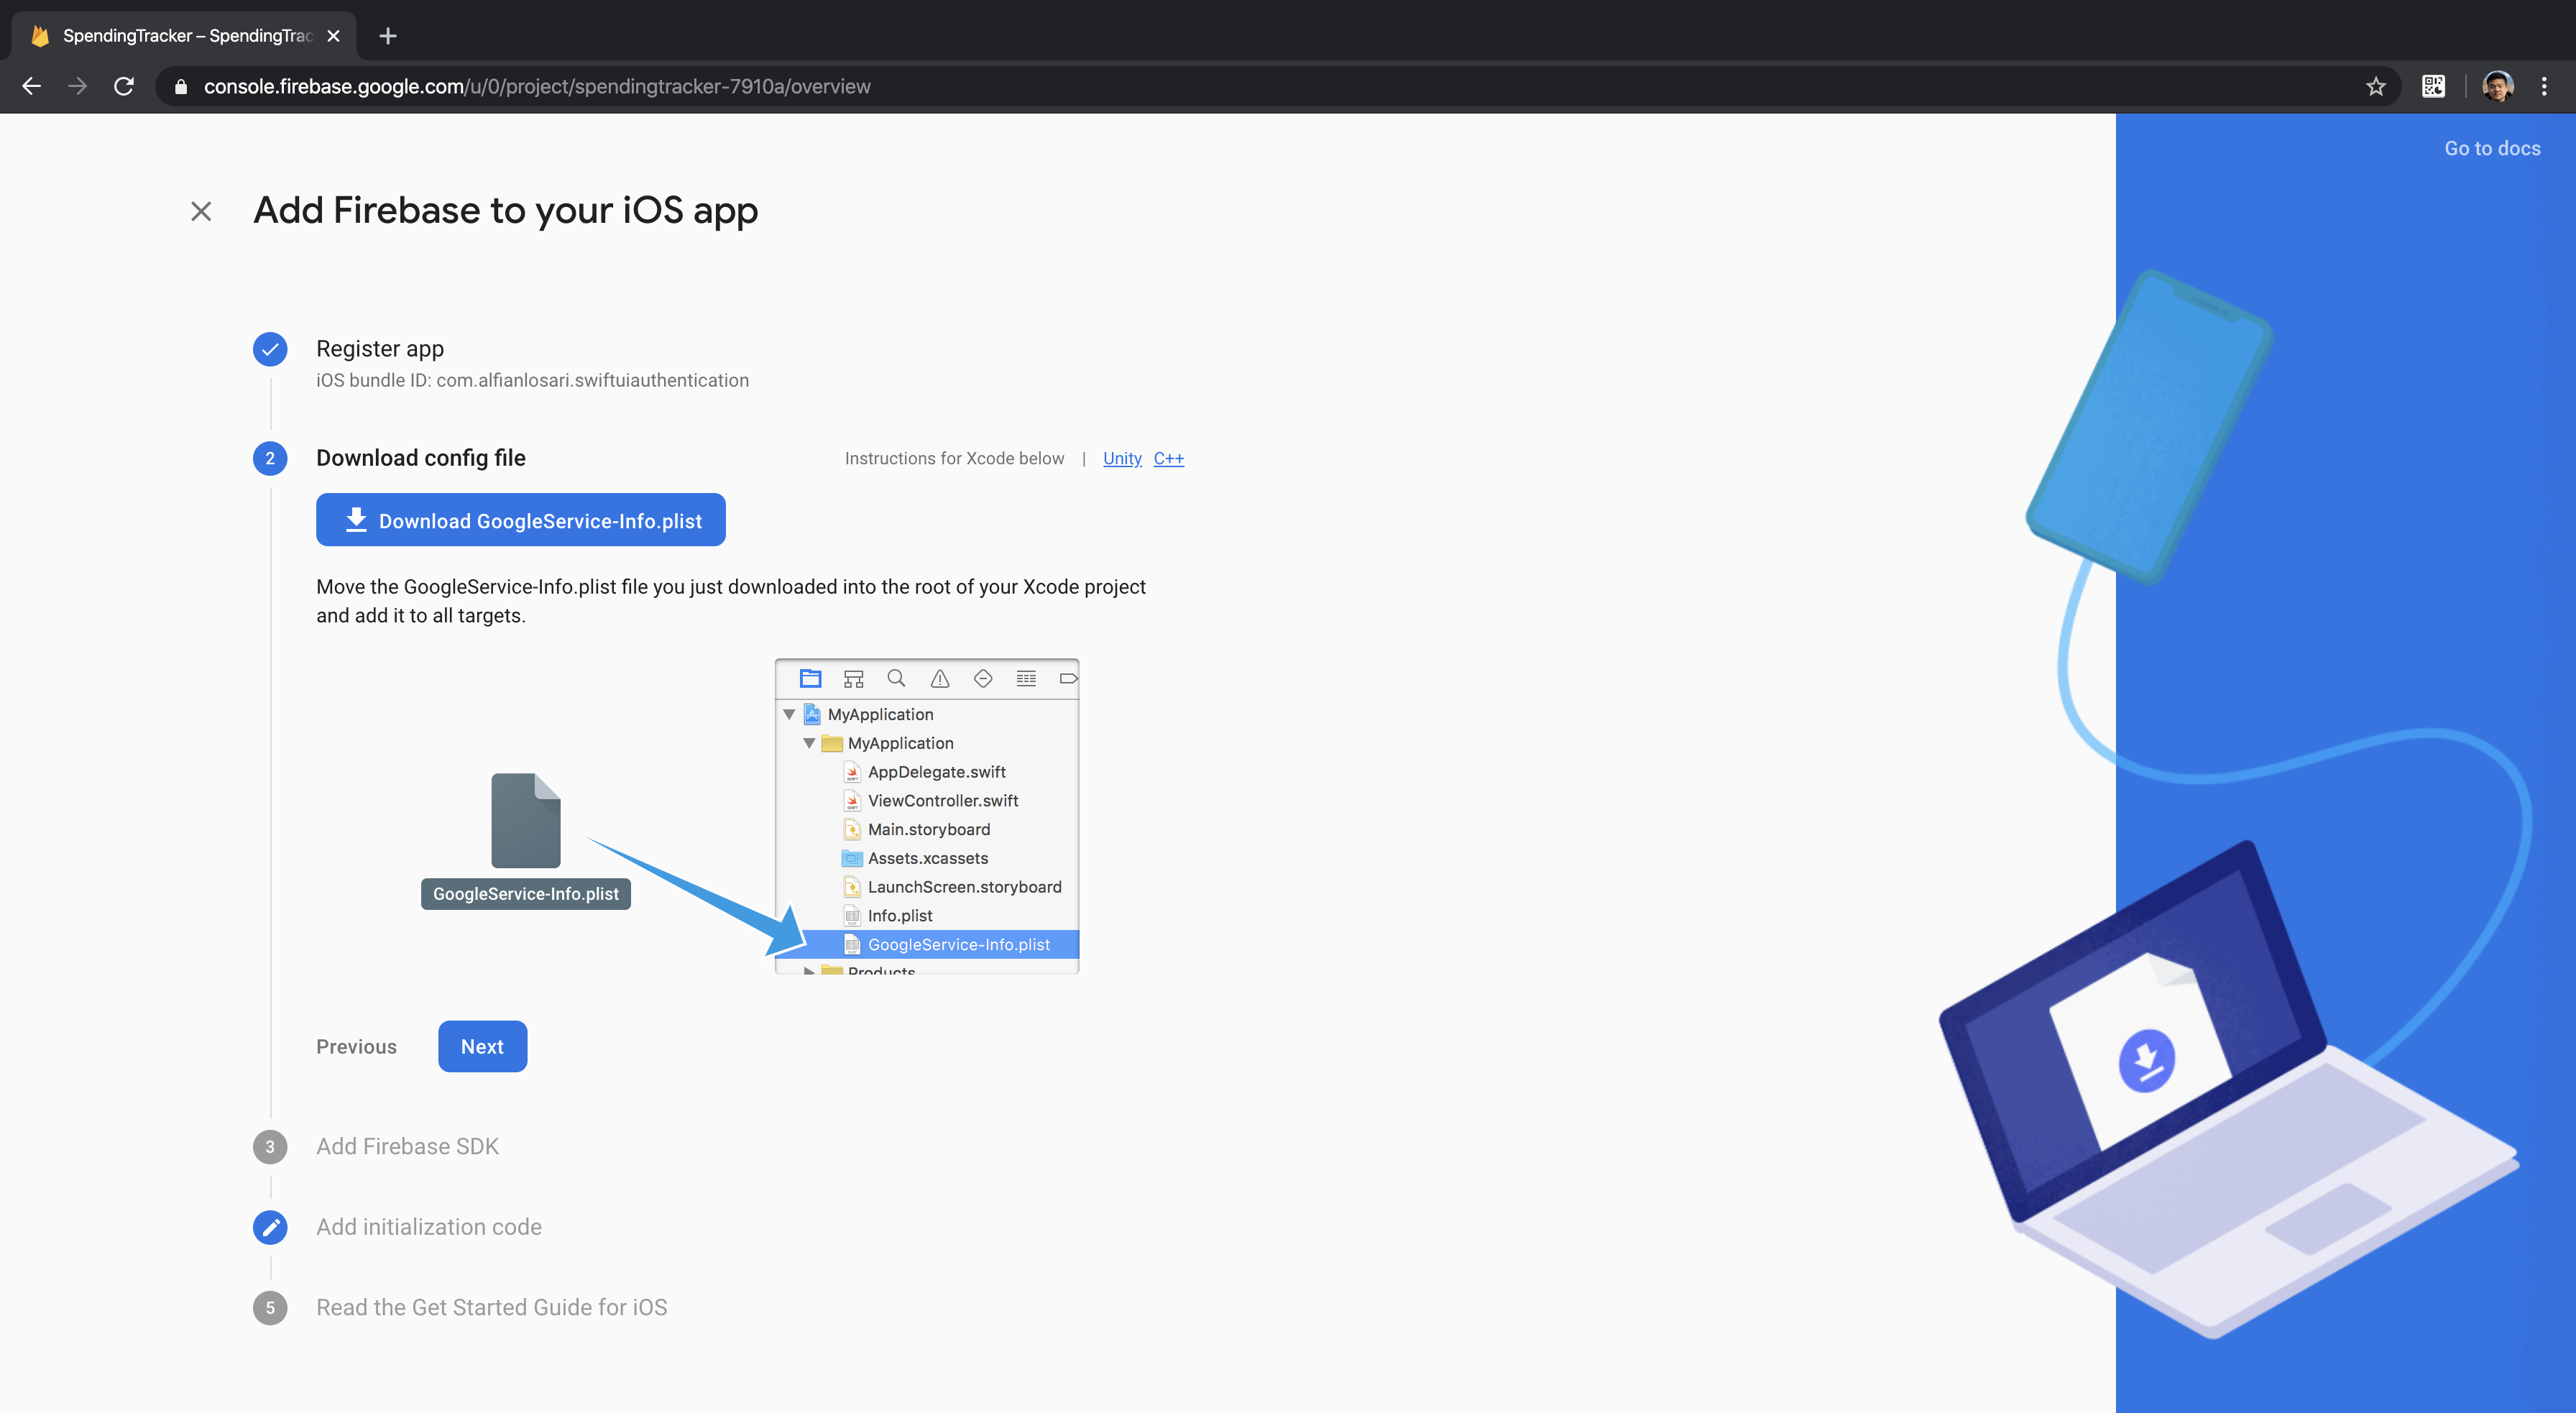
Go to the main dashboard project overview, and click on create a new iOS app. Provide your unique app/bundle identifier from the previous section. Click on next, then download the GoogleServices-Info.plist into your local machine. Then copy the plist file into the project. Finally, go to AppDelegate, import Firebase, and add the following code to configure Firebase when the app launch.
import UIKit
import Firebase

@UIApplicationMain
class AppDelegate: UIResponder, UIApplicationDelegate {

    func application(_ application: UIApplication, didFinishLaunchingWithOptions launchOptions: [UIApplication.LaunchOptionsKey: Any]?) -> Bool {
        // Override point for customization after application launch.
        FirebaseApp.configure()
        return true
    }

    // ...
}
Building Authentication State Observed Object
To manage the state of user authentication in our app, create a new file named AuthenticationState. It is a singleton class that inherits NSObject and implements the ObservableObject protocol. Copy the following code into the source file.
class AuthenticationState: NSObject, ObservableObject {

    @Published var loggedInUser: User?
    @Published var isAuthenticating = false
    @Published var error: NSError?

    static let shared = AuthenticationState()

    private let auth = Auth.auth()
    fileprivate var currentNonce: String?

    func login(with loginOption: LoginOption) {
        self.isAuthenticating = true
        self.error = nil

        switch loginOption {
            case .signInWithApple:
                handleSignInWithApple()

            case let .emailAndPassword(email, password):
                handleSignInWith(email: email, password: password)
        }
    }

    func signup(email: String, password: String, passwordConfirmation: String) {
        // TODO
    }

    private func handleSignInWith(email: String, password: String) {
        // TODO
    }

    private func handleSignInWithApple() {
        // TODO
    }
}
In here, we also declare a LoginType enum to differentiate the case between login via email and Sign in with Apple. Here are the properties and methods we have declare in this class:
auth. It is aFirebaseAuthinstance responsible for all the authentication.loggedInUser. A published property that stores the current signed in user.isAuthenticating. A published property that represents whether the object is currently making an Authentication request to Firebase API.currentNonce. A randomnoncestring we will generate to make request for sign in with Apple.error. A published property that represents NSError if the authentication request failed.signup:(email:password:passwordConfirmation:method. The method to sign up a new user using email and password.loginWith:loginOptionmethod. The method that we expose to the View for making login request passing the login type.handleSignInWith:email:password:. Private method for making email and password sign in.handleSignInWithApple. Private method for Sign in with Apple authentication request.
We will implement those empty methods in the later sections. Let’s move on to observing the authentication state section!
Listening Authentication State From the View
In this part, we will be using FirebaseAuth SDK feature to listen whenever the authentication state changes and update the user published property accordingly inside the AuthenticationState object. The child views can listen and react to the changes by adding @EnvironmentObject as the property. The root ContentView will be using Group and conditional statements to determine which view will be rendered. When AuthenticationState user property exists, the HomeView is rendered. Otherwise, the AuthenticationView is rendered. We'll also add a simple bottom transition animation modifier when the views inside the Group updated.
struct ContentView: View {

    @EnvironmentObject var authState: AuthenticationState
    var body: some View {
        Group {
            if authState.loggedInUser != nil {
                HomeView()
            } else {
                // TODO: Implement Authentication Screen
                Text("Authentication Screen")
            }
        }
        .animation(.easeInOut)
        .transition(.move(edge: .bottom))
    }
}
We will inject AuthenticationState at the root of the view using the environment object modifier inside the SceneDelegate.
import UIKit
import SwiftUI

class SceneDelegate: UIResponder, UIWindowSceneDelegate {

    func scene(_ scene: UIScene, willConnectTo session: UISceneSession, options connectionOptions: UIScene.ConnectionOptions) {
        let authState = AuthenticationState.shared
        let contentView = ContentView()
            .environmentObject(authState)

        // ...
    }

    // ...
}
Building Authentication View
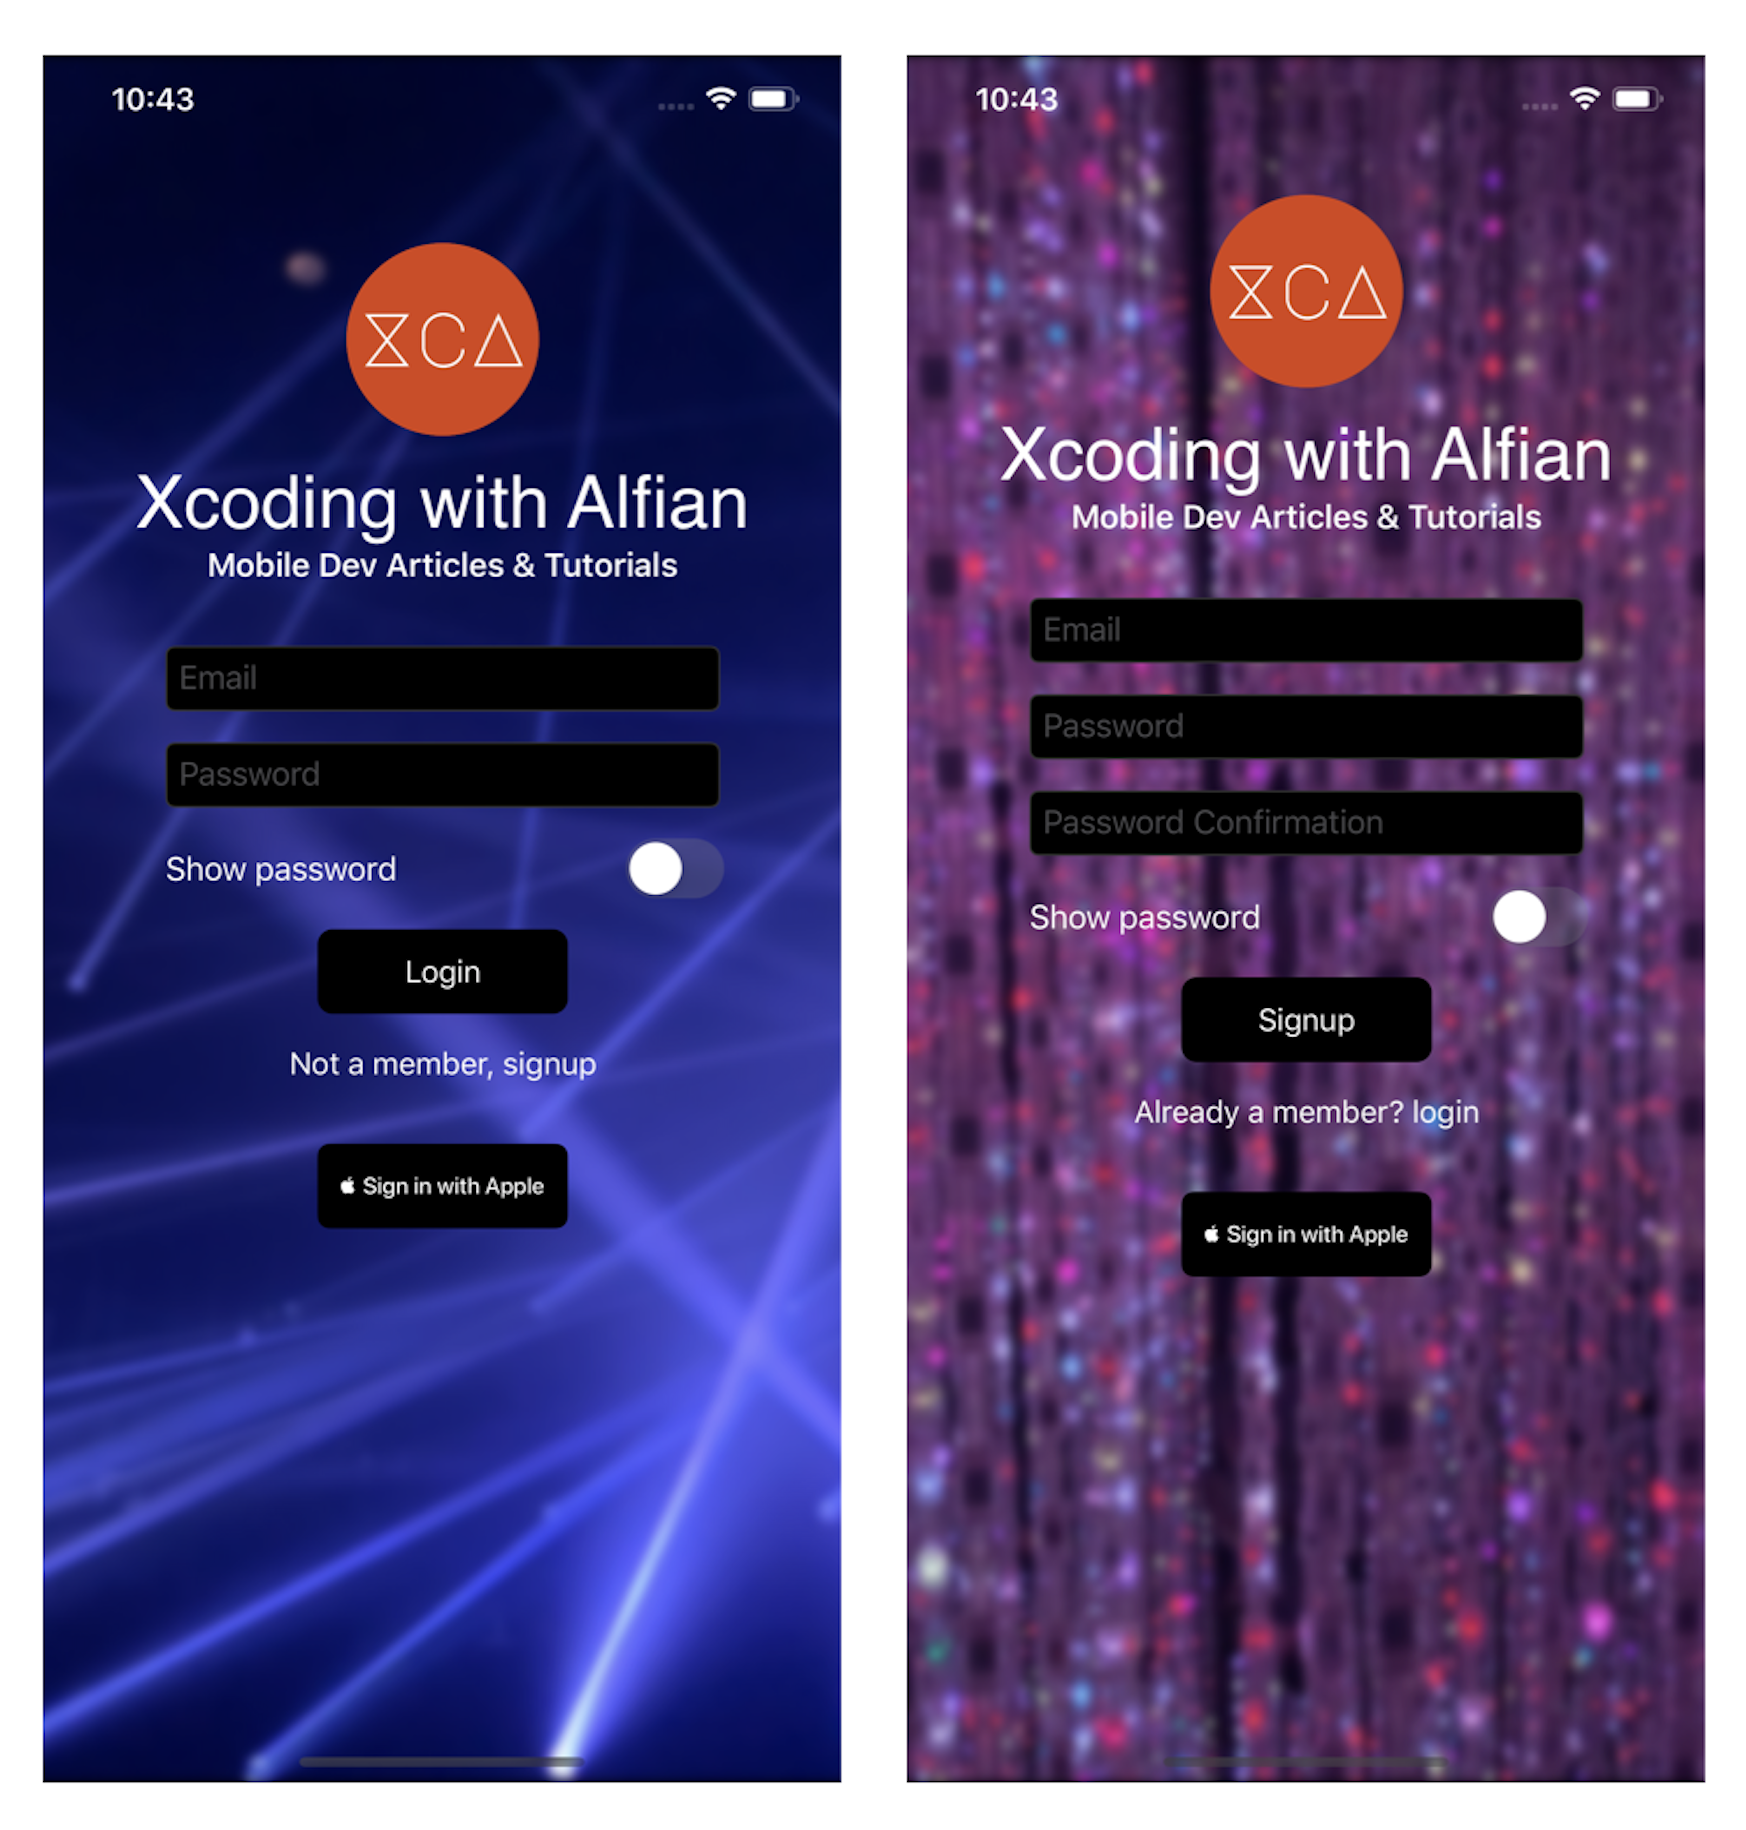
The Authentication View has AuthenticationType enum @State property. Whenever the value of the state changes, it displays different background asset images depending on the case, login, or signup. Next, we are going to add several properties to the AuthenticationView:
AuthenticationState @EnvironmentObjectproperty. It uses theisAuthenticatingproperty to show the loading indicator and hide theFormView. It will also be used to invoke Sign in with Apple when the user taps on the button.AuthType @Stateproperty that will be providing asset background name for displaying image depending on the state.
Copy the following code to implement the properties.
struct AuthenticationView: View {

    @EnvironmentObject var authState: AuthenticationState
    @State var authType = AuthenticationType.login

    var body: some View {
        // TODO: Implement SplashScreenView
        // TODO: Implement LogoTitleView
        // TODO: Implement AuthenticationFormView
        Text("Hello Authentication")
    }
}
Then, inside the models folder, create a new file named AuthenticationType.swift.
enum AuthenticationType: String {
    case login
    case signup

    var text: String {
        rawValue.capitalized
    }

    var assetBackgroundName: String {
        self == .login ? "login" : "signup"
    }

    var footerText: String {
        switch self {
            case .login:
                return "Not a member, signup"

            case .signup:
                return "Already a member? login"
        }
    }
}

extension NSError: Identifiable {
    public var id: Int { code }
}
Building Splash Screen View
Next, we'll create SplashScreenView to display the background image. This view accepts the imageName string containing the asset name to initialize the Image. We also apply several modifiers to resize the image into a 1:1 aspect ratio and content mode fill.
struct SplashScreenView: View {

    let imageName: String

    var body: some View {
        Image(imageName)
            .resizable()
            .aspectRatio(1/1, contentMode: .fill)
            .edgesIgnoringSafeArea(.all)
    }
}
Building Logo Title View
Next, we'll create LogoTitleView to display our app logo, title, and tagline. The Image, text title, and tagline are contained within a VStack.
struct LogoTitle: View {
    var body: some View {
        VStack {
            Image("logo")
                .resizable()
                .frame(width: 100, height: 100)

            Text("Xcoding with Alfian")
                .font(.custom("SF-Pro", size: 38))
                .lineLimit(2)

            Text("Mobile Dev Articles & Tutorials")
                .font(.headline)

        }
        .foregroundColor(.white)
    }
}
Building Authentication Form View
The AuthenticationFormView renders email and password text fields, when the authType property is set to signup, it shows additional password confirmation text field.
The AuthenticationFormView has several properties:
AuthenticationState @EnvironmentObjectproperty. It will be used to invoke the login and signup method passing the correct parameter. The error property is used to display an alert sheet containing the error message. An extension ofNSErrorthat implements theIdentifiableprotocol is declared for binding it to the alert sheet; in this case, we use the code to return theid.Email, password, passwordConfirmation @Stateproperties for text fields bindings.isShowingPassword @Stateproperty for binding the toggle switch. This will show or hide the password field depending on the boolean valueauthType @Bindingproperty to determine the text value of the buttons and to show additional password confirmation text field for signup state.
Copy the following code into a new struct called AuthenticationFormView.
struct AuthenticationFormView: View {

    @EnvironmentObject var authState: AuthenticationState

    @State var email: String = ""
    @State var password: String = ""
    @State var passwordConf: String = ""
    @State var isShowingPassword = false

    @Binding var authType: AuthenticationType

    var body: some View {
        // 1
        VStack(spacing: 16) {
            // 2
            TextField("Email", text: $email)
                .textContentType(.emailAddress)
                .keyboardType(.emailAddress)
                .autocapitalization(.none)

            // 3
            if isShowingPassword {
                TextField("Password", text: $password)
                .textContentType(.password)
                .autocapitalization(.none)
            } else {
                SecureField("Password", text: $password)
            }

            // 4
            if authType == .signup {
                if isShowingPassword {
                    TextField("Password Confirmation", text: $passwordConf)
                        .textContentType(.password)
                        .autocapitalization(.none)
                } else {
                    SecureField("Password Confirmation", text: $passwordConf)
                }
            }

            // 5
            Toggle("Show password", isOn: $isShowingPassword)
                .foregroundColor(.white)

            // 6
            Button(action: emailAuthenticationTapped) {
                Text(authType.text)
                .font(.callout)
            }
            .buttonStyle(XCAButtonStyle())
            .disabled(email.count == 0 && password.count == 0)

            // 7
            Button(action: footerButtonTapped) {
                Text(authType.footerText)
                .font(.callout)
            }
            .foregroundColor(.white)
        }
        .textFieldStyle(RoundedBorderTextFieldStyle())
        .frame(width: 288)
        // 8
        .alert(item: $authState.error) { error in
            Alert(title: Text("Error"), message: Text(error.localizedDescription))
        }
    }

    private func emailAuthenticationTapped() {
        switch authType {
        case .login:
            appState.login(with: .emailAndPassword(email: email, password: password))

        case .signup:
            appState.signup(email: email, password: password, passwordConfirmation: passwordConf)
        }
    }

    private func footerButtonTapped() {
        clearFormField()
        authType = authType == .signup ? .login : .signup
    }

    private func clearFormField() {
        email = ""
        password = ""
        passwordConf = ""
        isShowingPassword = false
    }
}
Here is the explanation of each of the step number:
- The Container View is a
VStackwithSpacingof 16 with defaultcenter alignment. - The email TextField binding the
emailstate property. Additional modifier is added for setting thetextContentTypeandkeyboardTypeto useemailAddress. - Using
isShowingPassword, we'll display a normal TextField withtextContentTypeof password if the value is true. Otherwise, we use theSecureFieldto hide the password. Both will bind thepasswordstate property. - If the current
authTypeissignup, we display an additional form forpassword confirmation. We will use the same approach to hide and show the password usingTextFieldandSecureFieldbased on the value ofisShowingPassword. Both fields will bind thepasswordConfstate property. - We use a
Tooggleto switch between theisShowingPasswordstate property using default UISwitch control. - This button will invoke
emailAuthenticationTappedmethod. Depending on the value ofauthTypeit will display different text and invoke a different method in theAuthenticationState. Forlogin, it displays theLogintext and invokeloginmethod. In the case ofsignup, it displays theSignuptext and invokessignupmethod. - This button will invoke the
footerButtonTappedmethod. This will switch theauthTypestate betweenloginandsignupand rest all the state properties. - The Alert view is only displayed if the
authStateerror property is not nil; the message from the error will be displayed inside the alert dialog.
Finishing Authentication View
Next, we'll connect all the previous views we have created into the AuthenticationView. We use ZStack as the container view, then at the bottom we put SplashScreenImage, then we add a VStack with spacing of 32. Inside the VStack, we have the LogoTitle and conditional logic to display ProgressView if authState is authenticating and the AuthenticationFormView in vice versa. At the bottom, we also add SignInAppleButton with action to invoke the authState login passing signInWithApple login type. At last, to make sure the keyboard is not covering the form field, we offset the y to -75 if the device is bigger than iPhone 5S, SE.
struct AuthenticationView: View {

    // ...

    var body: some View {
        ZStack {
            SplashScreenView(imageName: authType.assetBackgroundName)
            VStack(spacing: 32) {
                LogoTitle()
                if (!authState.isAuthenticating) {
                    AuthenticationFormViewView(authType: $authType)
                } else {
                    ProgressView()
                }

                SignInAppleButton {
                    self.authState.login(with: .signInWithApple)
                }
                .frame(width: 130, height: 44)
            }
            .offset(y: UIScreen.main.bounds.width > 320 ? -75 : 0)
        }
    }
}
Also, make sure to update the ContentView to replace the Text placeholder to use the AuthenticationView passing login as the authType like so.
struct ContentView: View {

    // ...
    var body: some View {
        Group {
            if authState.loggedInUser != nil {
                HomeView()
            } else {
                AuthenticationView(authType: .login)
            }
        }
        // ...
    }
}
You can try and build the project to view the result on the screen! In the next sections, we will be adding the handler for signup & sign in via email and password as well as Sign in with Apple.
Implement Sign in and Signup with Email and Password with Firebase
Next, let's implement the sign in via email and password. Go to AuthenticationState.swift class and update the method with the following code.
class AuthenticationState: NSObject, ObservedObject {

    // ...
    private func handleSignInWith(email: String, password: String) {
        auth.signIn(withEmail: email, password: password, completion: handleAuthResultCompletion)
    }

    func signup(email: String, password: String, passwordConfirmation: String) {
        guard password == passwordConfirmation else {
            self.error = NSError(domain: "", code: 9210, userInfo: [NSLocalizedDescriptionKey: "Password and confirmation does not match"])
            return
        }

        self.isAuthenticating = true
        self.error = nil

        auth.createUser(withEmail: email, password: password, completion: handleAuthResultCompletion)
    }

    private func handleAuthResultCompletion(auth: AuthDataResult?, error: Error?) {
        DispatchQueue.main.async {
        self.isAuthenticating = false
            if let user = auth?.user {
                self.loggedInUser = user
            } else if let error = error {
                self.error = error as NSError
            }
        }
    }
}
In the handleSignIn method body, we just add the FirebaseAuth signIn API method passing the email and password as well the callback handler. We declare handleAuthResultCompletion as the callback handler that accepts optional AuthDataResult and error as the parameters. Inside, we set the isAuthenticating value to false, then update the loggedInUser and error using the value from parameters.
For signup, we assert whether the password and passwordConfirmation text are equal. If not, we'll set the error property using a custom NSError and return. If both values are equal, we set the isAuthenticating value to true and error to nil. Finally, we invoke FirebaseAuth createUser API passing the email and password as well as the handleAuthResult completion handler.
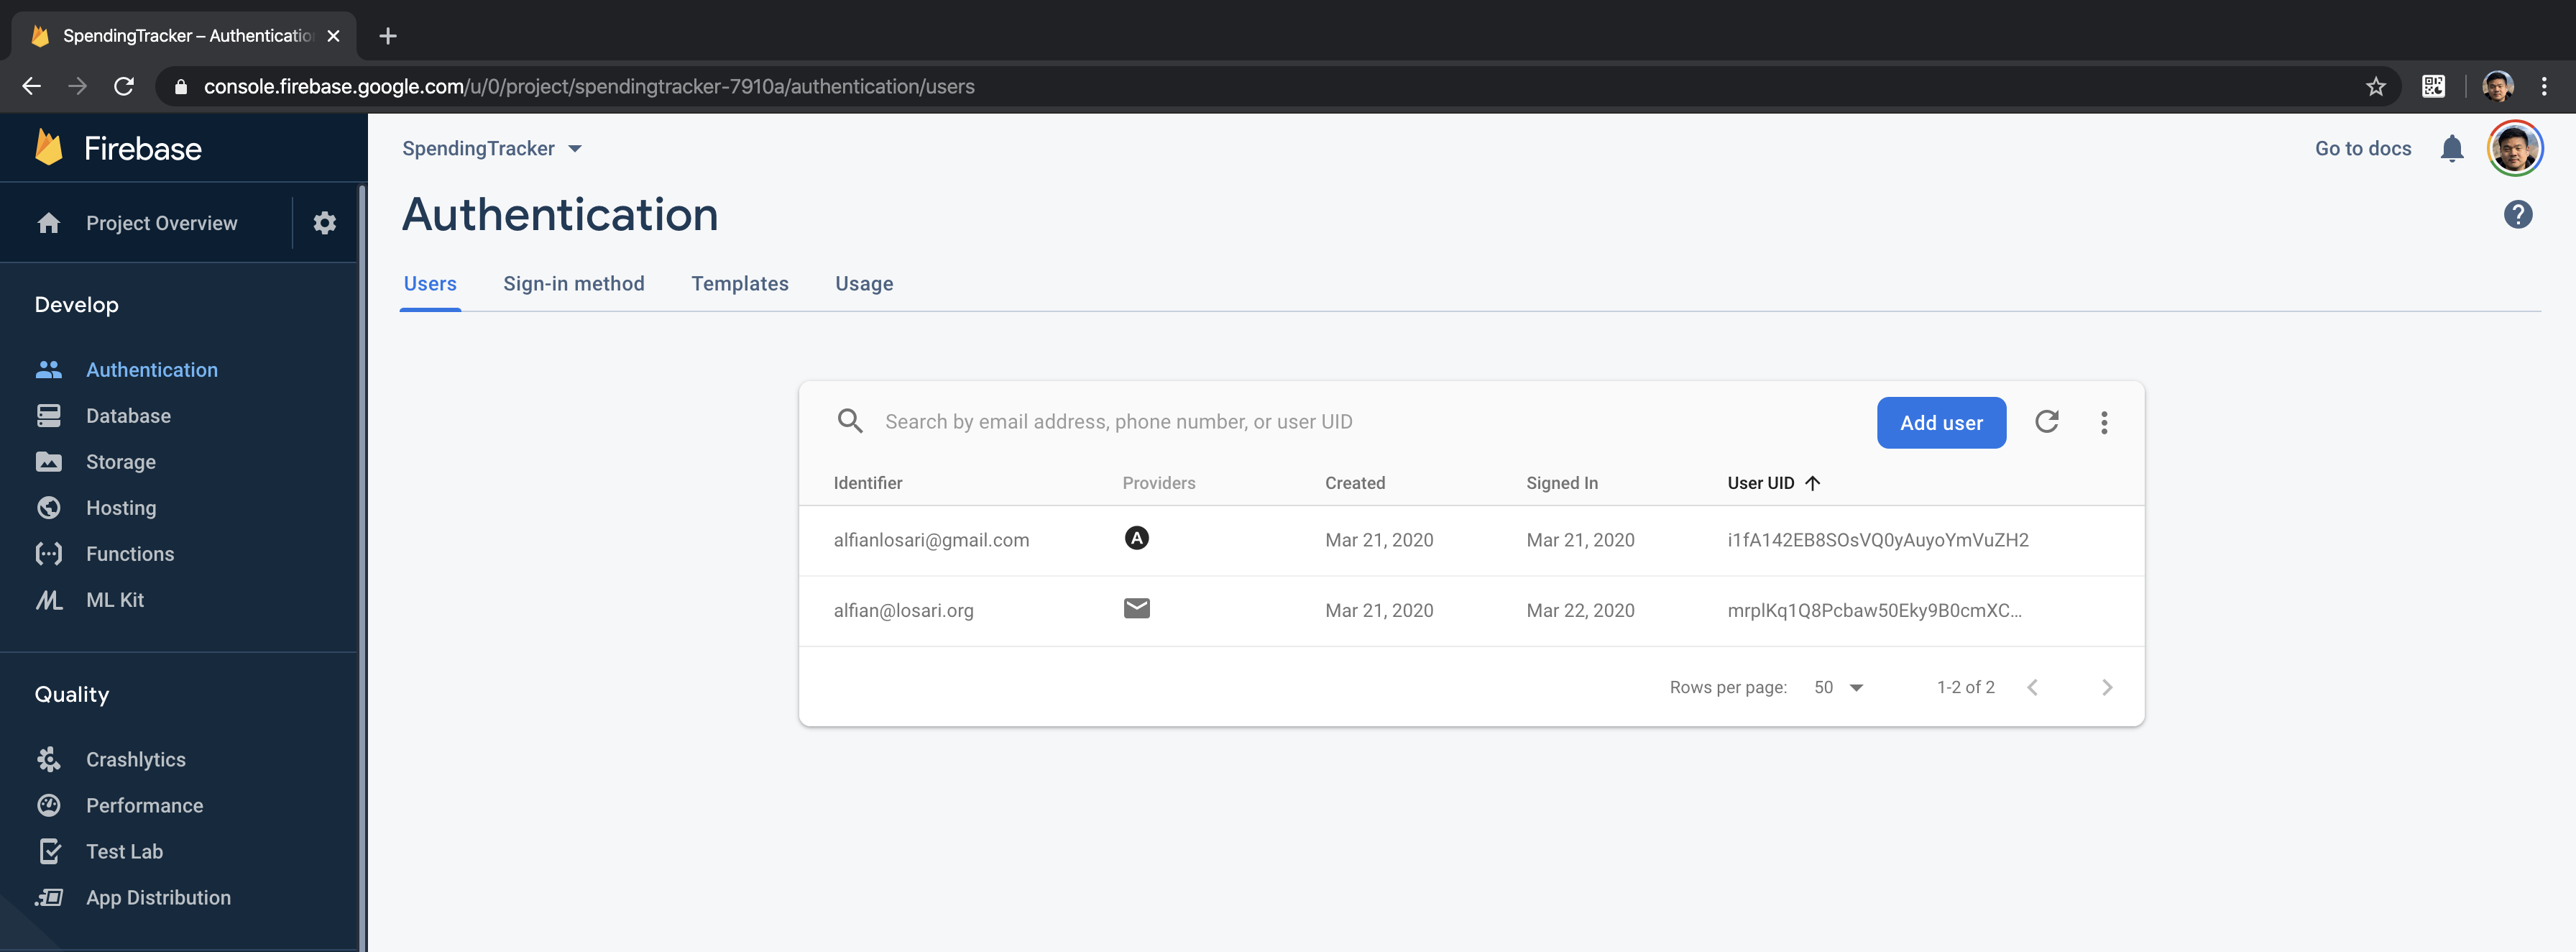
Try to build and run the project, after you signup the user, the SDK will automatically authenticate the user, and HomeView will be shown. You can open the Firebase web dashboard and go to Authentication to see the list of users. Next, we'll implement the signOut method.
Add Sign out method using firebase
To implement sign out, we can just invoke FirebaseAuth API signOut method. This method will trigger the authStateDidChangeListener and set the value of authenticated user to nil. This will trigger the AuthenticationState change that will render the AuthenticationView replacing the HomeView.
class AuthenticationState: NSObject, ObservedObject {

    // ....
    func signout() {
        try? auth.signOut()
    }
}
Also, go to HomeView and add the AuthenticationState @EnvironmentObject as property, then add the implementation inside the signoutTapped method.
struct HomeView: View {

    @EnvironmentObject var authState: AuthenticationState
    // ....

    private func signoutTapped() {
        authState.signout()
    }
}
Build and run the project, try tapping the Logout button inside the trailing navigation bar to go back to Authentication View. You can also try to sign in again using email and password that you used for signup before.
Using AuthenticationServices to integrate sign in with apple and authenticate with Firebase using OAuth credentials
In this last section, we will be using Apple AuthenticationServices framework to implement sign in with Apple. As a requirement, we need to make AuthenticationState to implement ASAuthorizationControllerDelegate and ASAuthorizationControllerPresentationContextProviding protocols. We will create an extension for AuthenticationState and move the handleSignInWithApple method into the extension. Copy the following code.
extension AuthenticationState: ASAuthorizationControllerDelegate, ASAuthorizationControllerPresentationContextProviding {

    // 1
    private func handleSignInWithApple() {
        let nonce = String.randomNonceString()
        currentNonce = nonce

        let appleIDProvider = ASAuthorizationAppleIDProvider()
        let request = appleIDProvider.createRequest()
        request.requestedScopes = [.fullName, .email]
        request.nonce = nonce.sha256

        let authorizationController = ASAuthorizationController(authorizationRequests: [request])
        authorizationController.delegate = self
        authorizationController.presentationContextProvider = self
        authorizationController.performRequests()
    }

    // 2
    func presentationAnchor(for controller: ASAuthorizationController) -> ASPresentationAnchor {
        return UIApplication.shared.windows[0]
    }

    // 3
    func authorizationController(controller: ASAuthorizationController, didCompleteWithAuthorization authorization: ASAuthorization) {
        if let appleIDCredential = authorization.credential as? ASAuthorizationAppleIDCredential {
            guard let nonce = currentNonce else {
                fatalError("Invalid state: A login callback was received, but no login request was sent.")
            }
            guard let appleIDToken = appleIDCredential.identityToken else {
                print("Unable to fetch identity token")
                return
            }
            guard let idTokenString = String(data: appleIDToken, encoding: .utf8) else {
                print("Unable to serialize token string from data: \(appleIDToken.debugDescription)")
                return
            }

            // Initialize a Firebase credential.
            let credential = OAuthProvider.credential(withProviderID: "apple.com",
            idToken: idTokenString,
            rawNonce: nonce)

            // Sign in with Firebase.
            Auth.auth().signIn(with: credential, completion: handleAuthResultCompletion)
        }
    }

    // 4
    func authorizationController(controller: ASAuthorizationController, didCompleteWithError error: Error) {
        print("Sign in with Apple error: \(error)")
        self.isAuthenticating = false
        self.error = error as NSError
    }

}
Here is the detailed explanation of each step:
- In the
handleSignInWithApplemethod, we use the extension method fromString+Extensionto generate a randomnoncestring and store it into thecurrentNonceproperty. We then createASAuthorizationAppleIDProviderand request. We set the request scope to retrieve email and full name. Also, we need to pass thenoncestring withSHA-256 hash. At last, we initializeASAuthorizationControllerpassing the request, we also set thedelegateandpresentationContextProviderto theAuthenticationStatebefore invokingperformRequestmethod. - In the
presentationAnchor:forController:method, we need to return the anchor. In this case, we use theAppDelegateto use the first window as theanchorfor presentation. - In the
authorizationController:didCompleteWithAuthorization authorization:, we retrieve the credential and id token fromASAuthorizationAppleIDCredential. Then, we construct the OAuth credential usingapple.comas the provider id and pass the id token as well as the nonce string. At last, we use the FirebaseAuth API to sign in passing the credential andhandleAuthCompletionclosure. - In the
authorizationController:didCompleteWithError error:, we set theisAuthenticatingproperty to false and set the error property using the passed error cast asNSError.
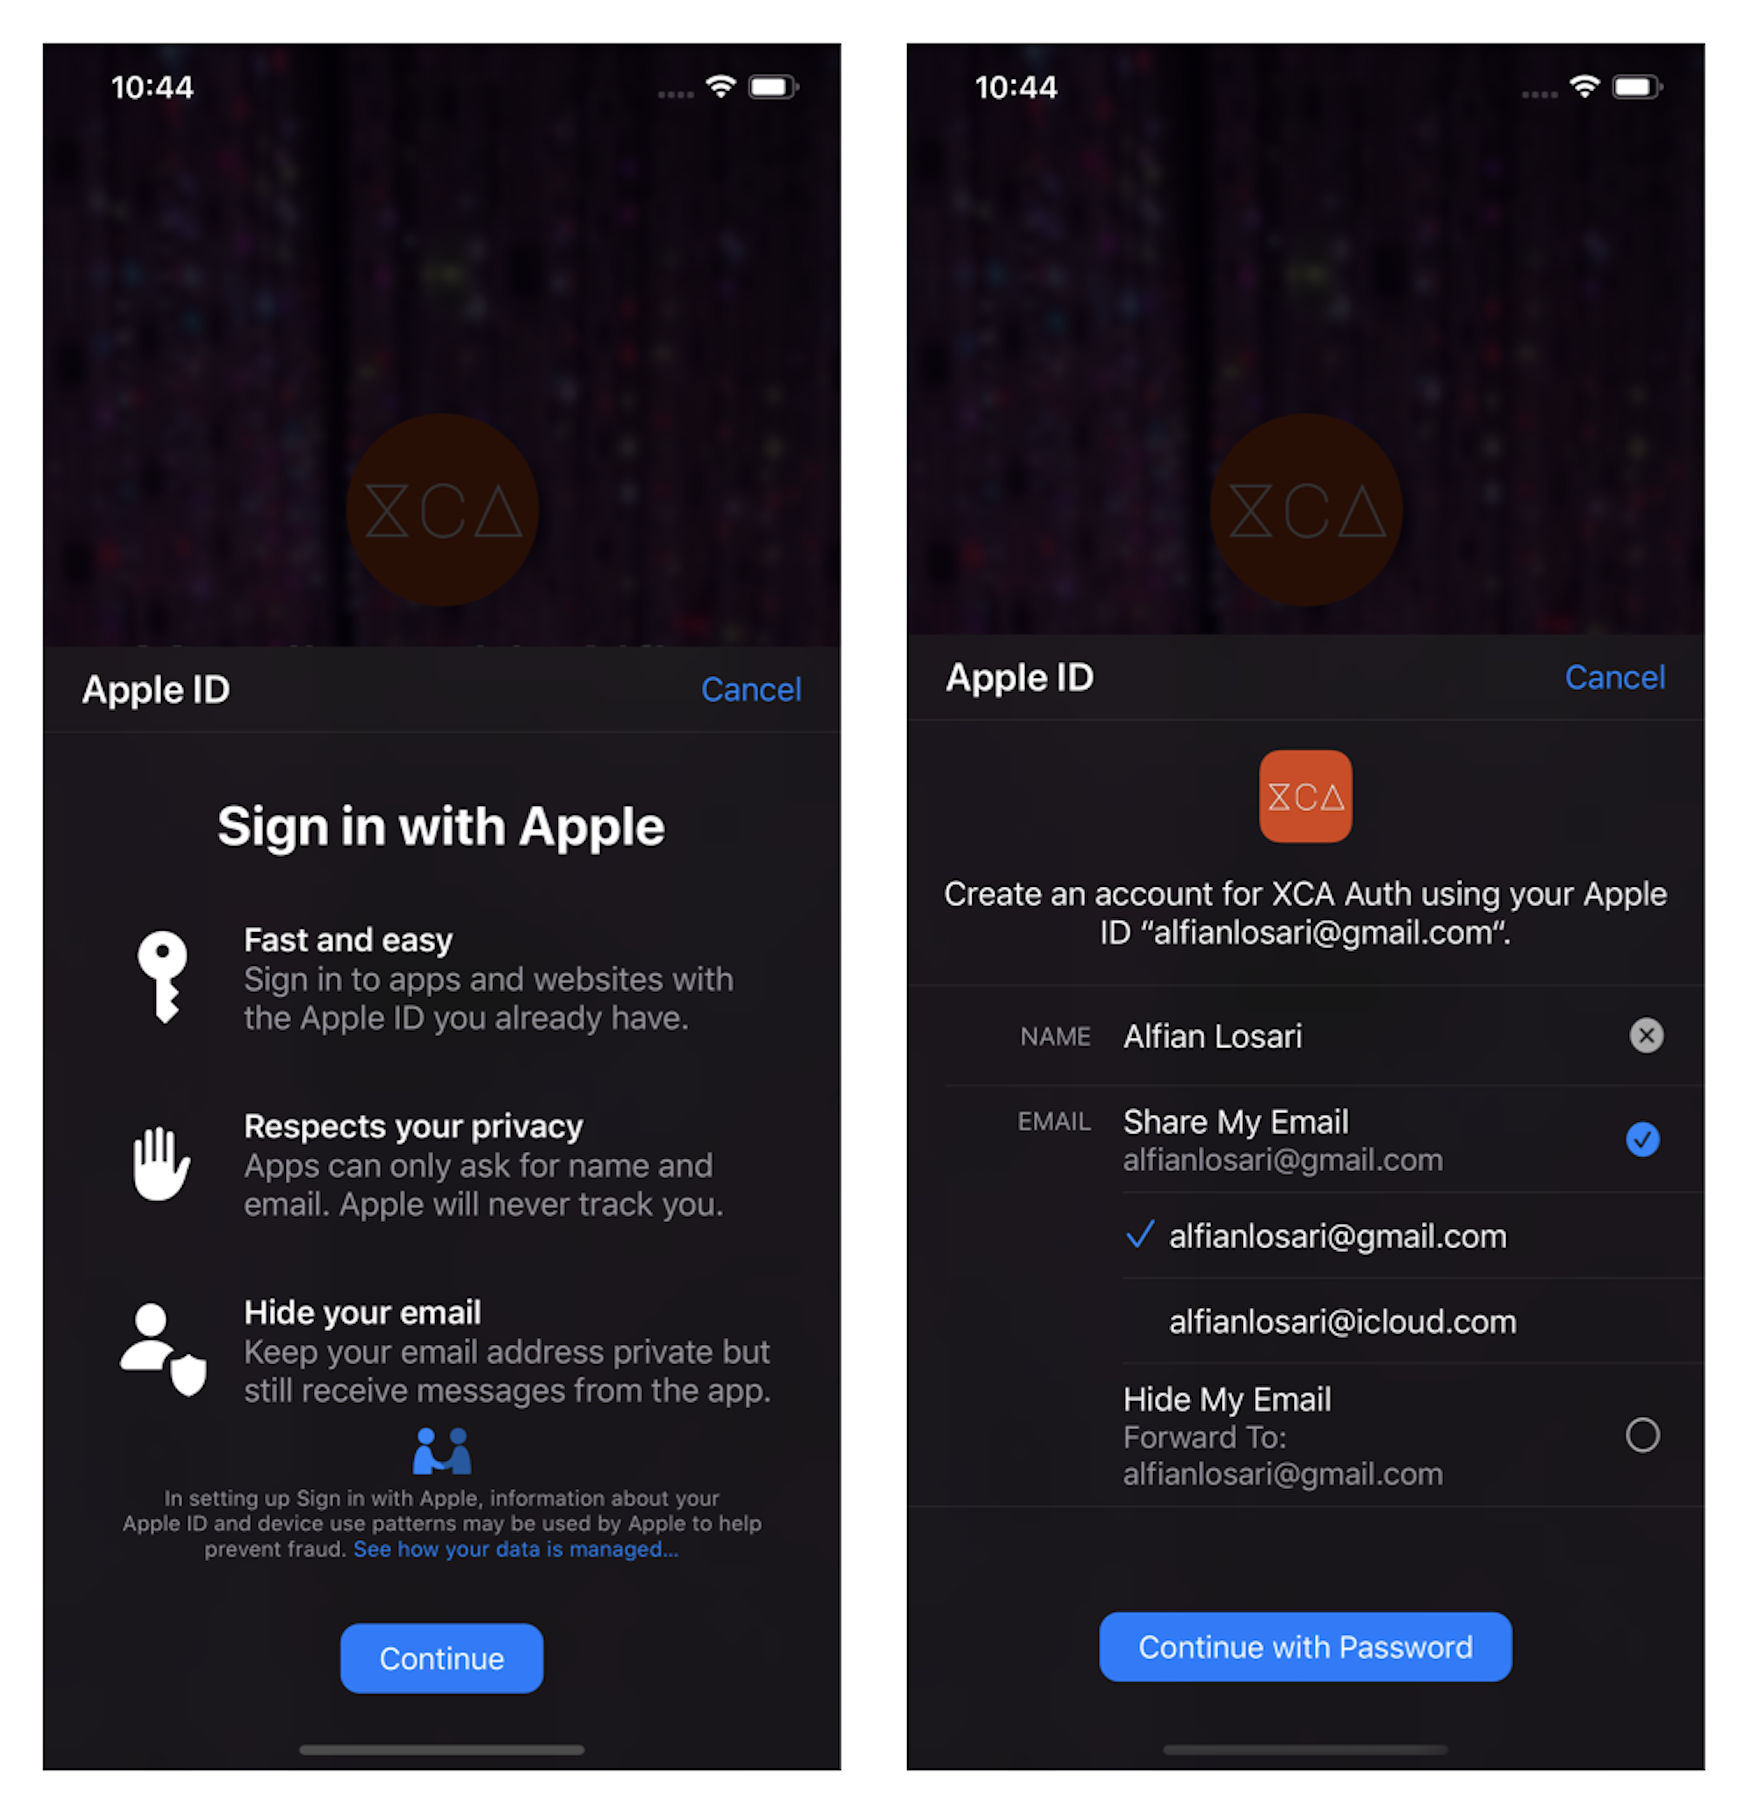
Make sure to add capabilities for Sign in With Apple into your target from Xcode. To test from simulator or devices, you need to sign into iCloud before you can test the feature. Build and run the project, then tap on the Sign in with Apple button to begin the authorization process.
Conclusion
Congrats on finishing the tutorial! We have learned how to create authentication mechanism in SwiftUI using Firebase Auth SDK and Sign in With Apple. Using Observable Object binding, we can easily manage the authentication state of the application and update the view accordingly. With Firebase Auth SDK, we don't have to spend time building our authentication system. Instead, we can rely on Google trusted security as the authentication system. Let's keep the lifelong learning goes on!
Challenge
One more thing, I have provided a challenge section if you want to implement more authentication features. I have provided three challenges for you to add into the app as features:
- Implement Sign in with Google or Facebook.
- Add reset password feature.
- Learn how to retrieve and refresh the user token.