Building Expense Tracker Apple Watch App with SwiftUI & Core Data
Published at May 07, 2020
This tutorial is part 3 of the tutorial series on how to build an expense tracker cross-platform App with SwiftUI, Core Data, & CloudKit. I recommend all of you to read the previous tutorials first before continuing, here are the previous tutorials:
Introduction
With the introduction of watchOS 6 in WWDC 2019, Apple finally provided the capability for developers to create a fully independent App Experience on Apple Watch without a companion app on iOS. Also, users can discover and download apps directly from the built-in App Store without an iPhone.
WatchOS 6 SDK also provides SwiftUI support for developers to build native and optimized Apple Watch user experience complete with custom views, animation, and digital crown haptic support out of the box. It also supports many native frameworks and features such as Core Data, CloudKit, Sign in with Apple, and many more. To learn more about developing Apps for watchOS, you can visit Apple Developer Website on watchOS.
What We Will Build
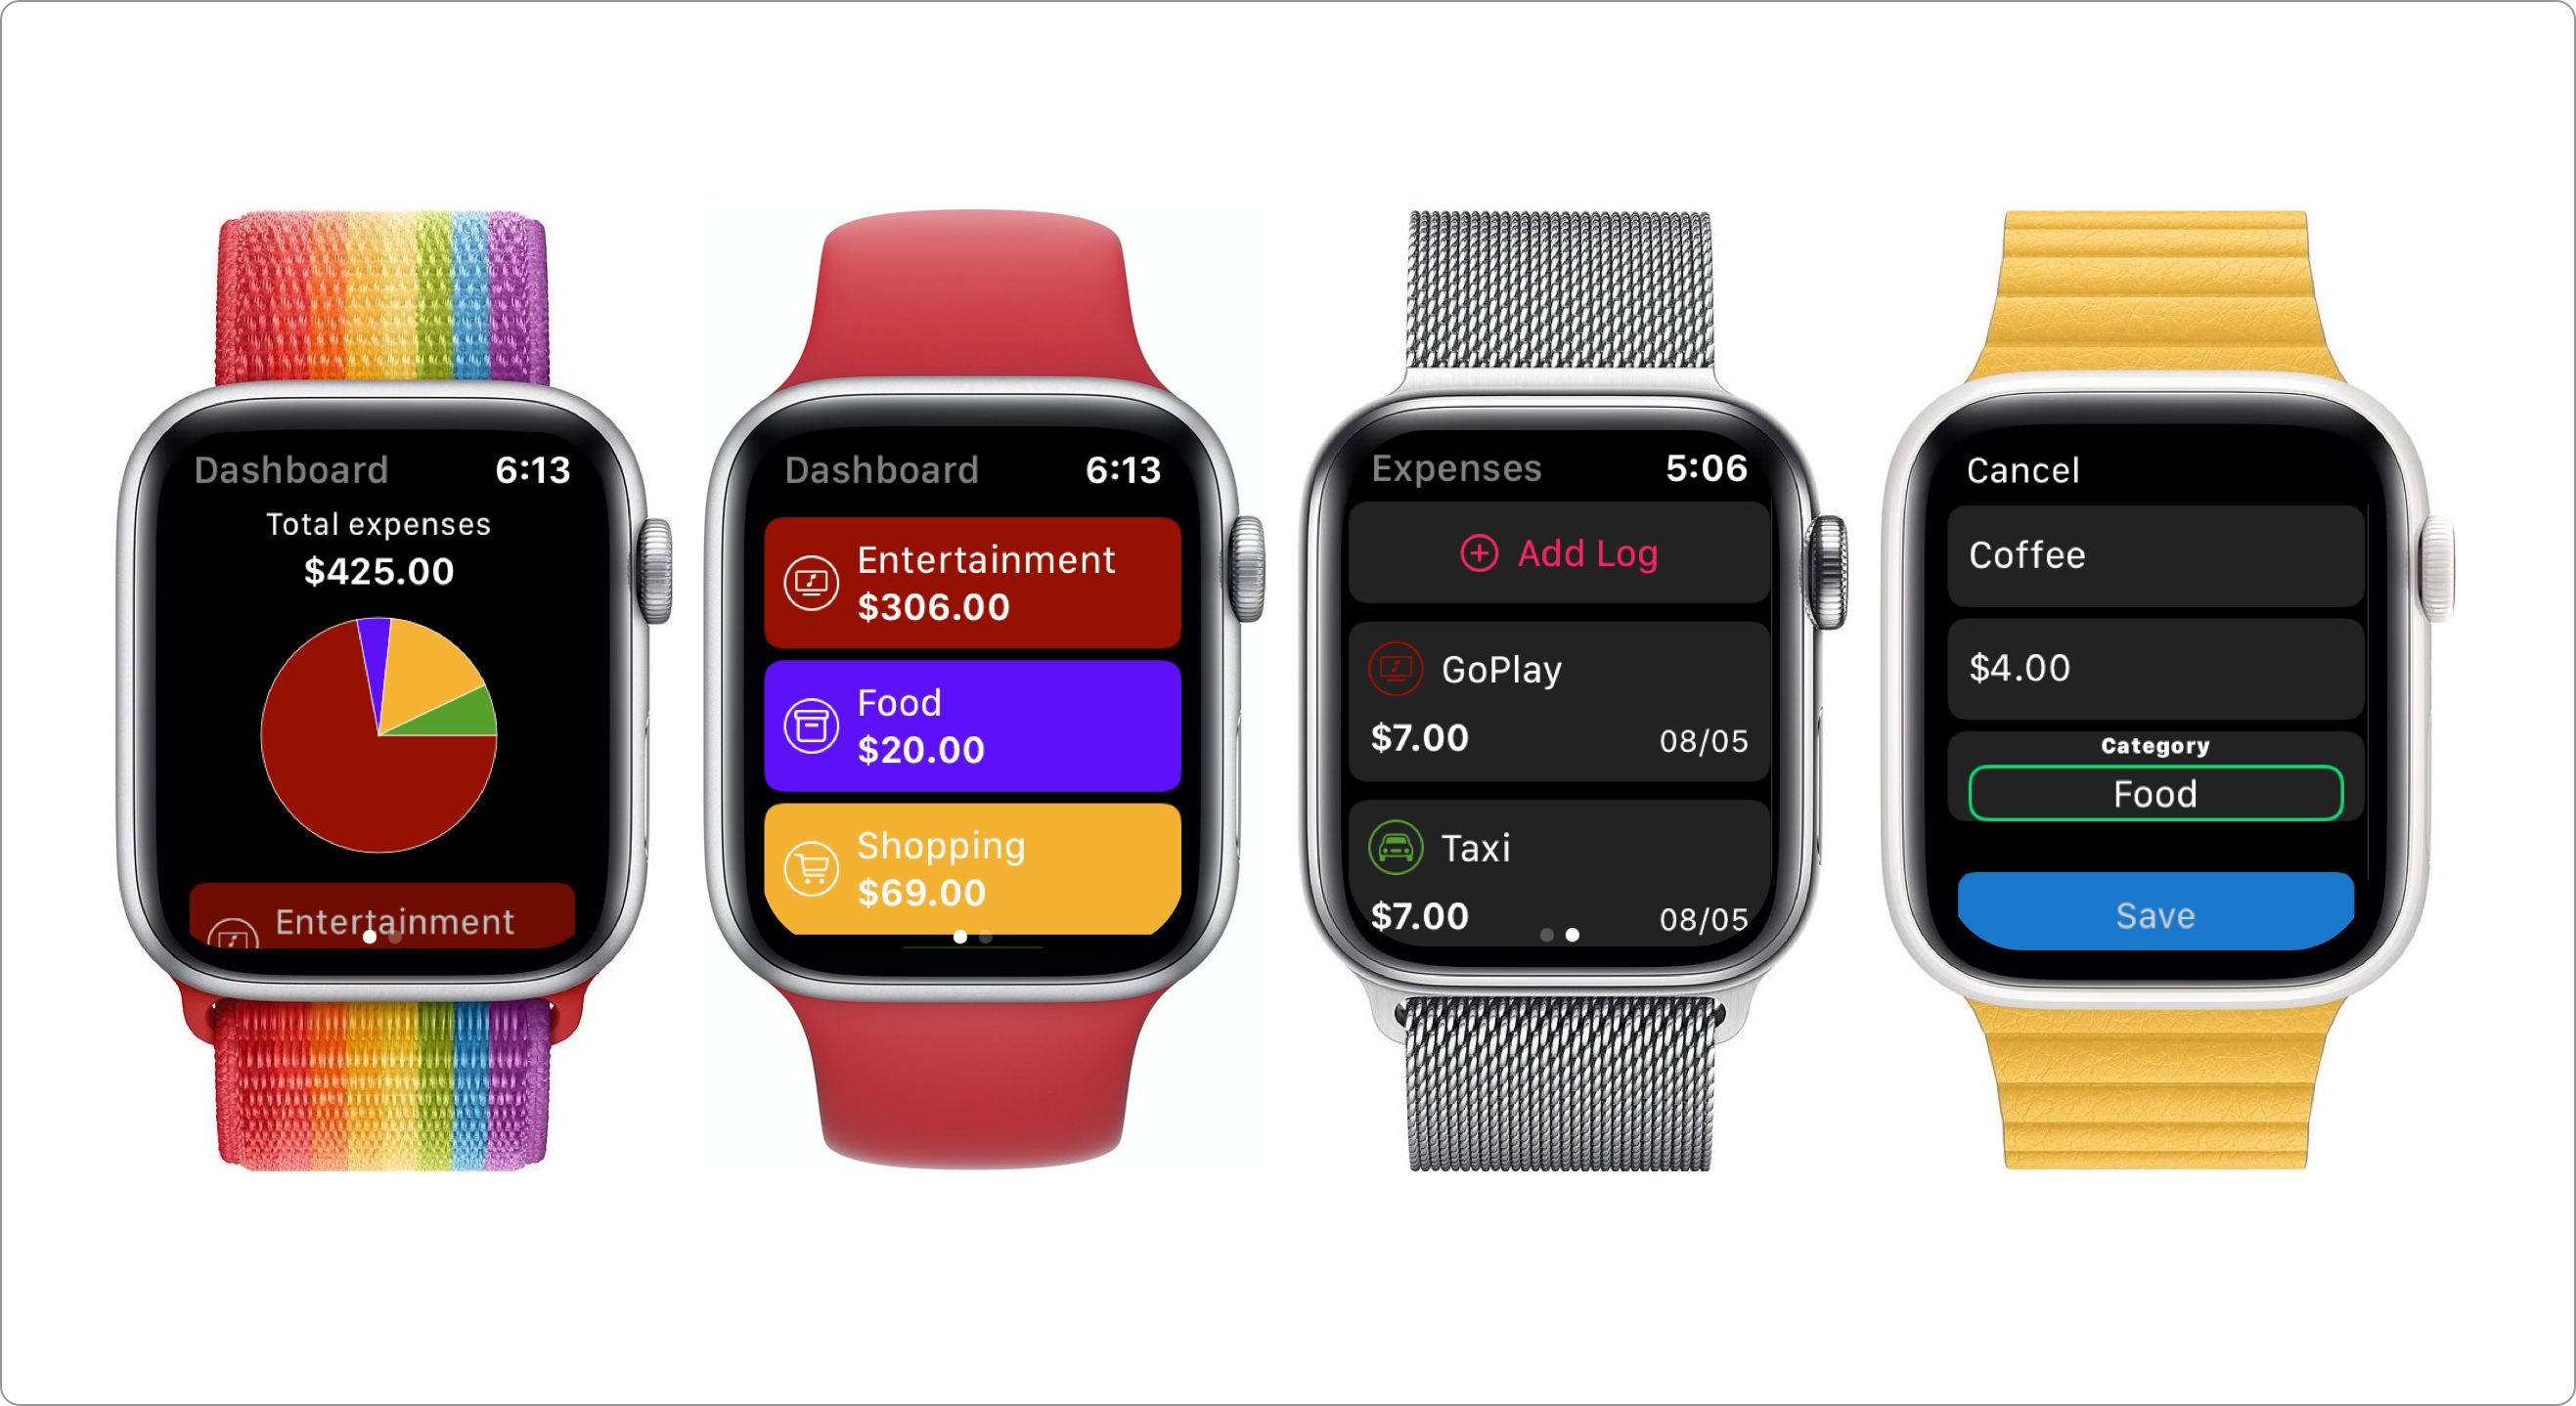
In this tutorial, we'll be focusing on building the Expense Tracker independent watchOS App. Similar to the iOS & macOS app in the previous article, our App will also have the dashboard and expense log list screen as well as the form to create and edit log.
When developing an Apple Watch App, we need to consider several design guidelines provided by Apple in their Human Interface Guidelines such as:
Lightweight interactions. The App needs to provide simplified, focused, and essential information where users can interact at a glance without too much visual distraction. We won't need features such as multi categories filer and sort selection from the log list so users can take a glance at essential information from the App.Holistic design. We'll use native SwiftUIListwith watchOS Carousel so users can seamlessly scroll the content the digital crown on Apple Watch with smooth native animation.
Here are the main components that we'll be focusing to build in this tutorial:
- Building Page Based Navigation with SwiftUI in WatchOS
- Building Log List View.
- Building Log Form View.
- Building Dashboard View Containing Pie Chart and Category total expenses sum.
You can download the completed project from the GitHub Repository.
The Starter Project
To begin this tutorial, please download the starter project from GitHub Repository. The starter project has already provided several components such as:
- Completed Expense Tracker iOS and MacOS App targets from the previous tutorials. To learn more about the Core Data part, please refer to the part 1 of this tutorial series, Building Expense Tracker iOS App with Core Data & SwiftUI
- WatchOS App Target with empty implementation.
- Shared Models, Core Data Managed Object Model, Utils, as well as extensions to help us build the project. These source files uses target membership to target macOS, iOS, and watchOS platforms.
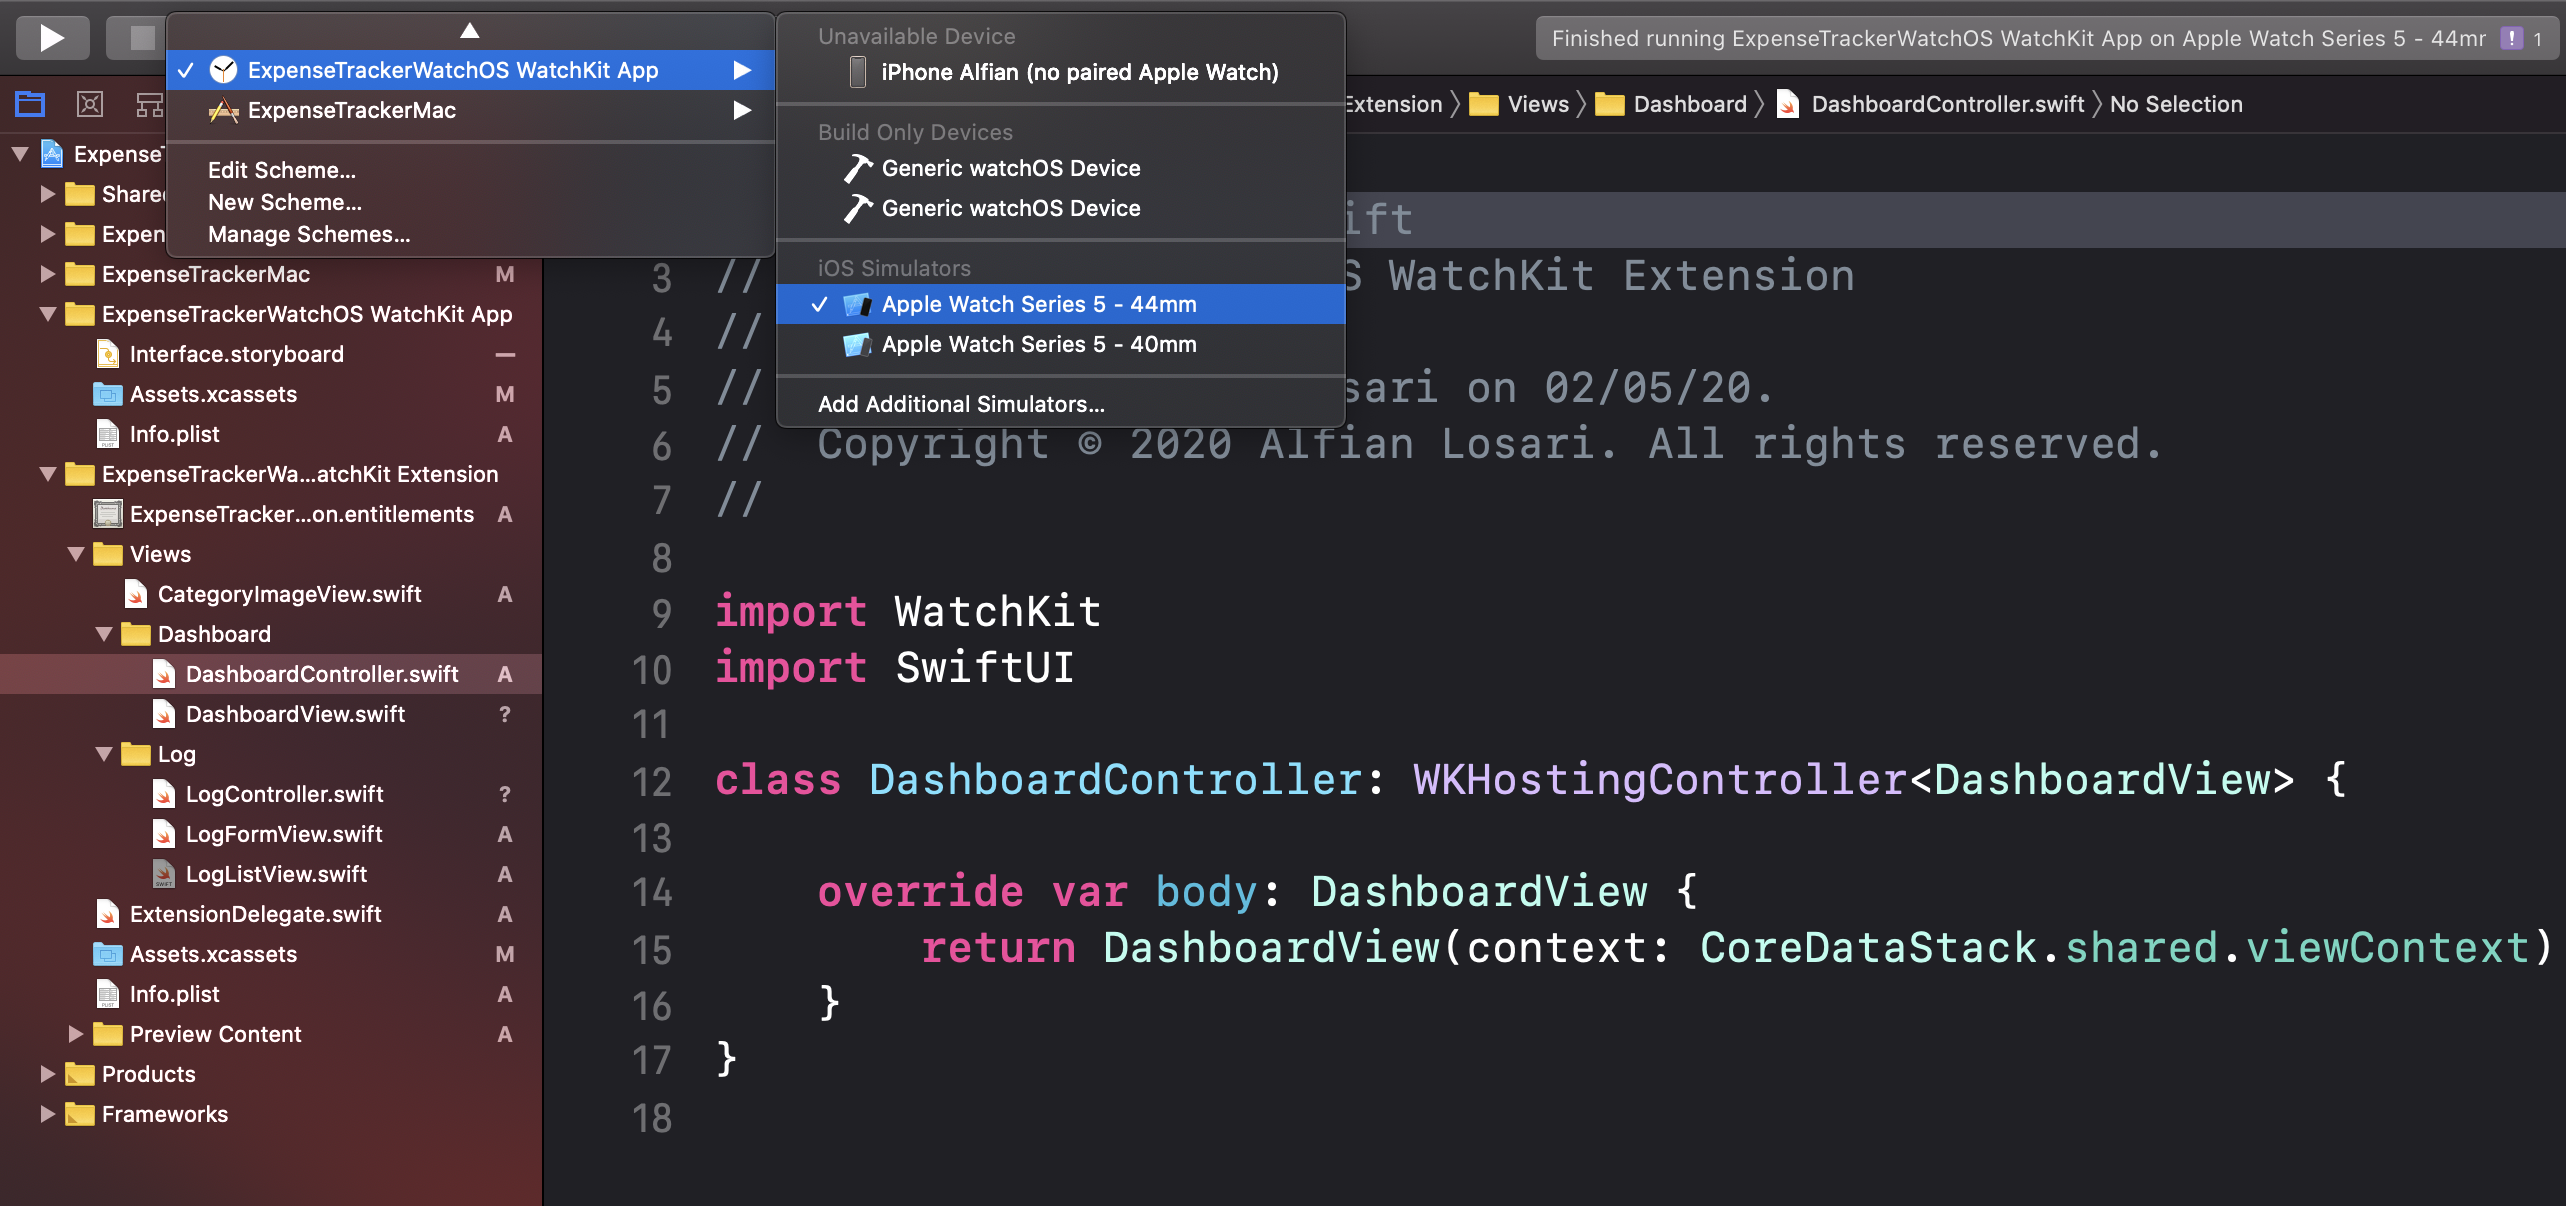
Make sure to select ExpenseTrackerWatchOS WatchKit App and Apple Watch simulator from the scheme to build and run the project. Let's move on to the next section, where we will create the root page based navigation for our App.
Building Page Based Navigation for Dashboard and Log Views
WatchOS uses WKInterfaceController as an equivalent of UIViewController in UIKit as the View Controller. To enable SwiftUI in watchOS, Apple provides WKHostingController as the subclass of WKInterfaceController where we can return SwiftUI View by overriding body computed property. The API doesn't use Swift Opaque type, so we need to fill the generic placeholder using the concrete View.
Navigate to the ExpenseTrackerWatchOS WatchKit Extension folder, create a new file named DashboardView.swift and copy the following code.
import SwiftUI
import CoreData

struct DashboardView: View {

    var context: NSManagedObjectContext

    var body: some View {
        Text("Dashboard")
    }
}
Next, create a file named DashboardController.swift and copy the following code.
import WatchKit
import SwiftUI

class DashboardController: WKHostingController<DashboardView> {

    override var body: DashboardView {
        return DashboardView(context: CoreDataStack.shared.viewContext)
    }
}
Here, we just return the DashboardView passing the managed object context from CoreDataStack singleton—the managed object context itself used by the fetch request to query our data later.
Navigate to the ExpenseTrackerWatchOS WatchKit Extension folder, create a new file named LogView.swift and copy the following code.
import SwiftUI
import CoreData

struct LogListView: View {

    @Environment(\.managedObjectContext)
    var context

    var body: some View {
        Text("Logs")
    }
}
Next, create a file name LogController.swift and copy the following code.
import WatchKit
import SwiftUI
import CoreData

class LogController: WKHostingController<LogView> {

    override var body: LogView {
        return LogView(context: CoreDataStack.shared.viewContext)
    }
}

struct LogView: View {

    var context: NSManagedObjectContext

    var body: some View {
        LogListView()
            .environment(\.managedObjectContext, context)
    }
}
Here, we need to create proxy LogView where we'll return in the LogController body property passing the managed object context. There are two reasons:
WKHostingControllerdoesn't support SwiftOpaquetype for SwiftUI View. If we just return a view by applying anenvironment modifierto pass the managed object context, the compiler will raise an error because the type isView.- To be able to use
@FetchRequestproperty wrapper, we need to pass the managed object context via@Environmentproperty wrapper by injecting it from the parent View.
Navigate to the ExpenseTrackerWatchOS WatchKit App, and click on the Interface.storyboard. We'll put our initial controller and create page-based navigation.
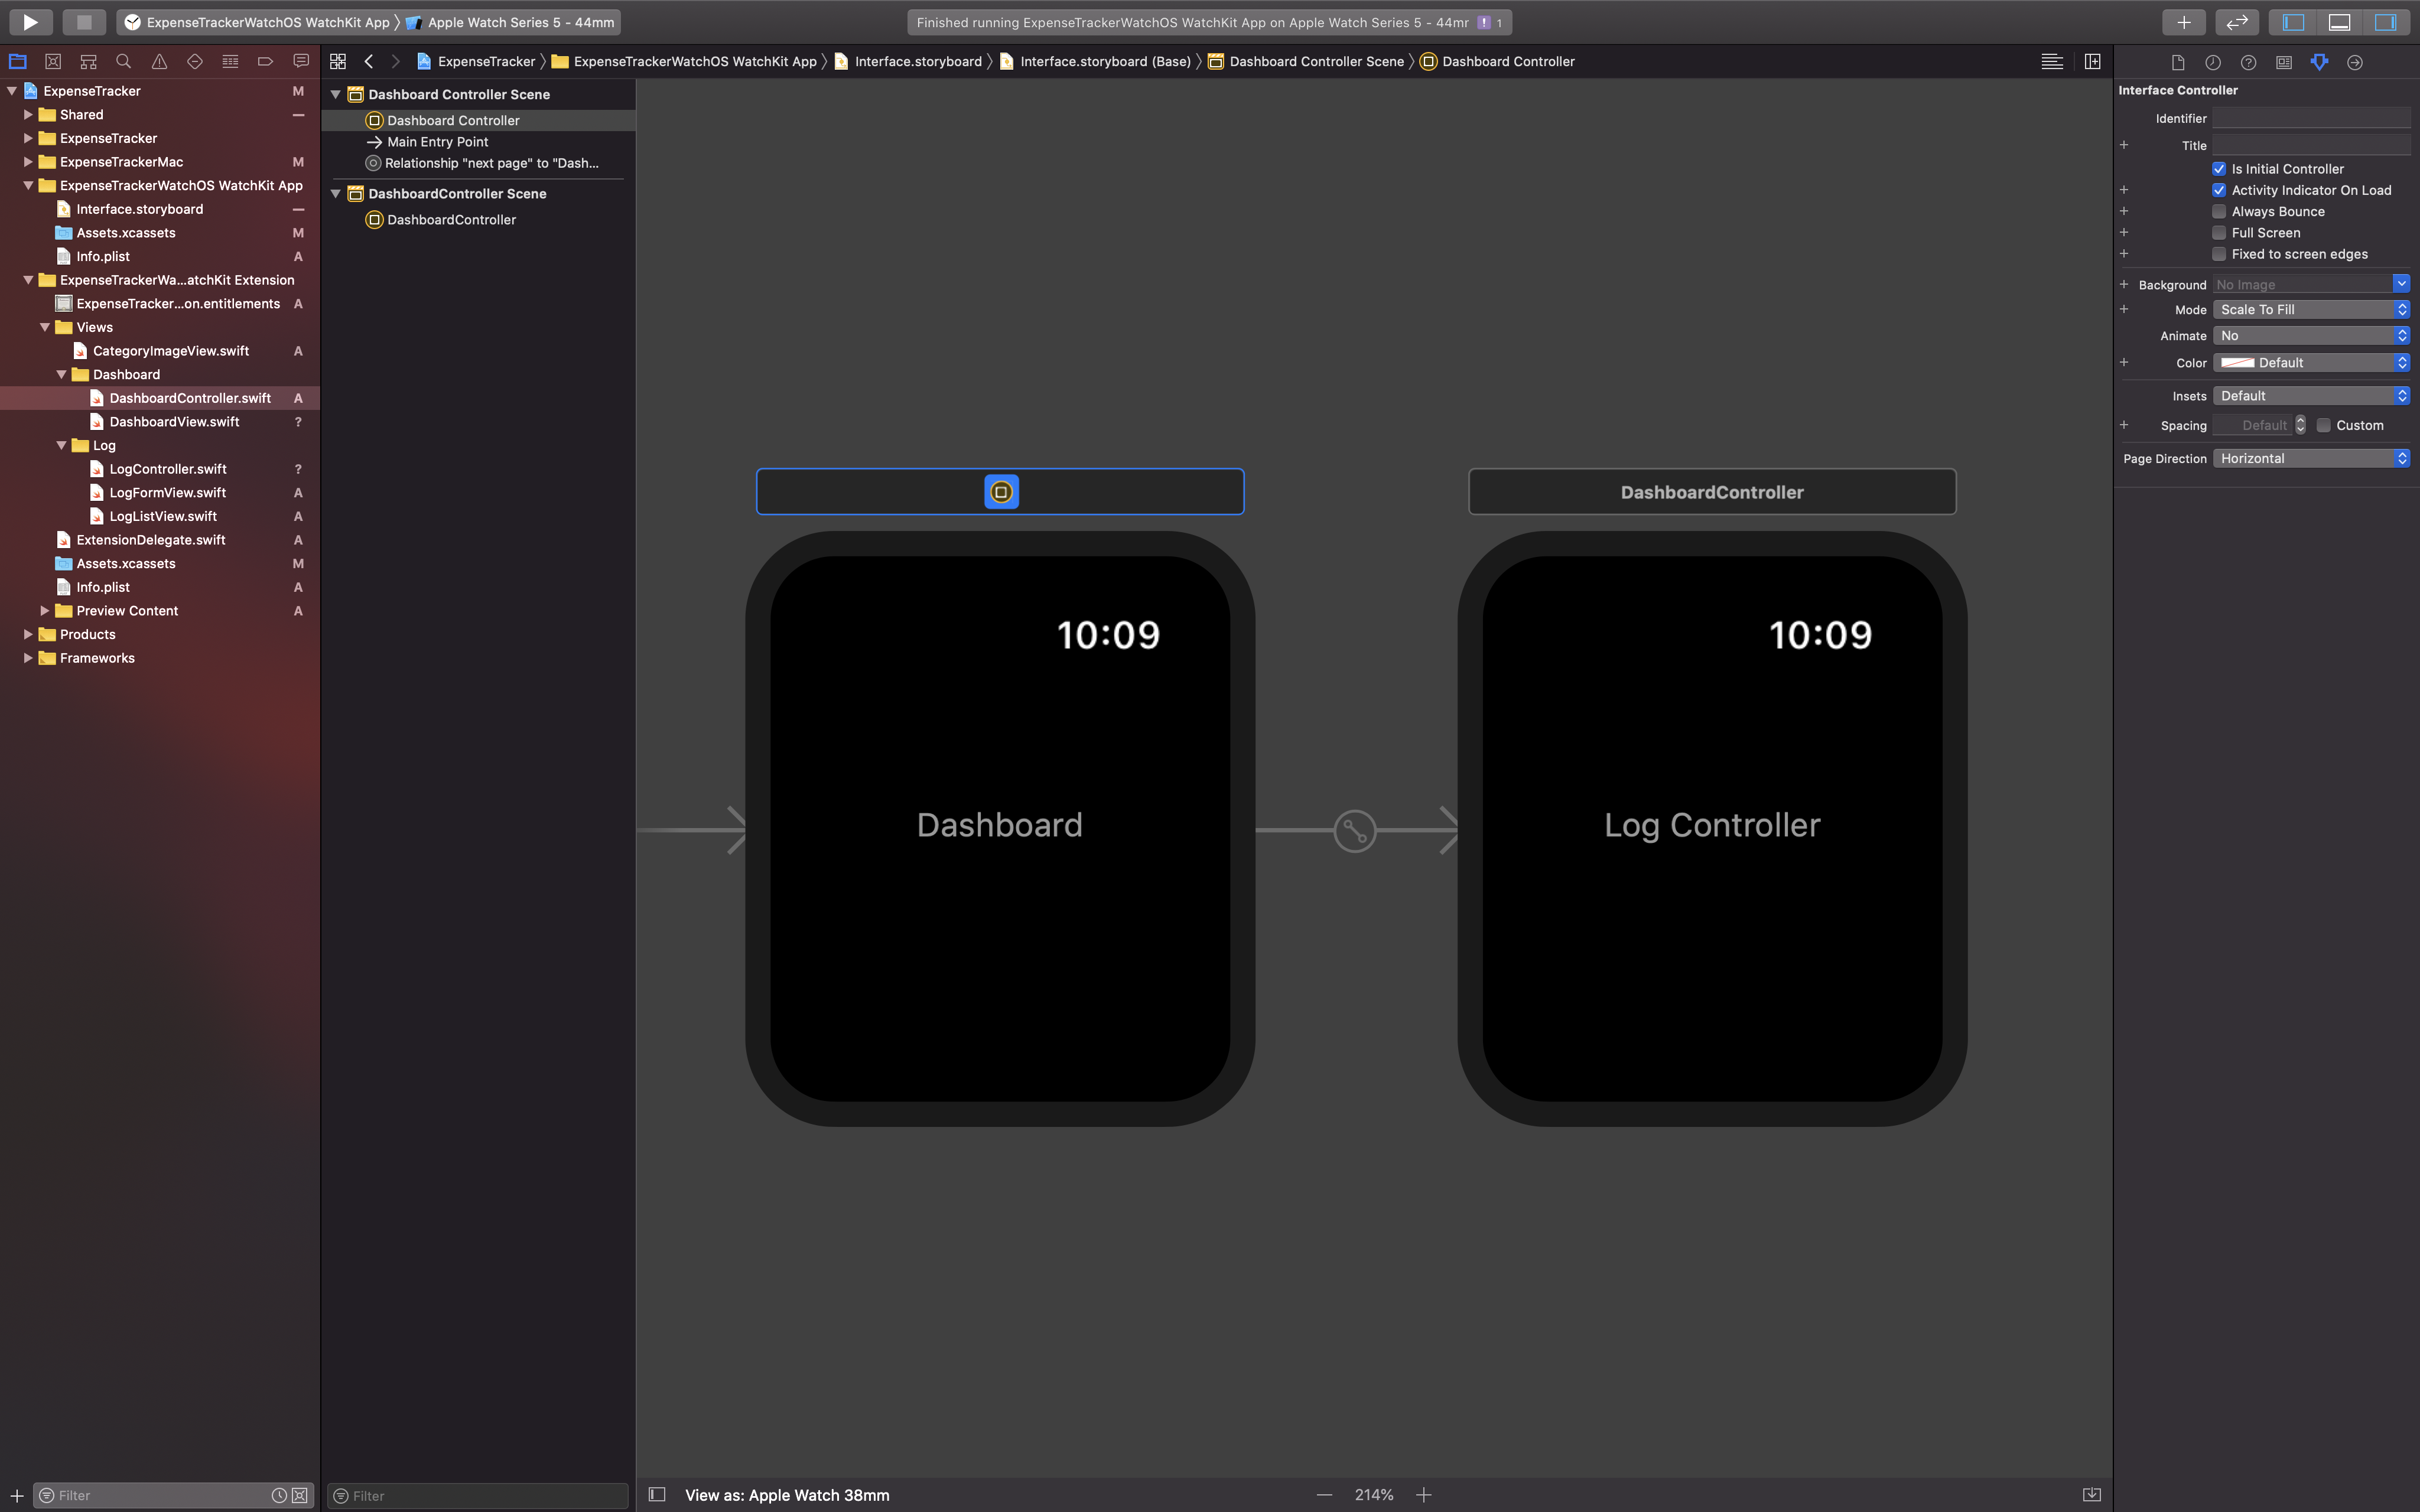
From the object library, drag a HostingController into the storyboard, click on the Identity Inspector and assign DashboardController as the class. Then, click on the Attributes Inspector and check Is Initial Controller.
Next, drag the second HostingController into the storyboard. Assign LogController as the class from Identity Inspector.
To create page-based navigation, Hold Ctrl key on the DashboardController and drag the blue line to the LogController. It will ask you to create relationship segue with next page as the only option, make sure to check it.
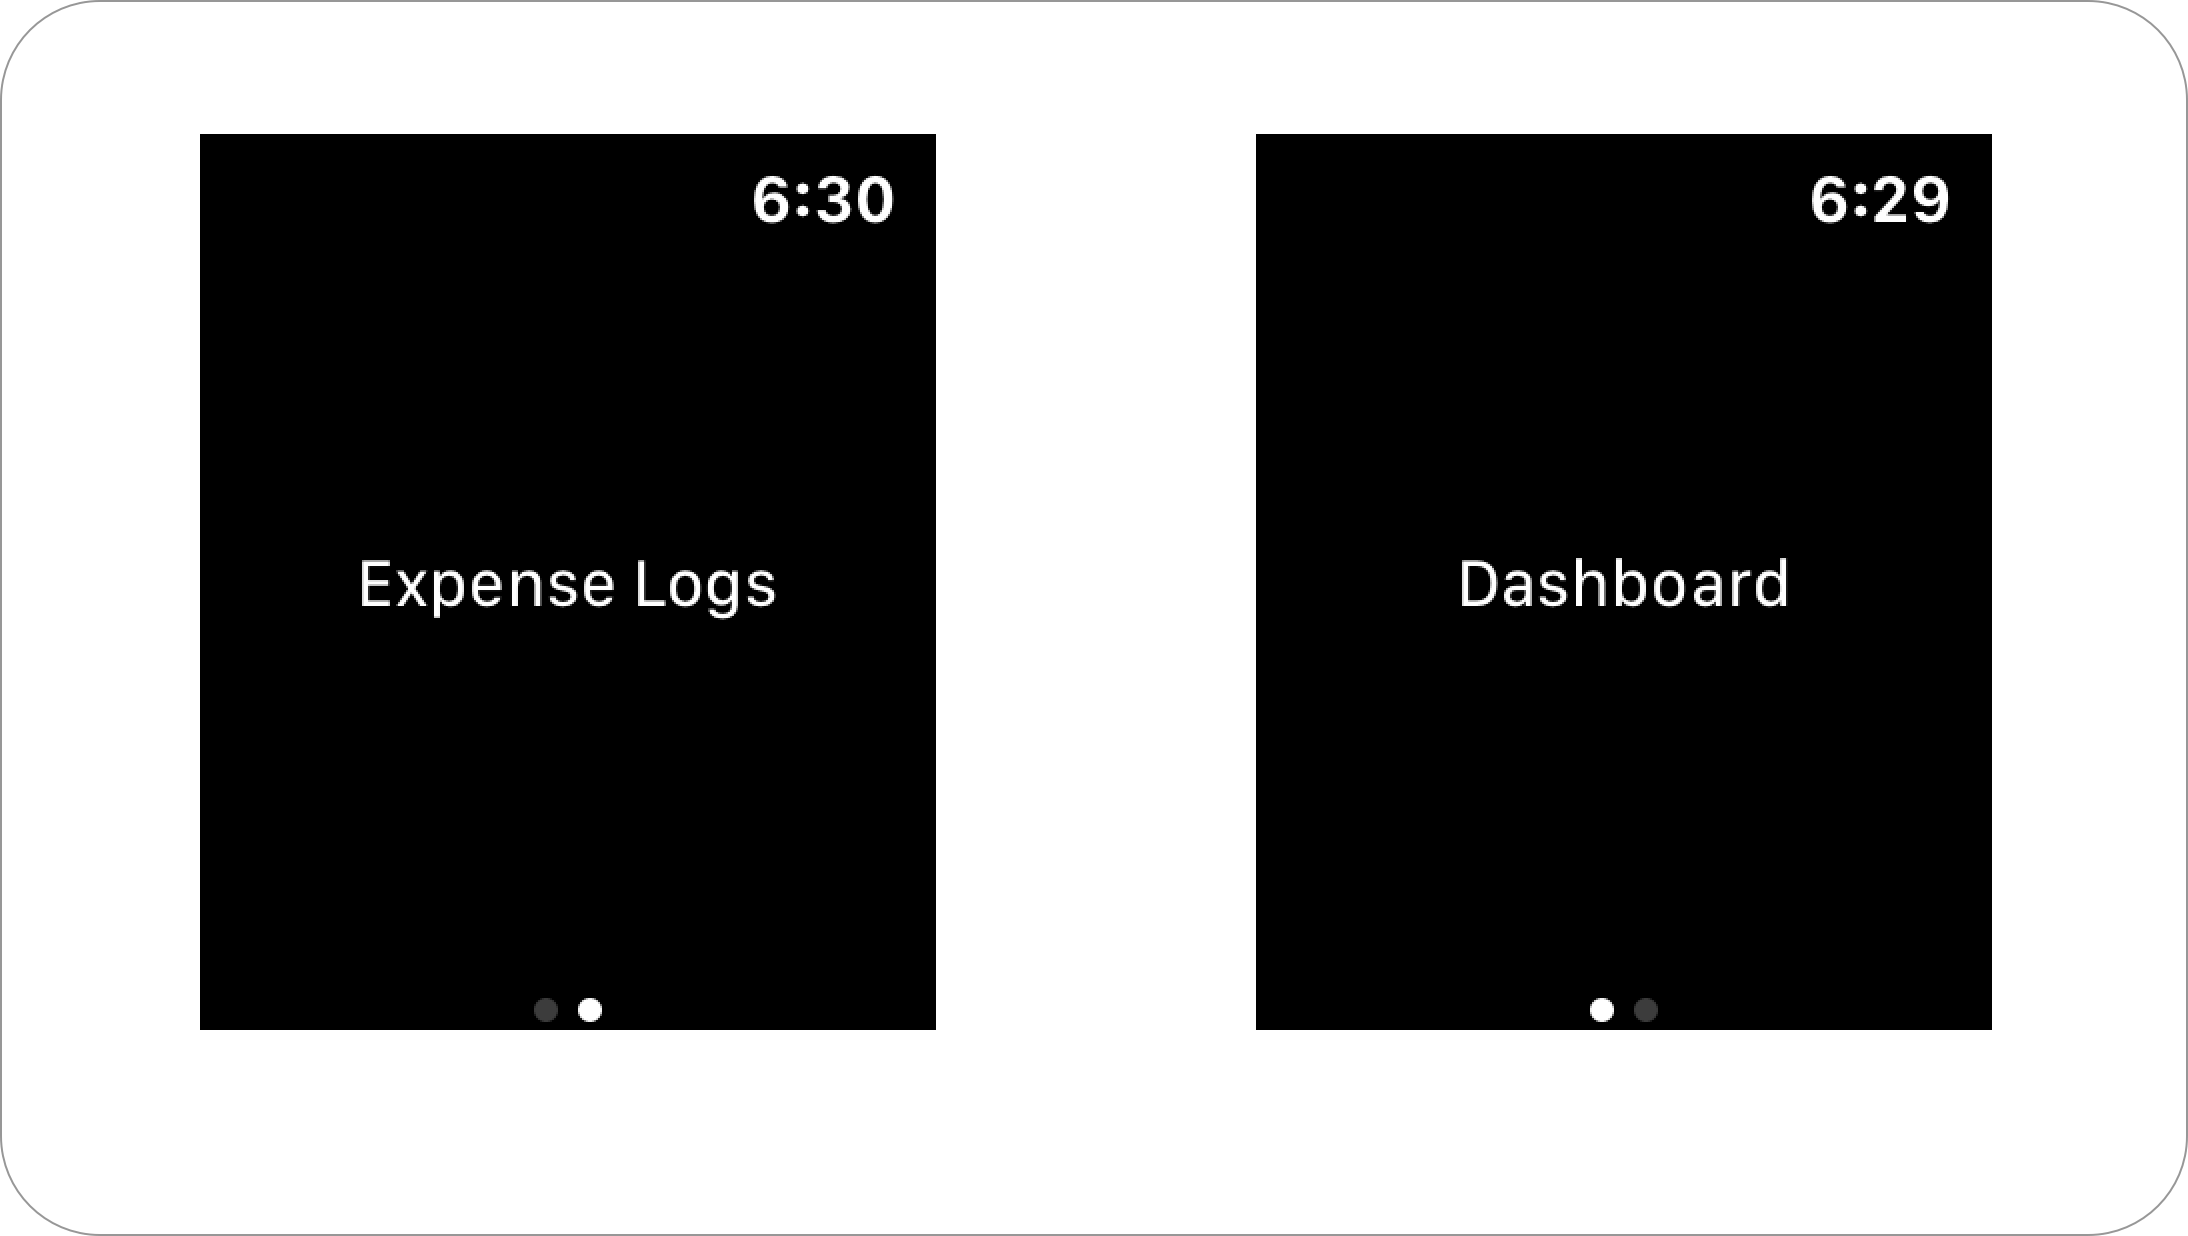
We have successfully build page based navigation for our watchOS app for the Dashboard and Log View. Build and run App in the simulator, and you should be able to navigate between pages using the swipe gesture.
Building Category Image View
Before creating the LogListView, let's create the CategoryImageView first. This View displays the category image in our Dashboard and Log page.
Create a new file named CategoryImageView.swift. Copy the following code.
struct CategoryImageView: View {

    let category: Category
    var color: Color = .white

    var body: some View {
        Image(systemName: category.systemNameIcon)
            .resizable()
            .aspectRatio(contentMode: .fit)
            .frame(width: 15, height: 15)
            .padding(.all, 4)
            .foregroundColor(color)
            .overlay(
                Circle()
                    .stroke(color, style: StrokeStyle(lineWidth: 1)
                )
        )
    }
}
Here, we use the category systemNameIcon property to retrieve the image using SF Symbols system name for the respective category. We constrained the frame to have the width and height of 15 and add 4-pts of padding around. At last, we add an Overlay containing the Circle Shape, which we stroke with the the color property. Default color is white, but it can be costumized by injecting it from the initializer.
Building Log List View
Next, navigate to LogListView.swift file. This main view shows the list of expense logs sorted by a recent date. Copy the following code.
import SwiftUI
import CoreData

struct LogListView: View {

    // 1
    @Environment(\.managedObjectContext)
    var context

    @State private var logToEdit: ExpenseLog?
    @State private var isAddPresented: Bool = false

    // 2
    @FetchRequest(
        entity: ExpenseLog.entity(),
        sortDescriptors: [
            NSSortDescriptor(keyPath: \ExpenseLog.date, ascending: false)
        ]
    )
    private var result: FetchedResults<ExpenseLog>

    var body: some View {
        // 3
        ZStack {
            // 4
            ScrollView {
                Button(action: {
                     self.isAddPresented = true
                }) {
                     HStack {
                         Spacer()
                         Image(systemName: "plus.circle")
                         Text("Add Log")
                         Spacer()
                     }
                     .foregroundColor(Color(hexString: "#F92365"))
                }

                // 5
                ForEach(result) { (log: ExpenseLog) in
                    Button(action: {
                        self.logToEdit = log
                    }) {
                        LogRowView(log: .constant(log))
                    }
                }
                .sheet(item: self.$logToEdit) { (log: ExpenseLog) in
                    // TODO: return LogFormView for editing log
                }
            }

            if result.isEmpty {
                Text("No expenses data\nPlease add an expense first.")
                    .multilineTextAlignment(.center)
                    .font(.headline)
                    .padding(.horizontal)
            }
        }
        .navigationBarTitle("Expenses")
        .sheet(isPresented: $isAddPresented) {
            // TODO: return LogFormView for adding log
        }
    }

    private func onDelete(with indexSet: IndexSet) {
        indexSet.forEach { index in
            let log = result[index]
            context.delete(log)
        }
        try? context.saveContext()
    }
}

struct LogRowView: View {

    @Binding var log: ExpenseLog

    var body: some View {
        VStack(alignment: .leading) {
            HStack {
                CategoryImageView(category: log.categoryEnum, color: log.categoryEnum.color)
                Text(log.nameText)
                    .font(.body)
            }
            HStack(alignment: .firstTextBaseline) {
                Text(log.amountText)
                    .font(.headline)

                Spacer()
                Text(log.dateText)
                    .font(.footnote)
            }
        }
        .padding(.horizontal, 2)
        .padding(.vertical)
        .listRowPlatterColor(log.categoryEnum.color)
    }
}
Here are the explanations for all the points in the code above:
- We declared several properties. We'll use
@Environmentproperty wrapper to pass the managed object context from a parent. To handle presenting theLogFormViewsheet, we declareisAddPresentedstate property for adding log andlogToEditfor editing log. - We use
@FetchRequestproperty wrapper passing the expense log entity and default sort descriptor by a recent date. It will use the@Environmentmanaged object context to fetch the request automatically. - A
ZStackis the main container view. With this, we can add aTextto inform the user to add a new log in case the fetched result is empty. - An
Add Logbutton located at the top where the user can use it to add a new log using the Log Form View we'll build in the next section. - To display the expense logs, we use a
ScrollViewinstead ofListbecause currently it crashes when adding/updating/deleting withList. We pass theFetchedResultsso the list will be updated whenever the logs get added, updated, or deleted automatically. We'll addonTapGestureto assign thelogToEditproperty when the user taps on each row to present theLogFormViewin asheet. Finally, we'll addonDeletemodifier to delete the respective row whenever the user swipes on the row. - For each of the fetched expense log, we put it in
LogRowView. It uses a combination ofHStackandVStackto show the image of the log's category, name, amount, and date. Notice that we pass the log using@Bindingso the row can be updated whenever the item changes.
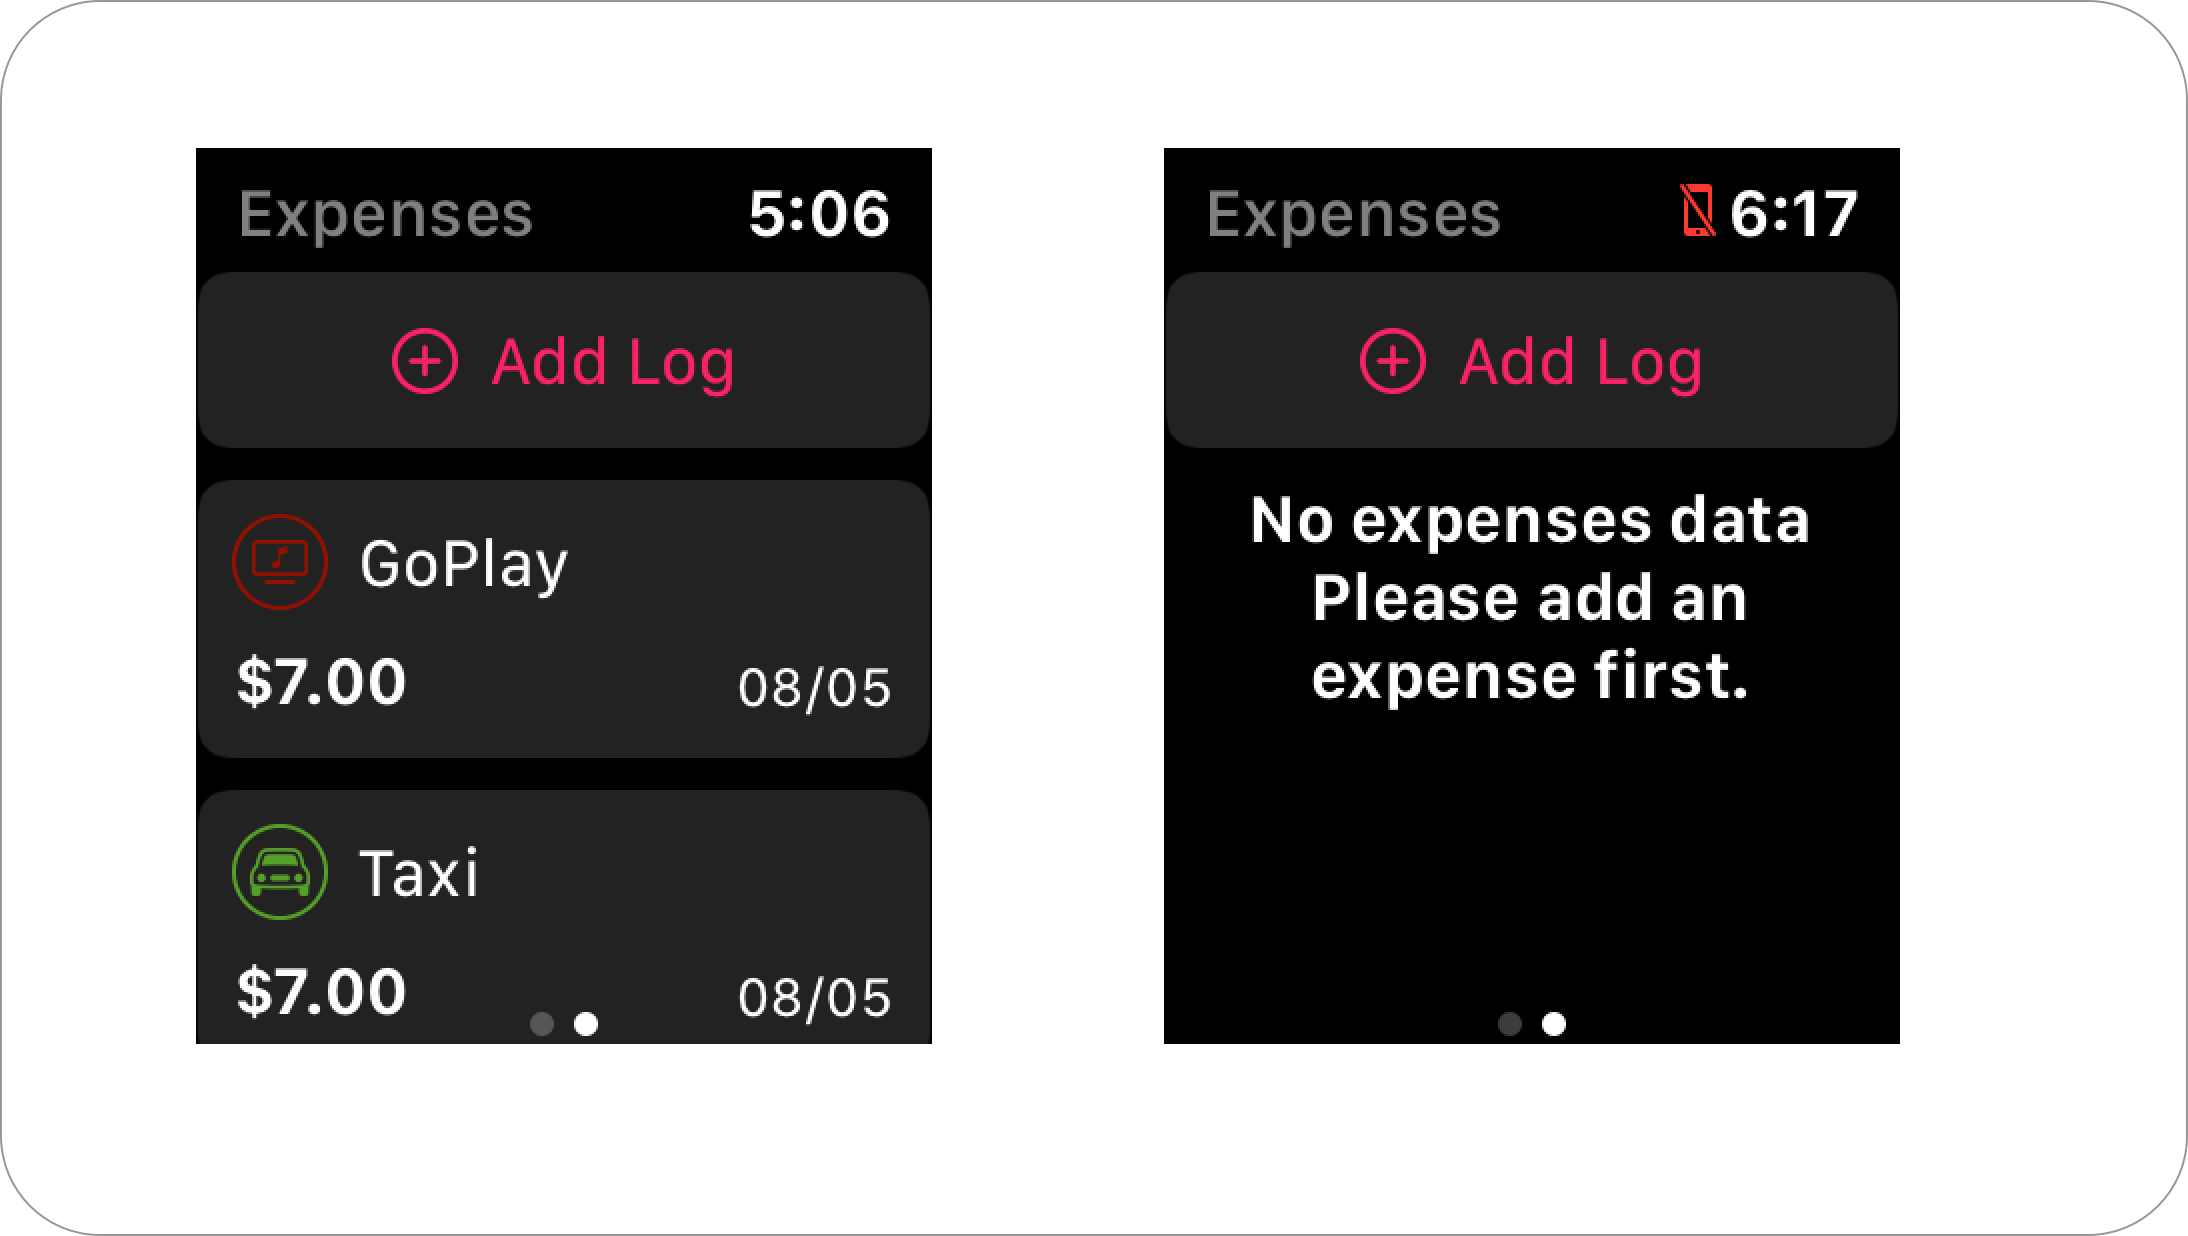
Try to build and run the project, and you should be able to navigate to the Log View. Currently, it only shows an Add Log button with a text telling the user to add a new expense log. Next, we'll be going to build the Log Form View so the user can add and edit log.
Building Log Form View
Next, create a file named LogFormView.swift. The LogFormView uses Form containing text fields for name, amount, and a picker for selecting a category. Copy the following code into the file.
import SwiftUI
import CoreData

struct LogFormView: View {

    // 1
    var logToEdit: ExpenseLog?
    var context: NSManagedObjectContext

    @Environment(\.presentationMode)
    var presentationMode

    // 2
    @State var name: String = ""
    @State var amount: Double = 0
    @State var category: Category = .utilities

    var body: some View {
        // 3
        Form {
            Section {
                TextField("Name", text: $name)
                TextField("Amount", value: $amount, formatter: Utils.numberFormatter)
                Picker(selection: $category, label: Text("Category")) {
                    ForEach(Category.allCases) { category in
                        Text(category.rawValue.capitalized).tag(category)
                    }
                }
            }

            // 4
            Section {
               Button(action: self.onSaveTapped) {
                   HStack {
                       Spacer()
                       Text("Save")
                           .foregroundColor(Color.white)
                       Spacer()
                   }
               }
               .listRowPlatterColor(Color.blue)

               if self.logToEdit != nil {
                   Button(action: self.onDeleteTapped) {
                       HStack {
                           Spacer()
                           Text("Delete")
                               .foregroundColor(Color.white)
                           Spacer()
                       }
                   }
                   .listRowPlatterColor(Color.red)
               }
           }
        }
    }

    // 5
    private func onSaveTapped() {
        let log: ExpenseLog
        if let logToEdit = self.logToEdit {
            log = logToEdit
        } else {
            log = ExpenseLog(context: self.context)
            log.id = UUID()
            log.date = Date()
        }

        log.name = self.name
        log.category = self.category.rawValue
        log.amount = NSDecimalNumber(value: self.amount)
        do {
            try context.saveContext()
        } catch let error as NSError {
            print(error.localizedDescription)
        }
        self.presentationMode.wrappedValue.dismiss()
    }

    // 6
    private func onDeleteTapped() {
         guard let logToEdit = self.logToEdit else { return }
         self.context.delete(logToEdit)
         try? context.saveContext()
         self.presentationMode.wrappedValue.dismiss()
     }
}
Here are the explanations for all the points in the code above:
- We declare several properties for this form of view. The
logToEditis an optional property that will be passed when the user taps on the row in the LogList View for editing a log. We useNSManagedObjectContextso we can save the created or updated log after user taps on the save button. At last, we use@Environmentto accessPresentationModeto dismiss the sheet after save. - We declare 3
@Stateproperties for name, amount, and category. These will be used as bindings for the text fields and picker in theForm. - The
Formis the main container for all the text fields and picker. We have text fields to bind thenameandamountstate. Notice, foramountwe are passing aNumberFormatterwith currency type so theStringcan be converted toDoubleafter the user commits the change. As for the category selection, we usePickerpassing theCategoryenum usingCaseIterableprotocol to retrieve all the cases. - We have a
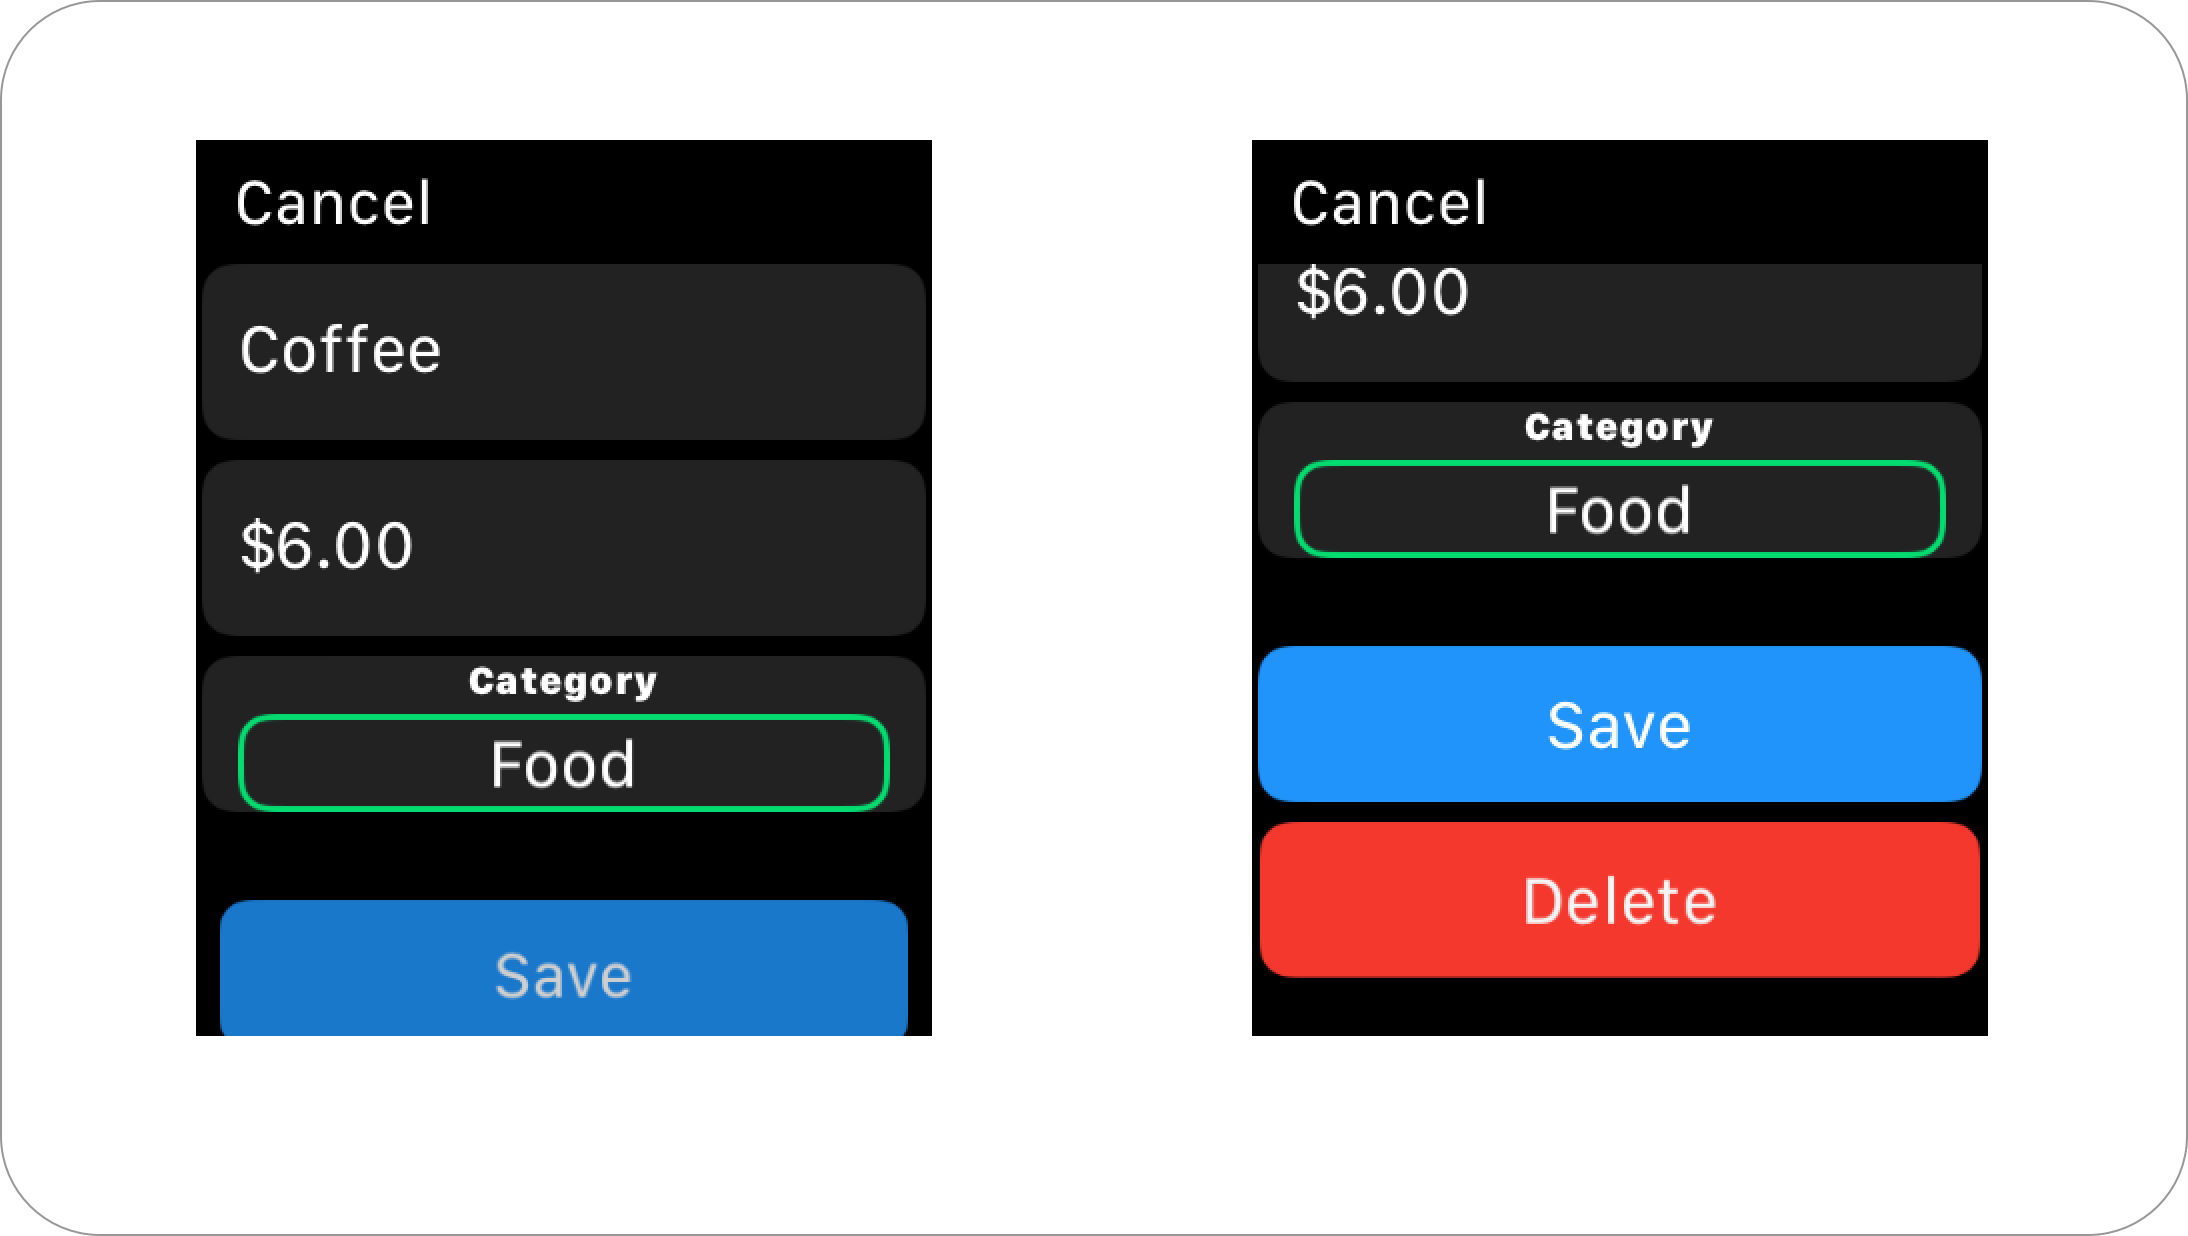
Savebutton that triggers theonSaveTappedmethod when the user taps. Also, we show aDeletebutton when user edit an item. - In the
onSaveTappedmethod, we create a new log iflogToEditvalue isnil, otherwise we use it as the log. We'll assign all the state properties such asname,amount, andcategoryto the log. Notice that we're assigning a current date for the new log to simplify the form. At last, we invoke the managed object context save method and dismiss the sheet. - In the
onDeleteTappedmethod, we delete thelogToEditfrom the managed object context, then save, and dismiss the sheet.
Before we try our new LogFormView, we'll need to add it in 2 places inside LogListView:
- In the sheet that uses
logToEditbinding. This property will be used in the case when the user taps on the log row. Here, we need to pass thelogToEditas well the states forname,amount,categoryto the initializer. Those states are going to populate the text fields and picker. - In the sheet that uses
isAddPresentedbinding. This property will be used in the case when the user taps on theAdd Logbutton, we need to pass the managed object context.
struct LogListView: View {

    // ...
    var body: some View {
        ZStack {
            ScrollView {

                // ..
                .sheet(item: self.$logToEdit) { (log: ExpenseLog) in
                    // 1
                    LogFormView(
                        logToEdit: log,
                        context: self.context,
                        name: log.name ?? "",
                        amount: log.amount?.doubleValue ?? 0,
                        category: Category(rawValue: log.category ?? "") ?? .food
                    )
                }
            }
            // ...
        }
        // ..
        .sheet(isPresented: $isAddPresented) {
            // 2
            LogFormView(context: self.context)
        }
    }
    // ...
}
Try to build and run the project, create several new logs to make sure the list gets updated. Also, try to edit and delete several logs to make sure it's working properly.
Building Dashboard View
Try to build and run the project, create several new logs to make sure the list gets updated. Also, try to edit and delete several logs to make sure it's working correctly.
import SwiftUI
import CoreData

struct DashboardView: View {

    // 1
    var context: NSManagedObjectContext

    @State var totalExpenses: Double?
    @State var categoriesSum: [CategorySum]?

    var body: some View {
        // 2
        List {
            // 3
             if totalExpenses != nil && totalExpenses! > 0 {
                VStack(alignment: .center, spacing: 2) {

                    Text("Total expenses")
                        .font(.footnote)
                    Text(totalExpenses!.formattedCurrencyText)
                        .font(.headline)

                    if categoriesSum != nil {
                        PieChartView(
                            data: categoriesSum!.map { ($0.sum, $0.category.color) },
                            style: Styles.pieChartStyleOne,
                            form: CGSize(width: 160, height: 110),
                            dropShadow: false
                        ).padding()
                    }
                }
                .listRowPlatterColor(.clear)
            }

            // 4
            if categoriesSum != nil {
                ForEach(self.categoriesSum!) {
                    CategoryRowView(category: $0.category, sum: $0.sum)
                }
            }

            // 5
            if totalExpenses == nil && categoriesSum == nil {
                Text("No expenses data\nPlease add your expenses from the logs page.")
                    .multilineTextAlignment(.center)
                    .font(.headline)
                    .padding()
            }

        }
        .listStyle(CarouselListStyle())
        .navigationBarTitle("Dashboard")
        .onAppear(perform: fetchTotalSums)
    }

    // 6
    func fetchTotalSums() {
        ExpenseLog.fetchAllCategoriesTotalAmountSum(context: self.context) { (results) in
            guard !results.isEmpty else {
                self.totalExpenses = nil
                self.categoriesSum = nil
                return
            }

            let totalSum = results.map { $0.sum }.reduce(0, +)
            self.totalExpenses = totalSum
            self.categoriesSum = results.map({ (result) -> CategorySum in
                return CategorySum(sum: result.sum, category: result.category)
            })
        }
    }
}

struct CategoryRowView: View {
    let category: Category
    let sum: Double

    var body: some View {
        HStack {
            CategoryImageView(category: category)
            VStack(alignment: .leading) {
                Text(category.rawValue.capitalized)
                Text(sum.formattedCurrencyText).font(.headline)
            }
        }
        .listRowPlatterColor(category.color)
        .padding(.vertical)
    }
}
Here are the explanations for all the points in the code above:
- For the view properties, we have a managed object context without
@Environmentproperty wrapper because we don't use@FetchRequestto fetch our total categories sum data. We have two state properties, one for the total expense sum for all categories. The other state property is an array ofCategorySumwhich stores the total sum for a category. - We use
ListwithCarouselListStyleto display the data, anonAppearmodifier is added, so we can fetch the data when the view appears. WithCarouselListStyle, we can have digital crown animation and animation as user scrolls the content. - For the first row in the
List, we use aVStackto display the total sum expense for all categories using aText. We'll also show the total sum for each category inside aPieChart. We are using a conditional statement only to render this row iftotalExpensestate is notnil. - For the other rows, we check if the
categoriesSumarray is notnil, then usingForEach, we pass thecategoriesSumarray. In theViewBuilderclosure, we return theCategoryRowView. You can see the declaration of this view at the bottom of the source code. It's usingHStackto display the image of the category usingCategoryImageView, thenVStackas a sibling containing the text of category name as well as the total formatted sum. - If the data haven't been fetched or empty, we display a text containing the information for the user to add a new log from the logs page.
- The
fetchTotalSumswill be invokedonAppear. In this case, we'll useExpenseLogstatic method to fetch all the categories with the total sum for each category. In the closure, we assign thetotalExpenseproperty usingreduceto sum all the value. At last, we transform the results and assign it to thecategoriesSumarray. These assignments will trigger a view update.
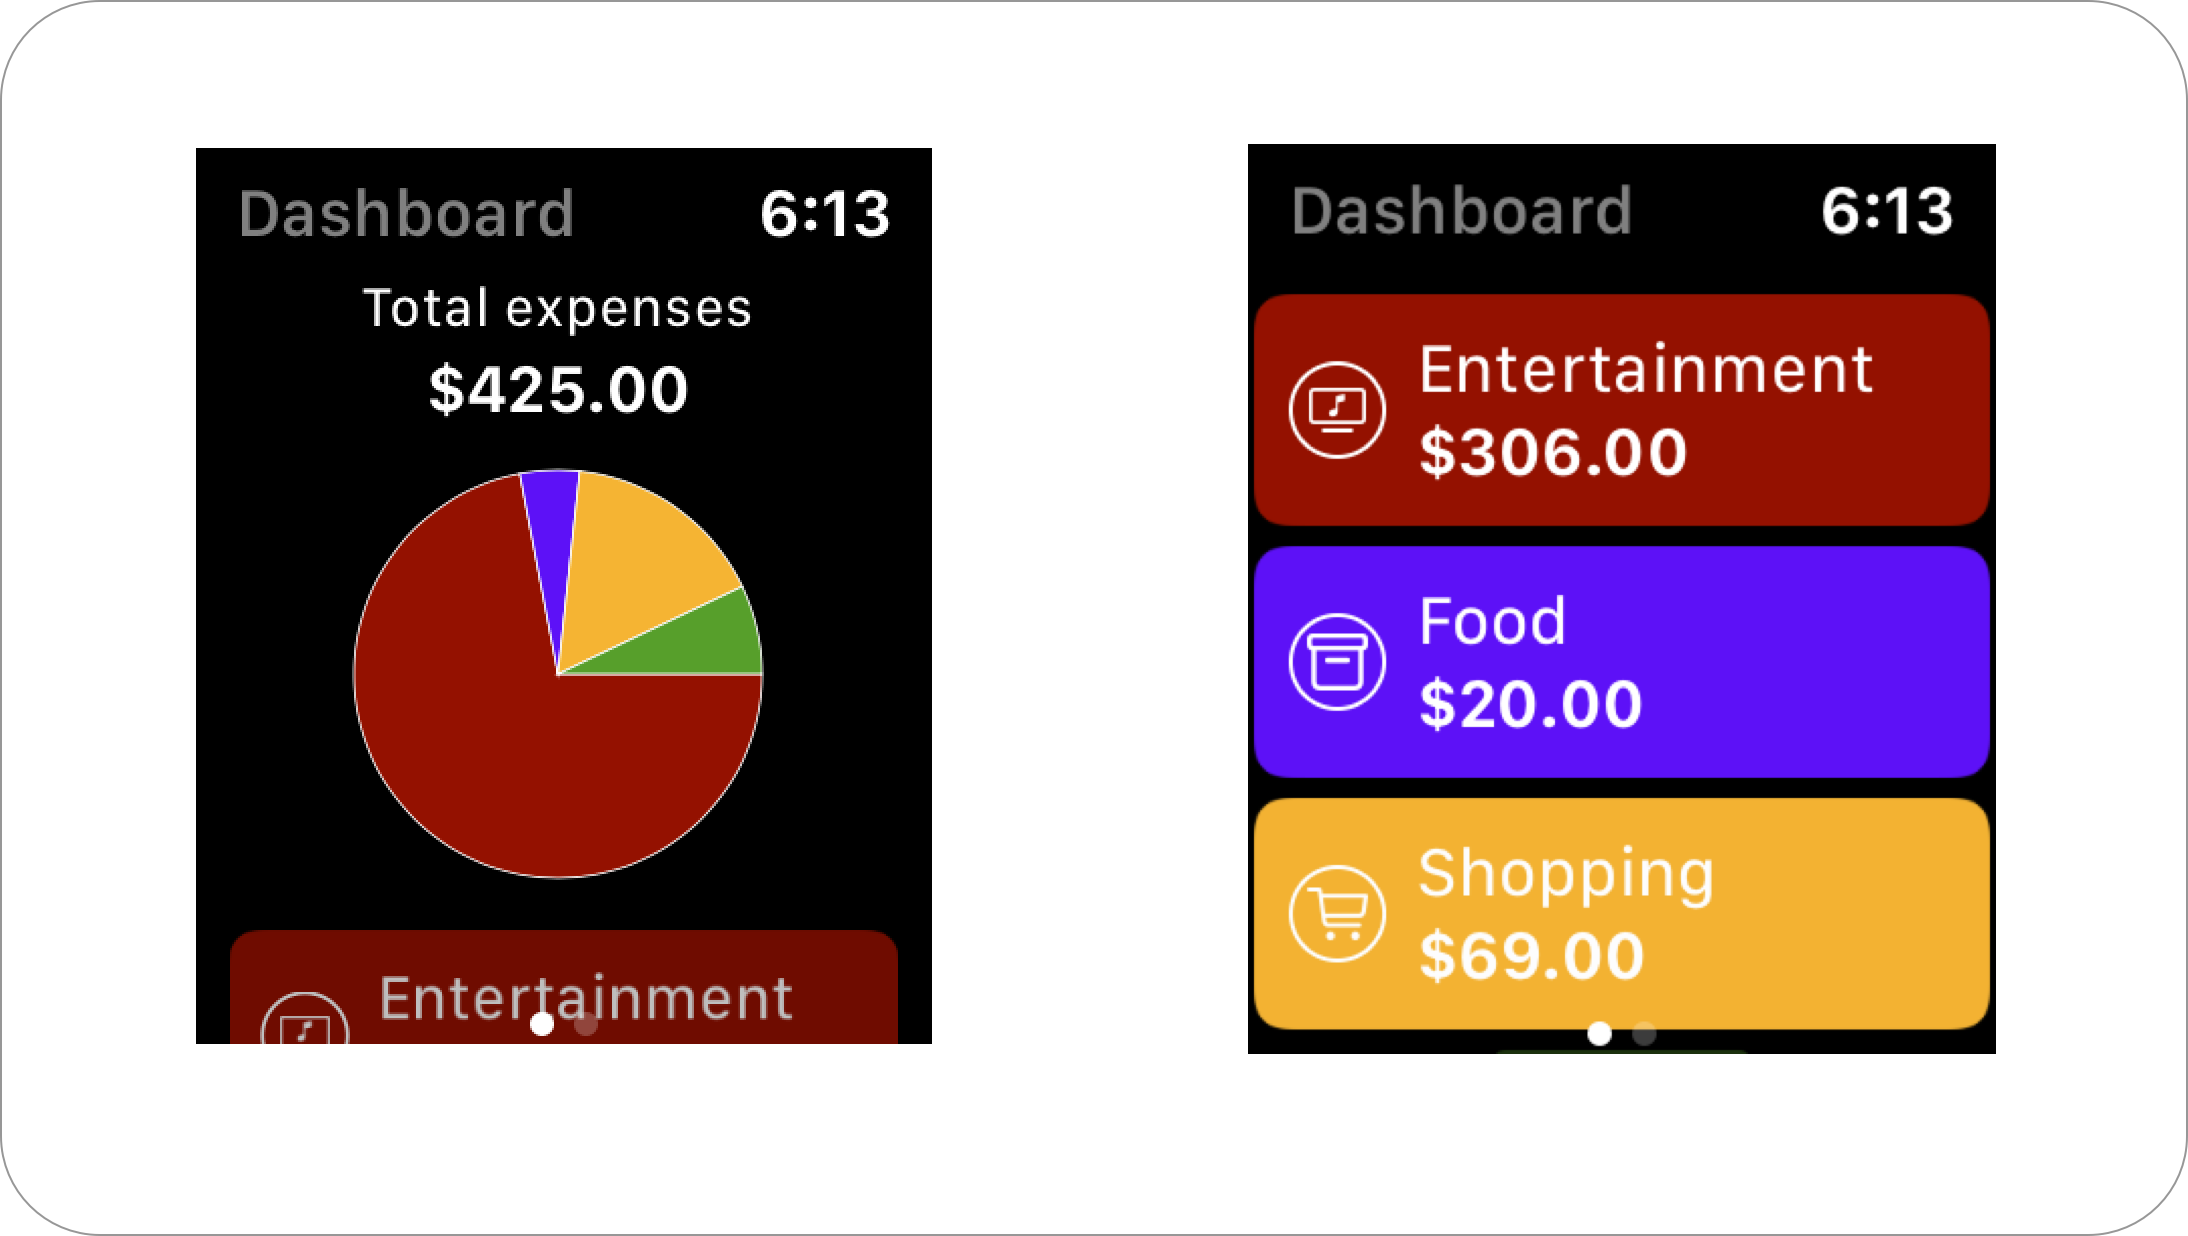
That's it! Try to build and run the project, and you should be able to see the total expenses sum, pie chart, and the list containing the amount of spending for each category.
Setup Core Data CloudKit Syncing in WatchOS Target
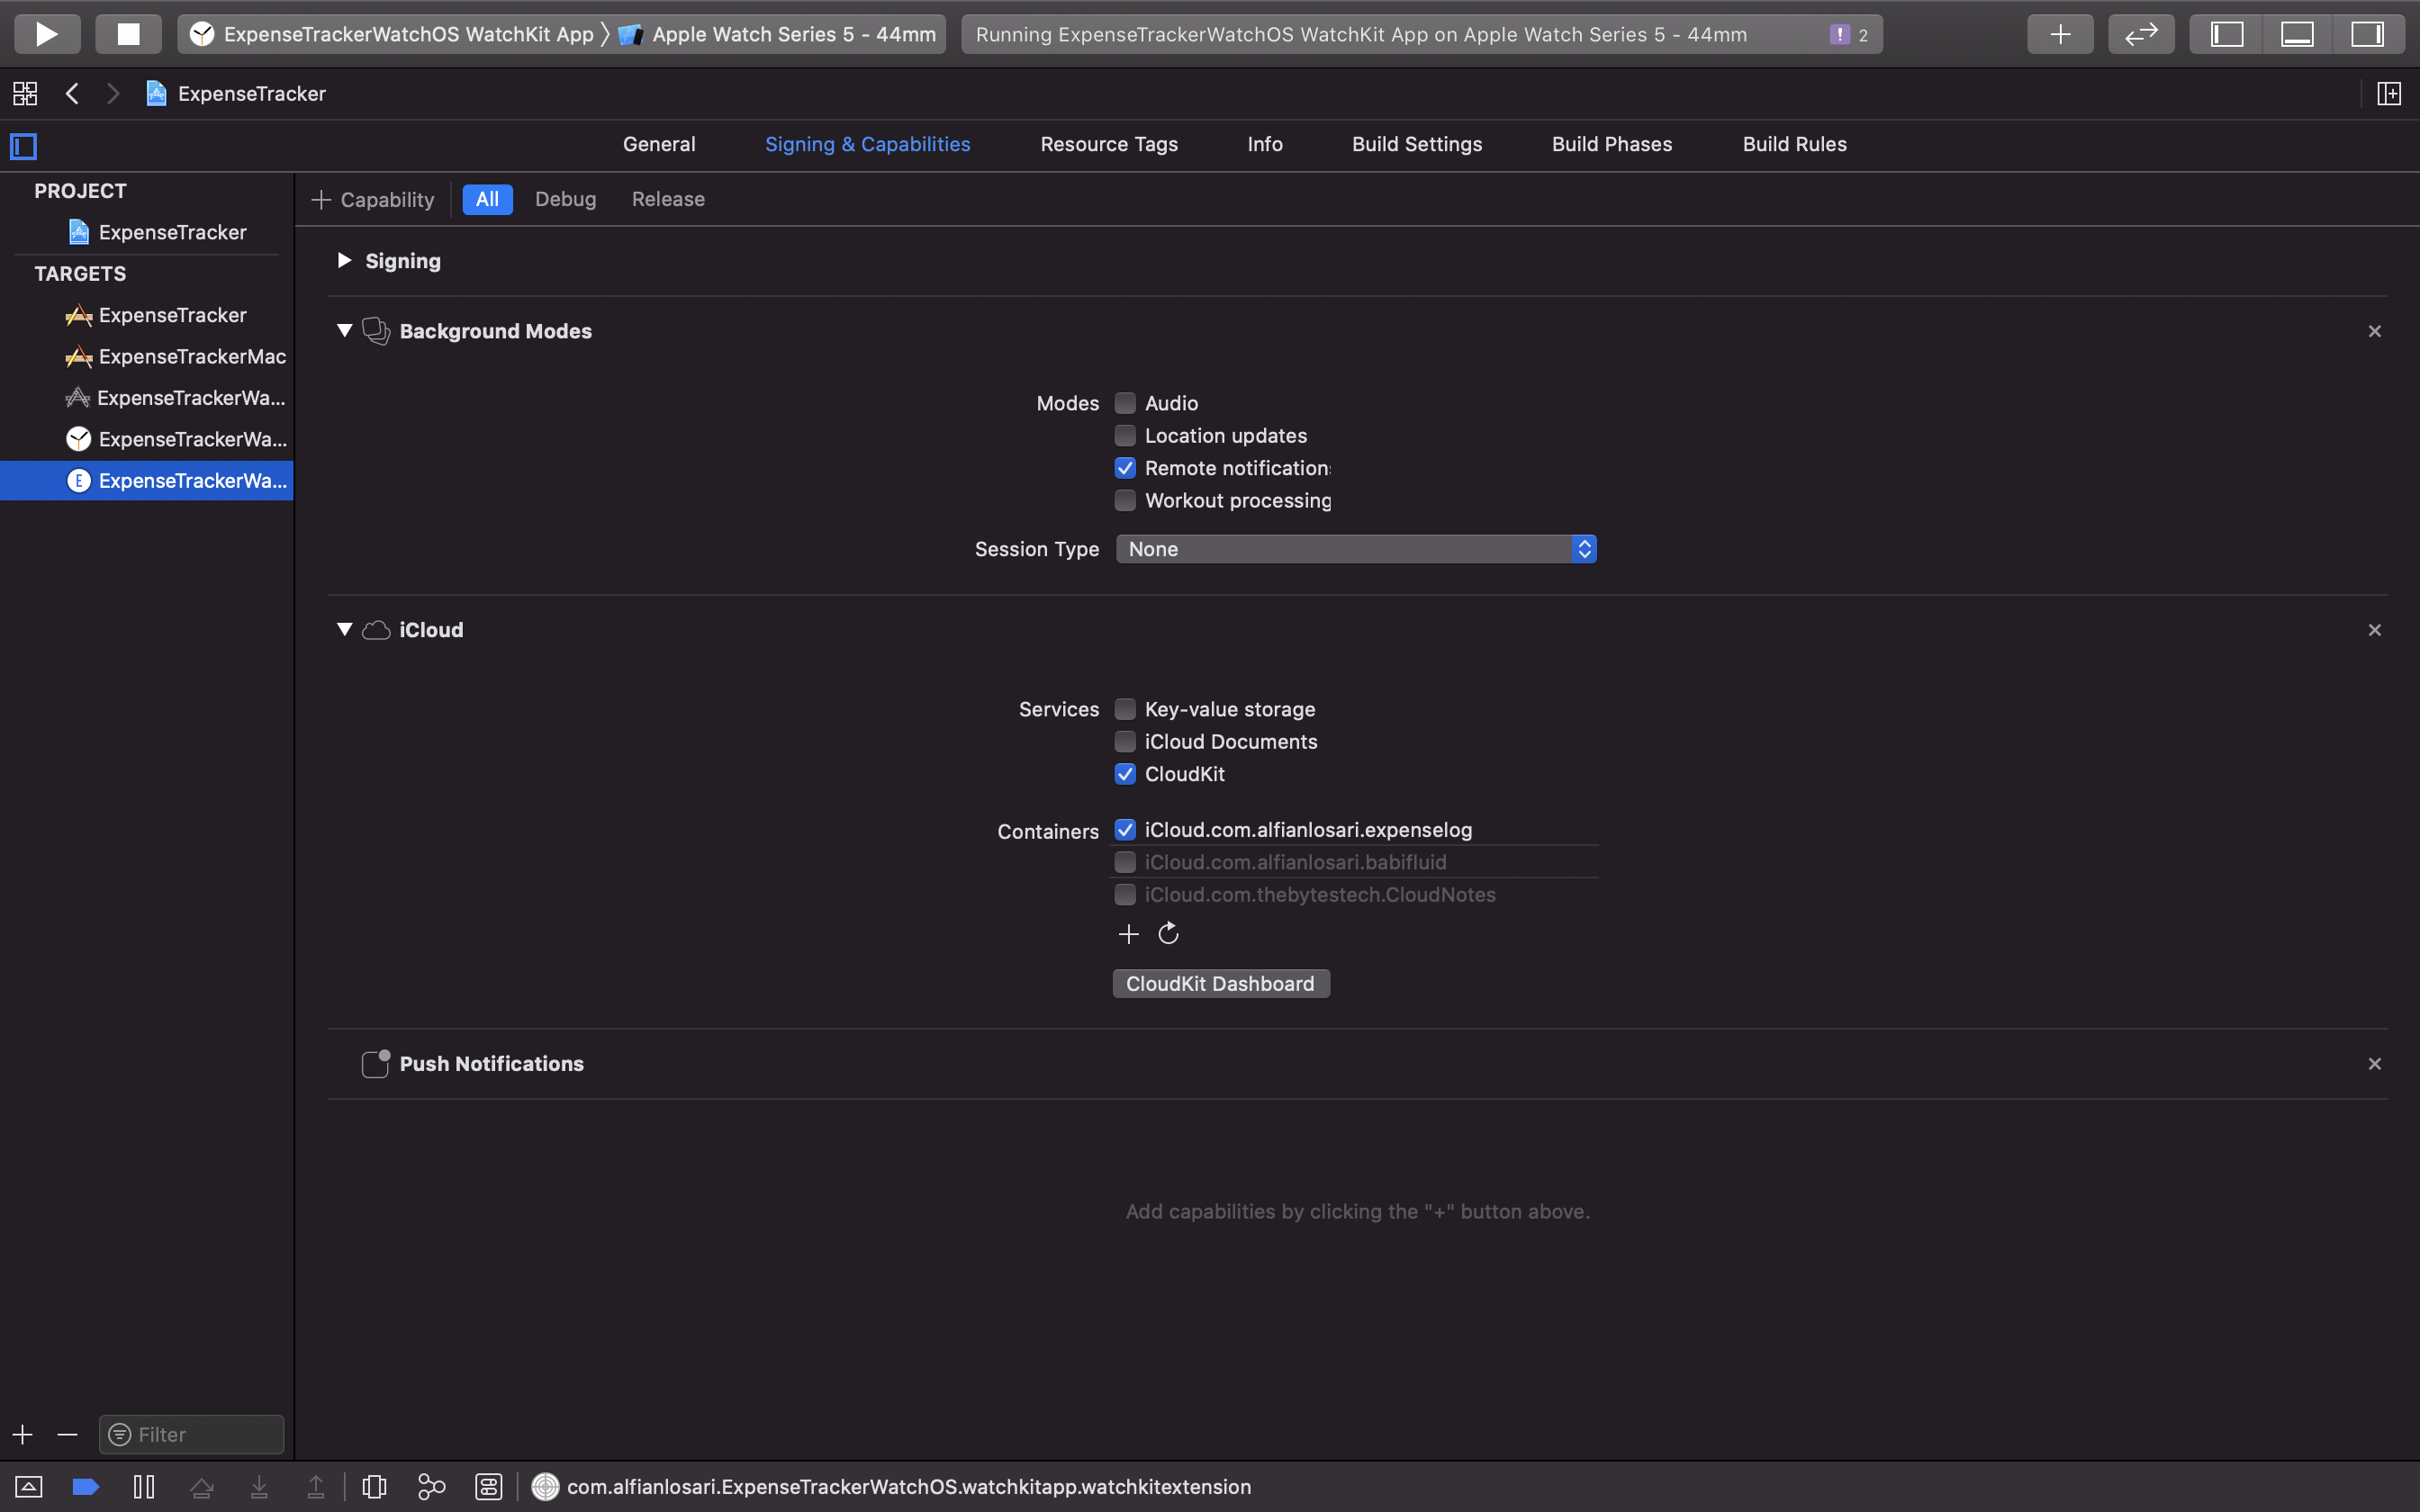
To make sure Core Data CloudKit syncing is working, you need to add a valid CloudKit container with the same identifier to all the targets. To try this, make sure you sign in into iCloud in the simulator or your physical devices when you want to test.
Try to add items on iOS. In 1 minute, it should sync the data to the other platforms.
Conclusion
Congratulations! You have successfully built the watchOS Expense Tracker App with SwiftUI. With Core Data + CloudKit, we're able to persist data locally as well as syncing the data to iCloud across all our Apple devices.
With SwiftUI, building an independent watch App has never become so much simple and fast! We're able to apply our learning to create unique app experiences across Apple platform. With simple modifiers such as passing CarouselListStyle for the listStyle, we're able to use the digital crown combined with sliding animation to provide an immersive experience and focus to the users when they use the app at a glance.
Until the next one! Let's keep the lifelong learning goes on!