Building Expense Tracker iOS App with Core Data & SwiftUI
Published at Apr 20, 2020
Persisting user data in a productivity-based offline application is the essential primary feature that we need to provide to users. There are many different data types associated with the recommended native storage solution in iOS, such as:
BLOB(Binary Large Object) type. Music, image, video, JSON, Plist archive files fall under this type. Apple recommends storing this in a file under the User document or temporary cache directory folder.UserDefaultsKey-Value storage type. It is a dictionary-based type suitable for storing bite-sized user preferences.Core Dataobject graph-based storage. It's the best for storing relational based object similar to a database.
According to Apple, Core Data is recommended to use when we want to store data permanently for offline use or even as a cache when there is no internet connection. Under the hood, Core Data uses high performance and compact SQLite database as its default persistent store. There are many advantages of using Core Data instead of accessing SQLite API manually such as:
- Automatically handles the mapping of
object graphto the database storage. - Efficient memory usage with the use of
faultandbatchto load the object and property as needed. UndoandRedoofindividualorbatchedchanges.- Provides
backgrounddata task API to handlelarge datasetimports without blocking mainUI thread. - View synchronization between data source and UI. For
UIKit,FetchedResultsControllercan be used to sync data changes in table and collection views. While inSwiftUI, we can use@FetchedResultsproperty wrapper to update the state of the View whenever the data source changes. - Provides
versioningandmigrationwhenschemachanges.
At last, our app size won't be affected as Core Data is built into the platform itself. Apple also uses it in most of its productivity-based apps, so we can ensure it is a reliable and battle-tested framework.
What We Will Build
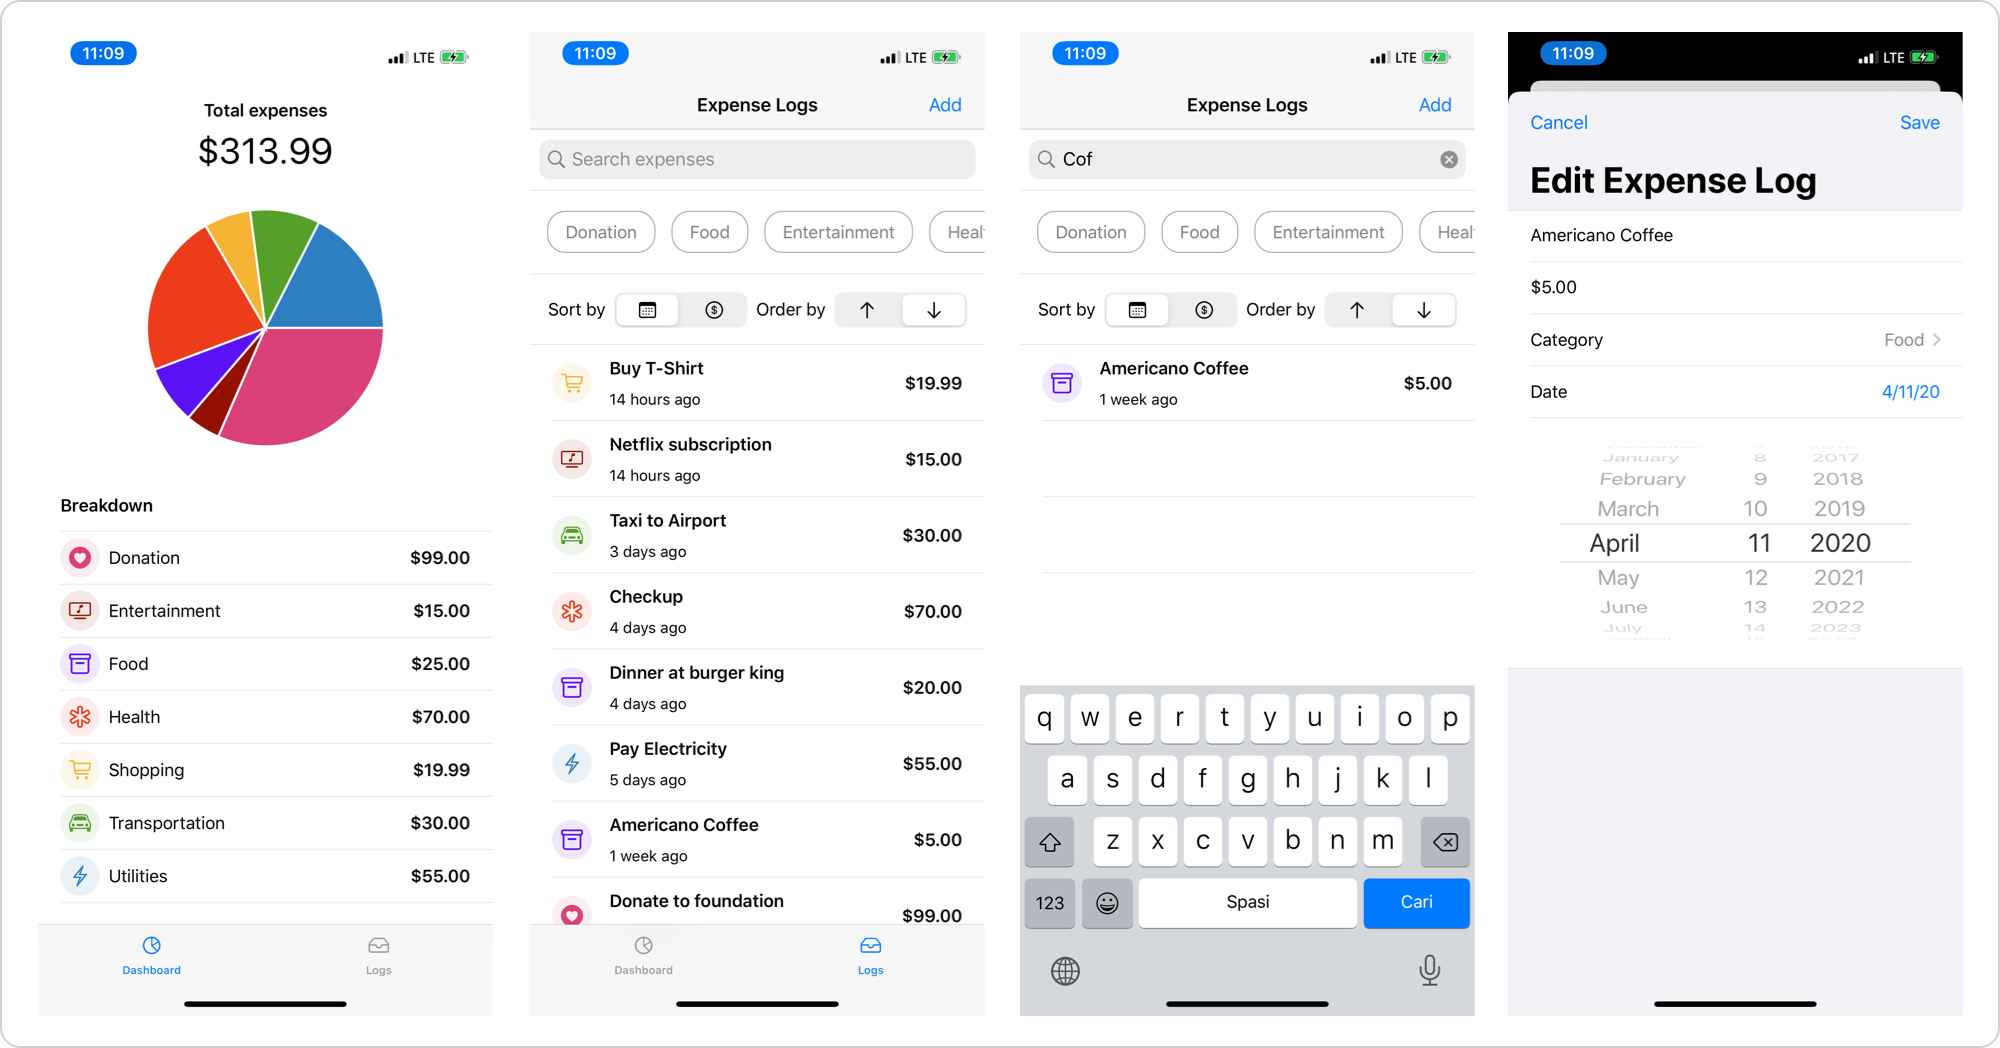
In this tutorial, we are going to build an expense tracker iOS app using Core Data and SwiftUI. Here are the main features of the app:
Create, edit, and deleteexpense logs.- Display
list of expenses. Filterexpenses by categories and search query.Sortexpenses bydate or amountin the order ofdescending or ascending.- Display the
dashboardof total expense sum for all and each category. - Display distribution of each category using a
pie chart.
Before you begin, you can download and play around with the app from the completed project GitHub
The Starter Project
To begin, you need to download the Starter Project from GitHub. Most of the UI components, standard models, and helpers are already included in the starter project, so we can focus on implementing Core Data Stack within the app.
Here are the main models provided inside the starter project:
Categoryenum. It is an abstraction for the expense category, such asentertainment, food, transportation, utilities, etc. Each expense log belongs to a category.SortOrder and Sort type enums. Both are an abstraction for the representation of sorting bydate/orderinascending/descendingorder.Utilsstruct provides a static property to retrieveformatterfor number and date inside the app.
The app has two primary tabs, dashboard and logs tabs. For Views, we have several main components, such as:
DashboadTabView. It showcases the sum of the total expenses for all categories, individual categories, and categories expenses sum distribution inside apie chart.LogsTabView. This tab is a container that consists of the filters selection, sort by and order selection, and list of logs.LogFormView. This view is a form used for creating and editing log. It has text fields for name and amount as well as a picker for date and category selection.FilterCategoriesView. It is a carousel scroll view where users can apply multiple selections of categories as a filter. It accepts the binding ofSet<Category>to bind the data from the parent state.SelectSortOrderView. It is aHStackwhere the user can pick sort-by and order by type using segmented controls. It accepts the binding ofSortOrderandSortTypeto bind the data from the parent state.PieChartView. It is a Pie Chart View by AppPear. I cloned and made a slight modification to the source code so it can display different colors for each category.
Try to build the app and play around with it. The dashboard tab will be empty as we don't have any data yet to display. While in the logs tab, you can play around by applying categories filter and sort order types. Try to tap on the add button; the form will be presented, but the save button won't create a new log for now as we haven't implemented the Core Data persistence into the app.
Create Managed Object Data Model
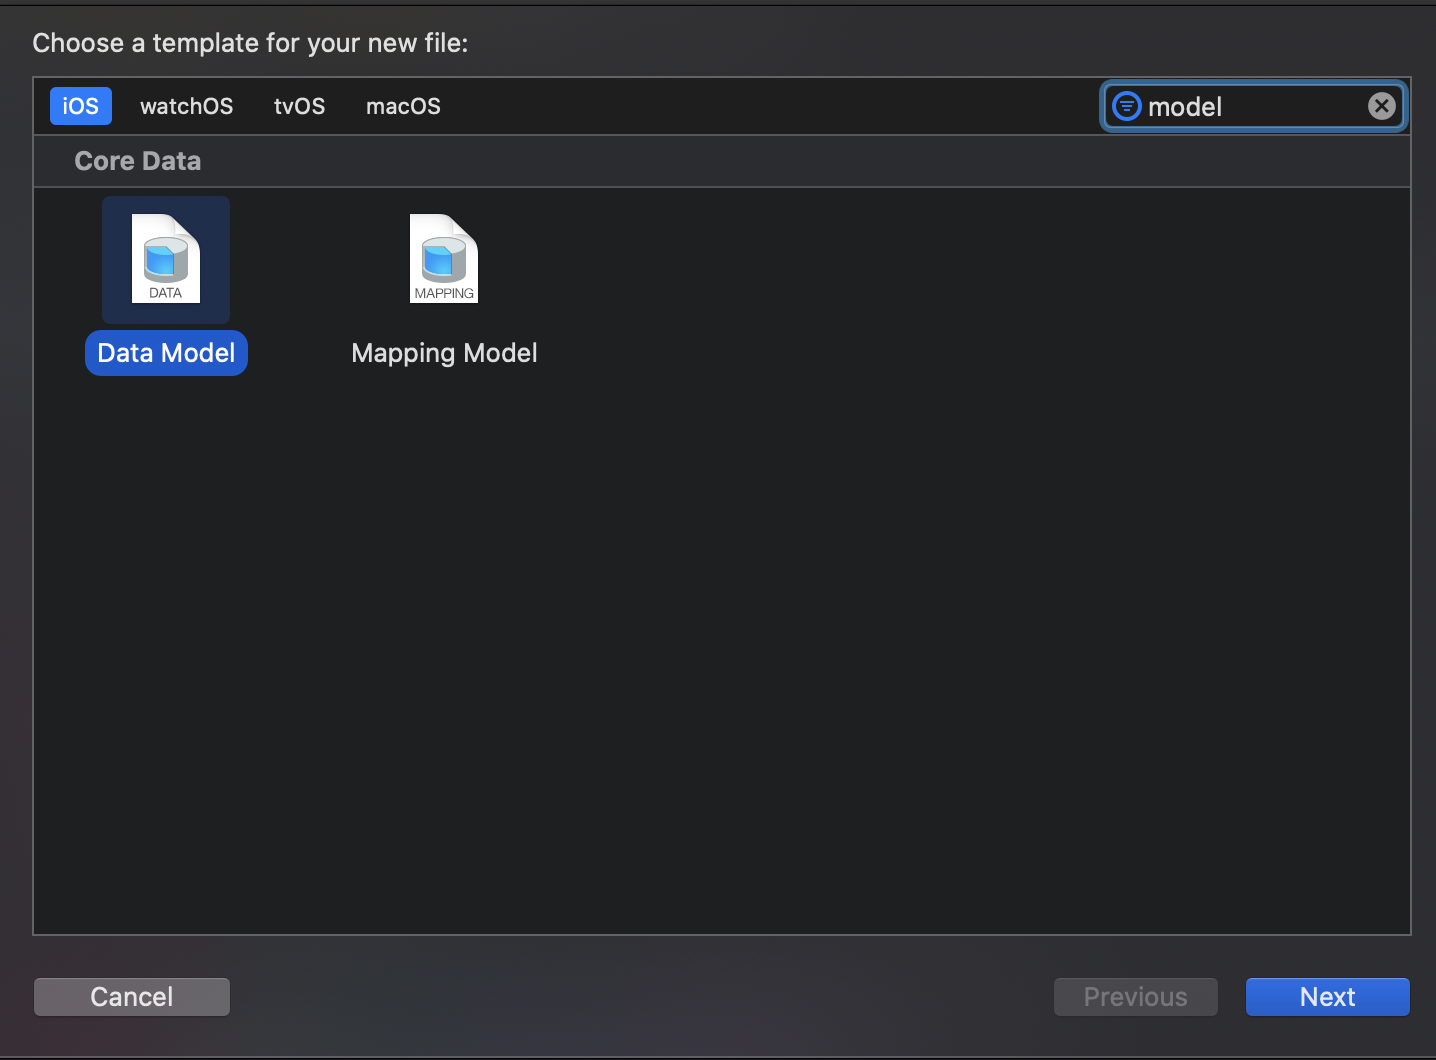
To begin, let's create a new managed object data model file. Click on Menu Bar > New > File. Select Data Model from Core Data section and click next. You can also type data model from the filter text field to find it. Give it ExpenseTracker.xcdatamodeld as the filename.
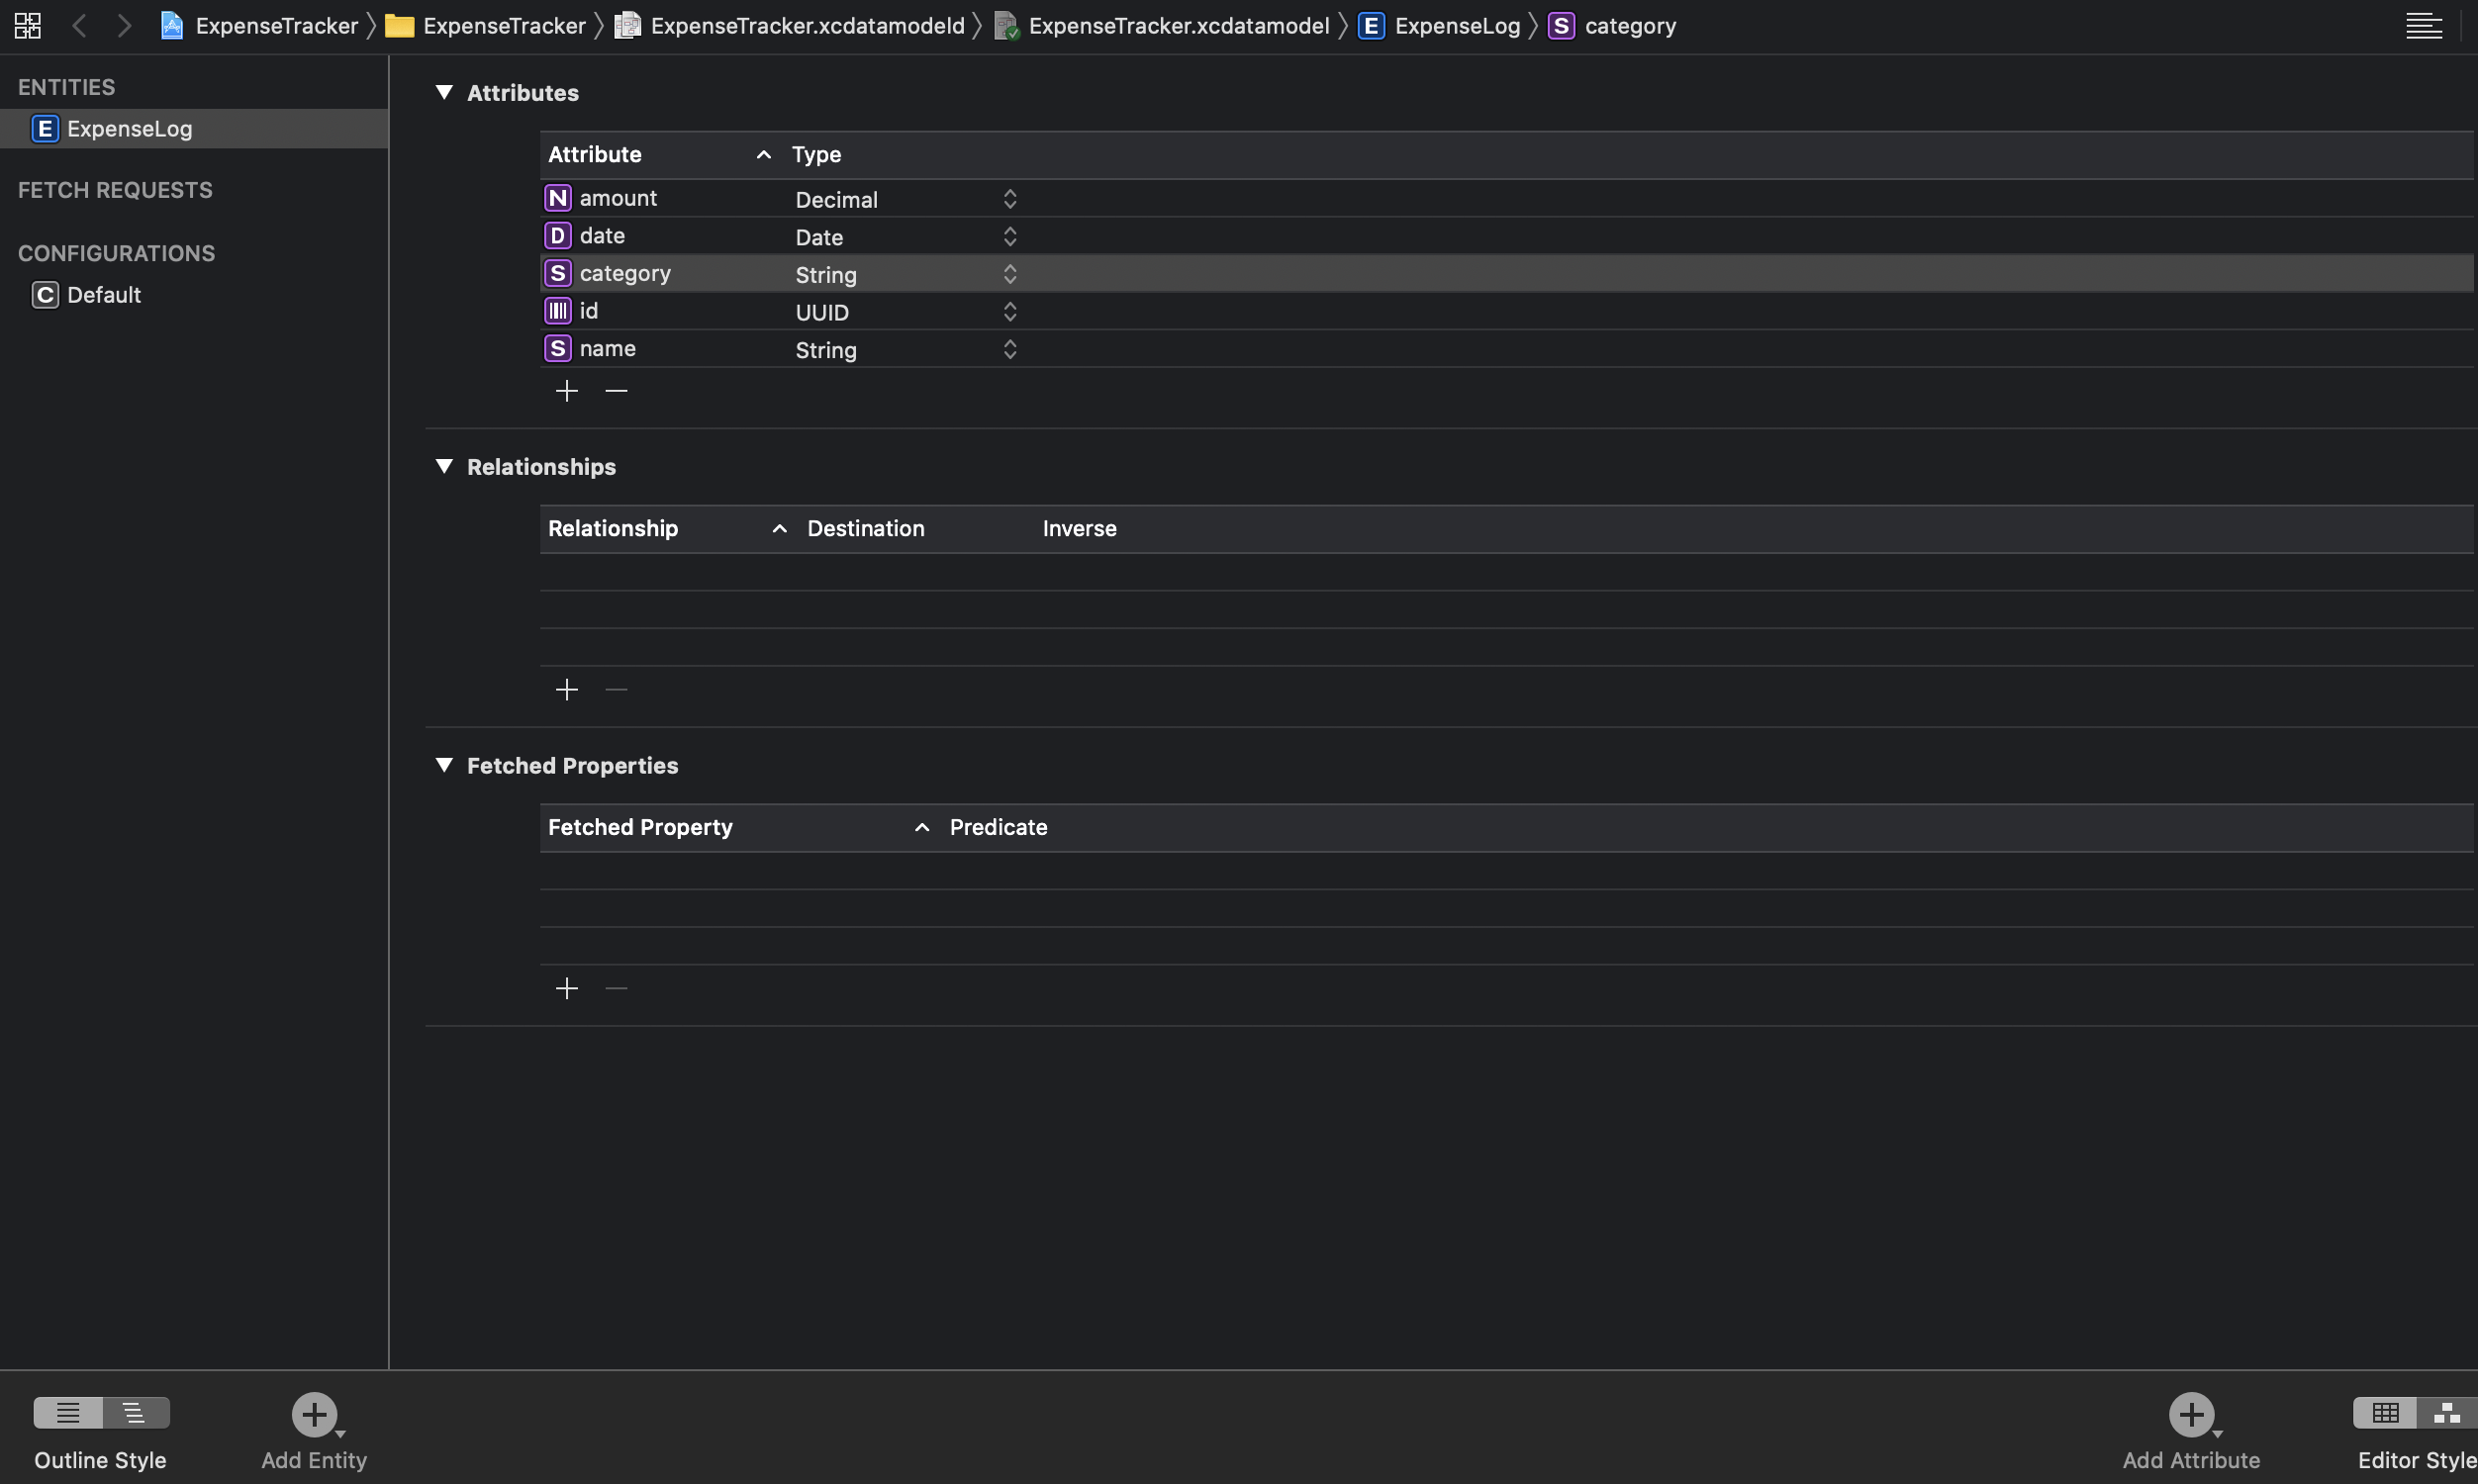
Click on the new file. It will open the Core Data editor. Click on the Add Entity button at the bottom to create one entity. Rename the entity to Expenselog. Click on the ExpenseLog, from the editor attributes section, click on + button 5 times to create new attributes. Here are the attributes with name and type association:
amount:Decimal.date:Date.category:String.id:UUID.name:String.
Rename all the attributes to match the list above. Xcode will automatically generate the managed object model subclass for the ExpenseLog. Close and reopen the Xcode to make sure the autogenerated class is added correctly to the project by Xcode.
Create Core Data Stack and Inject Managed Object Context Dependency
Before we can use Core Data, we need to initialize a NSPersistentContainer at first. We will encapsulate this into the CoreDataStack class. In the initializer, we pass the containerName for initializing NSPersistentContainer, the container name itself is the name of the xcdatamodeld file, which in our case is ExpenseTracker.
Using NSPersistentContainer that was introduced by Apple in iOS 10, we don't have to manually initialize all Core Data Stacks such as the persistent store coordinator, description, file URL, main managed object context. It will automatically handle it for us as well as exposing property for the UI context and a function to generate a background thread context.
The ManagedObjectContext class itself will be the main workhorse where all the managed object models will be stored. It is not a thread-safe object, so we have to be very careful only to use the main thread context when fetching data from UI. A background thread context is suitable when we want to import large datasets from an API on the internet.
Create a new Swift File named CoreDataStack and copy the following code below. I also added a simple extension to save context only if it has changed.
import CoreData

class CoreDataStack {

    private let containerName: String
    var viewContext: NSManagedObjectContext { persistentContainer.viewContext }

    private lazy var persistentContainer: NSPersistentContainer = {
        let container = NSPersistentContainer(name: containerName)
        container.loadPersistentStores(completionHandler: { (storeDescription, error) in
            if let error = error as NSError? {
                print(error.localizedDescription)
            }
            print(storeDescription)
        })
        return container
    }()

    init(containerName: String) {
        self.containerName = containerName
        _ = persistentContainer
    }
}

extension NSManagedObjectContext {

    func saveContext() throws {
        guard hasChanges else { return }
        try save()
    }
}
Next, we will inject the managed object context into the root view using SwiftUI Environment so all the children view can explicitly receive this using environment keypath. We will do this in the SceneDelegate, copy the following code into the file.
class SceneDelegate: UIResponder, UIWindowSceneDelegate {

    var window: UIWindow?

    var coreDataStack = CoreDataStack(containerName: "ExpenseTracker")

    func scene(_ scene: UIScene, willConnectTo session: UISceneSession, options connectionOptions: UIScene.ConnectionOptions) {

        let contentView = ContentView()
            .environment(\.managedObjectContext, coreDataStack.viewContext)

        if let windowScene = scene as? UIWindowScene {
            let window = UIWindow(windowScene: windowScene)
            window.rootViewController = UIHostingController(rootView: contentView)
            self.window = window
            window.makeKeyAndVisible()
        }
    }
}
Extend Generated ExpenseLog Managed Object Model
Before we begin integrating the Core Data model to our views, we will create an extension for the ExpenseLog model that will make our life easier later. In here, we declare several properties such as:
categoryEnum. Core Data doesn't support enum as the attribute for an entity. We store thecategoryasString, so using this computed property, we can easily access thecategoryenum type for ourExpenseLog.nameText. Core Data attributes are optional, so to make it easier integrating with SwiftUI, we create a non-optional computed property to return the nameStringwith an empty string as default value.dateText. In ourLogListView, we use a relative date formatted text to display the date of the expense relative to the current date.amountText. This helps us to display theamountas a currency number formatted text.
Create a new Swift file named ExpenseLog+Extension inside the Models folder and copy the following code.
import Foundation
import CoreData

extension ExpenseLog: Identifiable {

    var categoryEnum: Category {
        Category(rawValue: category ?? "") ?? .other
    }

    var nameText: String {
        name ?? ""
    }

    var dateText: String {
        Utils.dateFormatter.localizedString(for: date ?? Date(), relativeTo: Date())
    }

    var amountText: String {
        Utils.numberFormatter.string(from: NSNumber(value: amount?.doubleValue ?? 0)) ?? ""
    }
Before we move to the next section, navigate to Sort.swift file, and implement the sortDescriptor computed property to return the NSSortDescriptor based on the sort type of date or amount. We will use this on the next section to create a fetch request in the LogListView
struct ExpenseLogSort {
      // ....
    var sortDescriptor: NSSortDescriptor {
        switch sortType {
        case .date:
            return NSSortDescriptor(keyPath: \ExpenseLog.date, ascending: isAscending)
        case .amount:
            return NSSortDescriptor(keyPath: \ExpenseLog.amount, ascending: isAscending)
        }
    }
}
Using Fetch Request with Predicate and Sort Descriptor to Query Logs in LogListView
In this section, we are going to add FetchRequest on the LogListView to query our expense logs dataset from CoreData. To query data from a managed object context, we need to use NSFetchRequest. It will have several parameters to configure:
- Entity Name. The string text of the entity named in the Data Model.
- Sort Descriptors. An array of
NSSortDescriptorto configure the order of the result set from Core Data. It uses the property key and sorts it in ascending or descending order. - Predicate (Optional).
NSPredicateobject where we can filter the results set by constraining the result to match a specific expression and value (similar toWHEREstatement in SQL)
In SwiftUI, Apple creates a property wrapper named @FetchRequest where it drives and binds the View using a NSFetchRequest. Whenever the result set changes, it will update the View depending on the state of the data source. It makes sure the View and data source are synchronized automatically.
Navigate to the LogListView file, then copy the following code below:
import SwiftUI
import CoreData

struct LogListView: View {

    // 1
    @Environment(\.managedObjectContext)
    var context: NSManagedObjectContext

    // 2
    @FetchRequest(
        entity: ExpenseLog.entity(),
        sortDescriptors: [
            NSSortDescriptor(keyPath: \ExpenseLog.date, ascending: false)
        ]
    )
    private var result: FetchedResults<ExpenseLog>

    // 3
    init(predicate: NSPredicate?, sortDescriptor: NSSortDescriptor) {
        let fetchRequest = NSFetchRequest<ExpenseLog>(entityName: ExpenseLog.entity().name ?? "ExpenseLog")
        fetchRequest.sortDescriptors = [sortDescriptor]

        if let predicate = predicate {
            fetchRequest.predicate = predicate
        }
        _result = FetchRequest(fetchRequest: fetchRequest)
    }

    // 4
    var body: some View {
        List {
            ForEach(result) { (log: ExpenseLog) in
                Button(action: {
                    // TODO: Implement Edit
                }) {
                    HStack(spacing: 16) {
                        CategoryImageView(category: log.categoryEnum)
                        VStack(alignment: .leading, spacing: 8) {
                            Text(log.nameText).font(.headline)
                            Text(log.dateText).font(.subheadline)
                        }
                        Spacer()
                        Text(log.amountText).font(.headline)
                    }
                    .padding(.vertical, 4)
                }
            }
            .onDelete(perform: onDelete)
        }
    }

    private func onDelete(with indexSet: IndexSet) {
        // TODO: Implement Delete
    }
}
To help you understand the detail of the code, I provided a detailed explanation for each of the number points:
- Using SwiftUI
@Environmentproperty wrapper, we inject the managed object context-dependency from the parent view. - Using
@FetchRequestproperty wrapper, we provide a default initializer and store theFetchedResultsin a property namedresult. The default fetch request won't have any predicate and sort the result by date in descending order. - We create an initializer that accepts an optional predicate and sort descriptor. The predicate will be used to filter the results based on selected categories and search text filter from the
LogListViewwhile sort descriptor will be used to sort the result based on amount or date in ascending or descending order. - Inside the
List, we useForEachpassing theresultofExpenseLogthat is already conforming toIdentifiableprotocol. In each loop, we wrap the row inside aButtonso it can be tappable to invoke a function. The row itself usesHStackcontaining the icon, text for name, formatted date, and amount.
Next, let's move to ExpenseLog+Extension file to add a method to generate NSPredicate based on the selected categories and search text. Copy the following code into the body of extension.
extension ExpenseLog {

    // ...
    // 1
    static func predicate(with categories: [Category], searchText: String) -> NSPredicate? {
        var predicates = [NSPredicate]()

        // 2
        if !categories.isEmpty {
            let categoriesString = categories.map { $0.rawValue }
            predicates.append(NSPredicate(format: "category IN %@", categoriesString))
        }

        // 3
        if !searchText.isEmpty {
            predicates.append(NSPredicate(format: "name CONTAINS[cd] %@", searchText.lowercased()))
        }

        // 4
        if predicates.isEmpty {
            return nil
        } else {
            return NSCompoundPredicate(andPredicateWithSubpredicates: predicates)
        }
    }
}
Here is the detailed explanation for each of the number points above:
- We declare a static function that accepts an array of categories and search text
String. In the beginning, we initialize an empty array ofNSPredicate. - If the categories array is not empty, we map it to an array of string and append an
NSPredicateusing theINexpression to only return the category is contained inside the array. - If search text is not empty, we append the
NSPredicateusingCONTAINS[cd]. This will only return the result if thenameattribute contains thesearchTextStringusingcase insensitive comparison. - If predicates are not empty, we use
NSCompoundPredicateto combine the predicates in the array using similarANDexpression in SQL. If it is empty, we returnnil, which won't filter the results in the fetch request.
Finally, let's move to the LogsTabView file and add the following code where we initialize the LogListView.
LogListView(predicate: ExpenseLog.predicate(with: Array(selectedCategories), searchText: searchText), sortDescriptor: ExpenseLogSort(sortType: sortType, sortOrder: sortOrder).sortDescriptor)
Here, we initialize the LogListView using the predicate from the helper method we create before. The LogListView itself already provided the states for the set of selected filters, selected sort type and sort order, as well as the search text string. ExpenseLogSort sort is a wrapper that accepts the sort type and sort order and generates a sort descriptor based on those two values.
Try to build and run the project to make sure it compiled successfully. As of now, we don't have any data yet to display. So, let's move on to the next section, where we will implement create expense log!
Create or Edit Expense Log from LogFormView
In this section, we'll be working on the create expense log feature using Core Data. The included LogFormView already provide a form where user can input the expense data such as name, amount, category, and date. We just need to handle the save function by creating an expense log managed object and save it into the managed object context.
Navigate to LogFormView file and add the following code.
import SwiftUI
import CoreData

struct LogFormView: View {

    // ....
    //1
    var logToEdit: ExpenseLog?
    var context: NSManagedObjectContext

    // 2
    var title: String {
        logToEdit == nil ? "Create Expense Log" : "Edit Expense Log"
    }
        // ...

        // 3
    private func onSaveTapped() {

        let log: ExpenseLog
        if let logToEdit = self.logToEdit {
            log = logToEdit
        } else {
            log = ExpenseLog(context: self.context)
            log.id = UUID()
        }

        log.name = self.name
        log.category = self.category.rawValue
        log.amount = NSDecimalNumber(value: self.amount)
        log.date = self.date

        do {
            try context.save()
        } catch let error as NSError {
            print(error.localizedDescription)
        }

        self.presentationMode.wrappedValue.dismiss()
    }
}
Here is the detailed explanation for each of the number points above:
- We add two new properties. First, the managed object context (notice we don't use environment to inject this as this View will be presented so it won't be the child of the root view). Second, we add an optional
logToEditproperty that will be passed when we want to edit a log. - We update the
titlecomputed property to dynamically return the title for the navigation bar, depending on whether thelogToEditexists or not. - In the
onSaveTappedmethod, there are two possibilities of the log object depending on whether thelogToEditexists. If it exists, we assign that as the log, otherwise we initialize a newExpenseLogin the context as well as assigning uniqueUUID. Next, we assign all the attributes using the value from the properties of the state. Finally, we just need to save the context and dismiss the presented form view.
Next, let's move to the LogsTabView. In this View, we have a navigation button item where the user can tap to create a new log. In SwiftUI, to be able to present a model view, we can use the sheet modifier. The sheet uses the state to determine whether it should be displayed. In this case, we use isAddFromPresented boolean property to toggle this to true when the user taps on the add button. Inside the sheet, we just need to declare the LogFormView passing the managed object context. Don't forget we also need to inject the managed object context property using the @Environment property wrapper.
struct LogsTabView: View {


      @Environment(\.managedObjectContext)
      var context: NSManagedObjectContext
            // ....

        var body: some View {
        NavigationView {
            ...
            .sheet(isPresented: $isAddFormPresented) {
                LogFormView(context: self.context)
            }
                      ...
        }
    }
}
Finally, let's move on to the LogListView. In this View, the user can tap on the row of the expense log to edit the associated log. In this case, we already wrapped our row inside a Button. Inside the action closure, we just need to assign the logToEdit state property with the selected log. The logToEdit state property will control whether the sheet containing the LogFormView will be presented using the binding passed to the initializer. If logToEdit is not nil, the sheet will be presented. In this case, we declare the LogFormView passing the logToEdit as well as initializing all the form properties using the existing log attributes values.
struct LogListView: View {
    // ...
    @State var logToEdit: ExpenseLog?

    var body: some View {
        List {
            ForEach(result) { (log: ExpenseLog) in
                Button(action: {
                    self.logToEdit = log
                }) {... }
             ...
            .onDelete(perform: onDelete)
            .sheet(item: $logToEdit, onDismiss: {
                self.logToEdit = nil
            }) { (log: ExpenseLog) in
                LogFormView(
                    logToEdit: log,
                    context: self.context,
                    name: log.name ?? "",
                    amount: log.amount?.doubleValue ?? 0,
                    category: Category(rawValue: log.category ?? "") ?? .food,
                    date: log.date ?? Date()
                )
            }
        }
    }
    // ...
}
That's it! Try to build and run the project. Create several logs to play with the filtering and sorting! If you have a problem setting the amount text field, make sure to press enter/return on the keyboard before assigning the value so it can be properly formatted to number.
Delete Expense Log from LogListView
For the deletion of log, we just need to implement the onDelete(with:IndexSet. This method will be invoked when the user performs a left swipe gesture to delete a row in the list. It will pass the IndexSet containing the index of rows. In this case, we can loop, retrieve the log, and pass it to the context for deletion. Also, we need to save the context for the deletion to be committed to the data store.
      private func onDelete(with indexSet: IndexSet) {
            indexSet.forEach { index in
             let log = result[index]
             context.delete(log)
        }
        try? context.saveContext()
    }
Using Expression and Fetch Request to query total expenses sum grouped by category in DashboardTabView
In this section, we are going to focus on the DashboardTabView. We need to fetch the sum of the total expenses for grouped by each of the categories so we can display it in a List as well as the Pie Chart.
Navigate to the ExpenseLog+Extension.swift file and copy the following code into the body of extension.
extension ExpenseLog {

        // ....

        // 1
    static func fetchAllCategoriesTotalAmountSum(context: NSManagedObjectContext, completion: @escaping ([(sum: Double, category: Category)]) -> ()) {

            // 2
        let keypathAmount = NSExpression(forKeyPath: \ExpenseLog.amount)
        let expression = NSExpression(forFunction: "sum:", arguments: [keypathAmount])

        let sumDesc = NSExpressionDescription()
        sumDesc.expression = expression
        sumDesc.name = "sum"
        sumDesc.expressionResultType = .decimalAttributeType

        // 3
        let request = NSFetchRequest<NSFetchRequestResult>(entityName: ExpenseLog.entity().name ?? "ExpenseLog")
        request.returnsObjectsAsFaults = false
        request.propertiesToGroupBy = ["category"]
        request.propertiesToFetch = [sumDesc, "category"]
        request.resultType = .dictionaryResultType

        // 4
        context.perform {
            do {
                let results = try request.execute()
                let data = results.map { (result) -> (Double, Category)? in
                    guard
                        let resultDict = result as? [String: Any],
                        let amount = resultDict["sum"] as? Double, amount > 0,
                        let categoryKey = resultDict["category"] as? String,
                        let category = Category(rawValue: categoryKey) else {
                            return nil
                    }
                    return (amount, category)
                }.compactMap { $0 }
                completion(data)
            } catch let error as NSError {
                print((error.localizedDescription))
                completion([])
            }
        }

    }
}
Here is the detailed explanation for each of the number points above:
- We declare a static method that accepts a managed object context. As this is an asynchronous operation, we'll use a closure as the completion handler passing the tuple array of
Categoryassociated with the value of the total sum for it. - We declare
NSExpressionpassing the keyPath ofamountto the initializer. We create a secondNSExpressionpassing:sumfor the function to the initializer as well as passing the previous expression to the arguments. Finally, we create aNSExpressionDescriptionand assigns the expression and name. The expression result type is a.decimalAttributeTypeas our amount attribute type isDecimal. - We declare
NSFetchRequestpassing theExpenseLogas the entity name. We assigncategoryas the propertiesToGroupBy as we want the result grouped by category. ForpropertiesToFech, we pass the sum expression and category so the request can return those two values in a single result. At last, we set the result type as.dictionaryResultType. In this case, the results will be an array ofDictionarywith values of sum and category instead of managed object model. - At last, we tell the context to execute the request and store the result in property. Then, we applied
mapfor each of result so we can transform it to a tuple of category and value of total sum by parsing the dictionary using thesumandcategorykey. Finally, we pass the array to the closure completion handler.
To integrate this, navigate to DashboardTabView and implement the fetchTotalSums method with the following code.
struct DashboardTabView: View {

    @Environment(\.managedObjectContext)
    var context: NSManagedObjectContext
    // ....

    func fetchTotalSums() {
        ExpenseLog.fetchAllCategoriesTotalAmountSum(context: self.context) { (results) in
            guard !results.isEmpty else { return }

            let totalSum = results.map { $0.sum }.reduce(0, +)
            self.totalExpenses = totalSum
            self.categoriesSum = results.map({ (result) -> CategorySum in
                return CategorySum(sum: result.sum, category: result.category)
            })
        }
    }

}
Here, we just use the static method from ExpenseLog to fetch the total sum for each category. Then, in the completion handler, we use reduce to get the total expenses for all categories and assign it to the totalExpenses state. At last, we map the array of a tuple into an array of CategorySum struct as this type implements Identifiable and will be used to drive the list of categories expense and the Pie Chart.
Try to build and run the project to see the final result of the project!
Conclusion
That's it! Congratulations on building your own expense tracker app using Core Data for persistence. With Core Data, we can create model entities, fetch data using complex predicate query filters, and sort descriptors. We also don't have to worry about view synchronization as we can use @FetchRequest property wrapper to bind between UI and data source change. In the next article, we will explore how we can sync our Core Data to the cloud using CloudKit integration.
Until the next time, let's keep the lifelong learning goes on!
Challenge
I have several challenges for you all to improve this App to be much better in terms of features with your new knowledge. There are several essential features that the App are still missing, such as:
- Monthly dashboard based View. Currently, we have shown all the total sum of expenses without constraining the date. You can improve this by showing current month data at a glance.
- Add an additional date range filter mechanism to filter the data based on the date when querying.
- Add Income log and budget features to the App.