Building Expense Tracker iOS & macOS SwiftUI App with Core Data CloudKit Syncing
Published at Apr 28, 2020
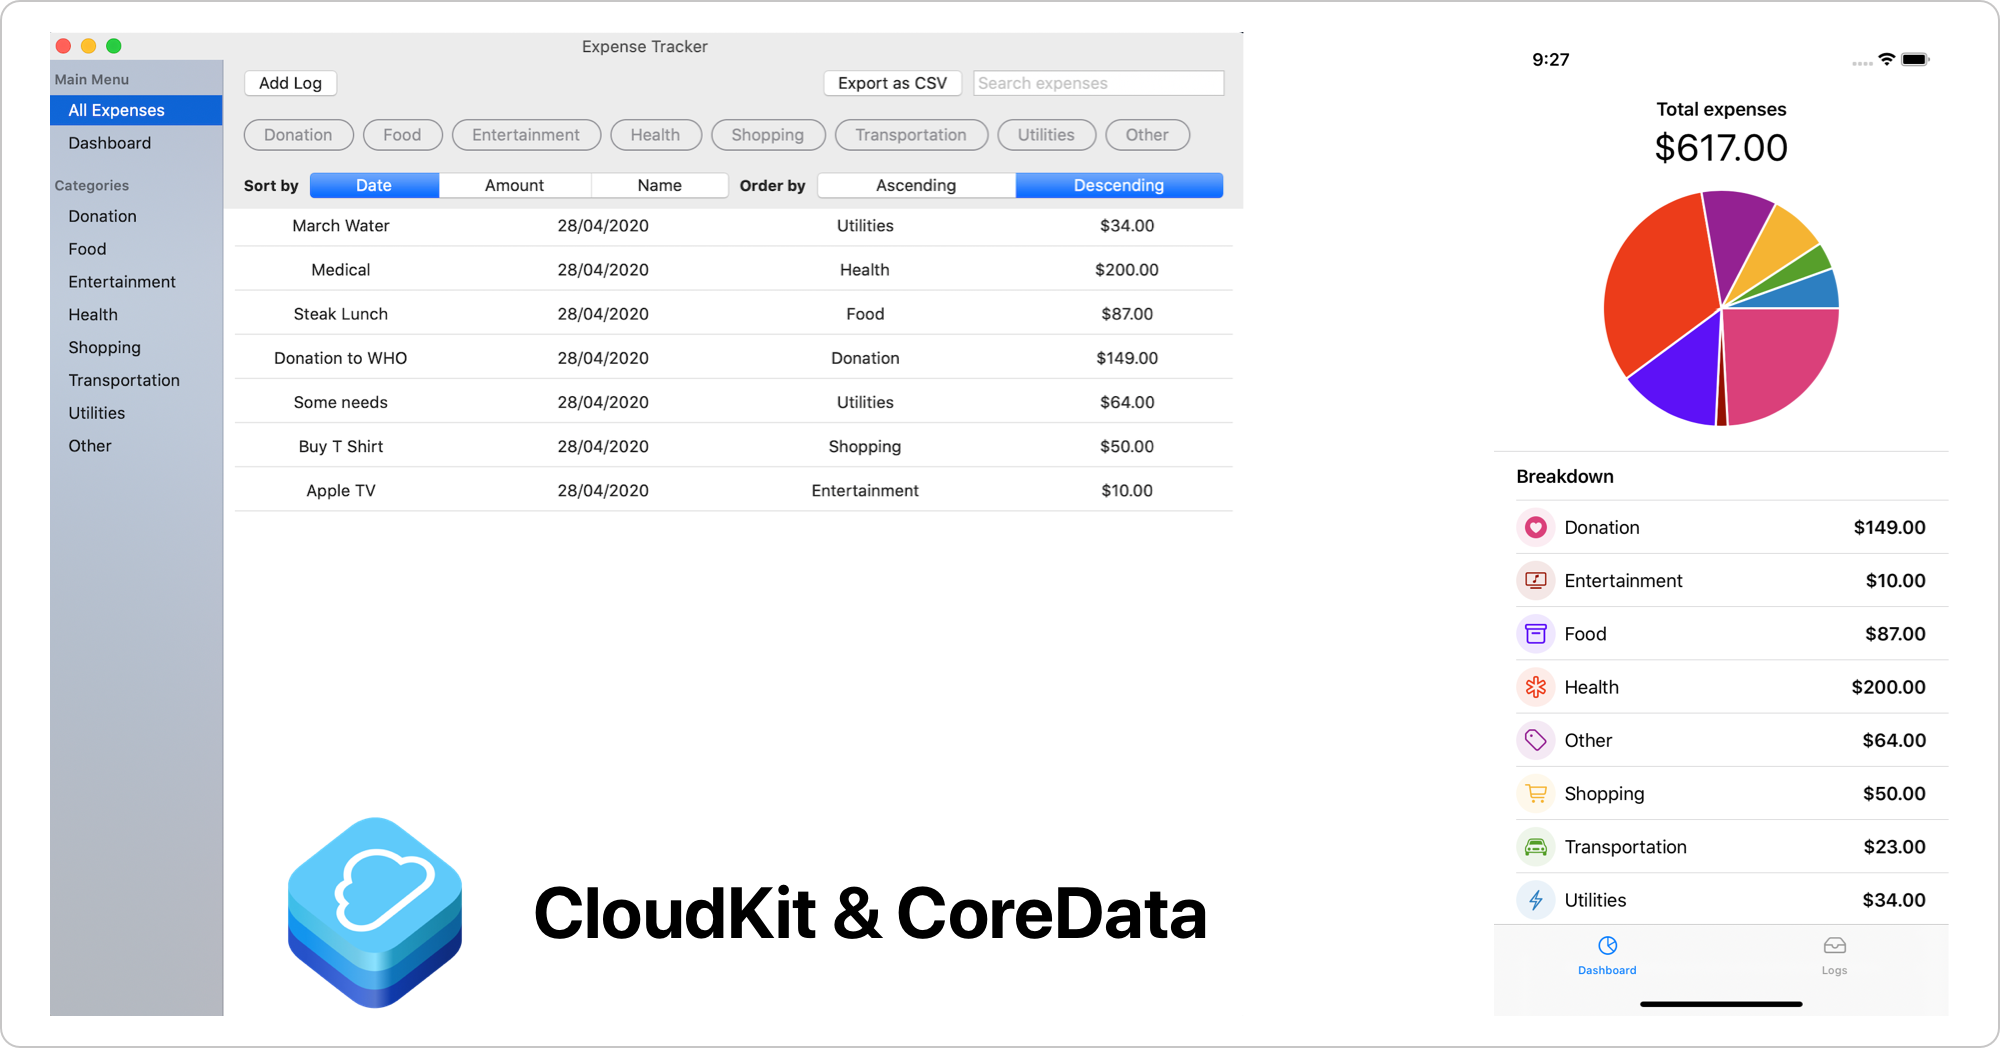
In the previous tutorial, we have learned on how to build expense tracker iOS app with Core Data & SwiftUI.
Continuing on the tutorial, now we are going to expand our expense tracker SwiftUI app to target macOS as well as integrating CloudKit Core Data sync so we can synchronize user data across their iOS and macOS devices.
CloudKit is a framework by Apple where developers can use to build an app with iCloud integration to store data in a database or assets within containers. It provides support for all Apple platforms using native API as well as third party platforms such as Web using CloudKit JS API.
Also, the cost is pretty cheap, as user data and documents are counted toward their own iCloud account total usage. It also provides free tier 10GB Asset Storage, 100MB public database storage, 2GB data transfer, and 40 Request per second. The limit of free tier cost will scale as the number of active users grows. You can calculate the cost using Apple CloudKit cost calculator in their website.
While using CloudKit to store data in the Cloud is fantastic, Apple said it is not a replacement for the app's existing data objects and persistence as it provides minimal offline caching support. It also requires the user to sign in to their iCloud account before they can store their data (user can still access data stored in the public database without sign in).
Apple already has Core Data as an object graph persistence framework that can be used to cache and persist data locally. It is very natural for Apple to integrate Core Data with CloudKit, so managed object instance can be transformed and synced to the CloudKit's CKRecord. We can do this manually, but there are many boilerplates code we need to write edge-case scenarios we need to handle ourselves.
In WWDC 2019, Apple finally introduced Core Data with CloudKit integration by introducing a new persistent container class, NSPersistentCloudKitContainer. It provides many amazing features out of the box automatically to save us writing thousand lines of code such as:
- Create a local replica of all CloudKit data.
- Handle schedules of data syncing and error recovery.
- Transformation of
NSManagedObjecttoCKRecord. - Support multiple stores (local, cloud, different store containers) using
store description configuration.
While it has many amazing features, there are also things we need to consider when architecting our app data model using NSPersistentCloudKitContainer such as:
No unique constraintfor the attribute field.- The
relationshipbetween entities is optional. No Cascade deletesupport between entities.- Need to handle
data collaboration, akaconflict resolution merge policymanually.
You can learn more about the detail and best practices about using Core Data with CloudKit from Apple WWDC 2019 Session 202.
What We Will Build
In this tutorial, we're going to focus on integrating Core Data Cloud with CloudKit using NSPersistentCloudKitContainer to an existing expense tracker iOS & macOS app. By targeting both, we can try the Core Data synchronization between platforms. You can clone the completed project from the GitHub repository.
If you want to learn more about the detail of building the expense tracker app with Core Data from the beginning, i recommend you to read the previous tutorial, Building Expense Tracker iOS app with Core Data & SwiftUI.
Starter Project
To begin, please download the starter project from the GitHub repository. The starter project already contains several main components, such as:
- iOS target for expense tracker app. You can learn more about the project from the previous tutorial.
- A shared folder with a managed object model schema, Core Data Stack, models, extensions, views, and helper utils class. The files in these folders have both app target membership checked so it can be referenced across both iOS and macOS platform.
- macOS app target for the expense tracker app. I already provided all the Views, so we can focus on integrating Core Data CloudKit integration. Feel free to look at the source code of the View. It uses the master-detail template with SwiftUI Navigation View. It provides native macOS interaction such as right-click and export query results to a CSV file using
NSSavePanel.
Here is the breakdown of tasks that we will do to build the completed App:
- Add Capability for iCloud, CloudKit, & Shared Container.
- Add Capability for Background mode remote notification.
- Enable CloudKit in Core Data Managed Object Model default configuration.
- Setup
NSPersistentCloudKitContainerin Core Data Stack. - Running and debugging the App.
Add CloudKit Capability and Container to Targets
First, open the Xcode project and navigate to the project target list and editor. We have the following two targets scheme:
- ExpenseTracker (iOS).
- ExpenseTrackerMac (macOS).
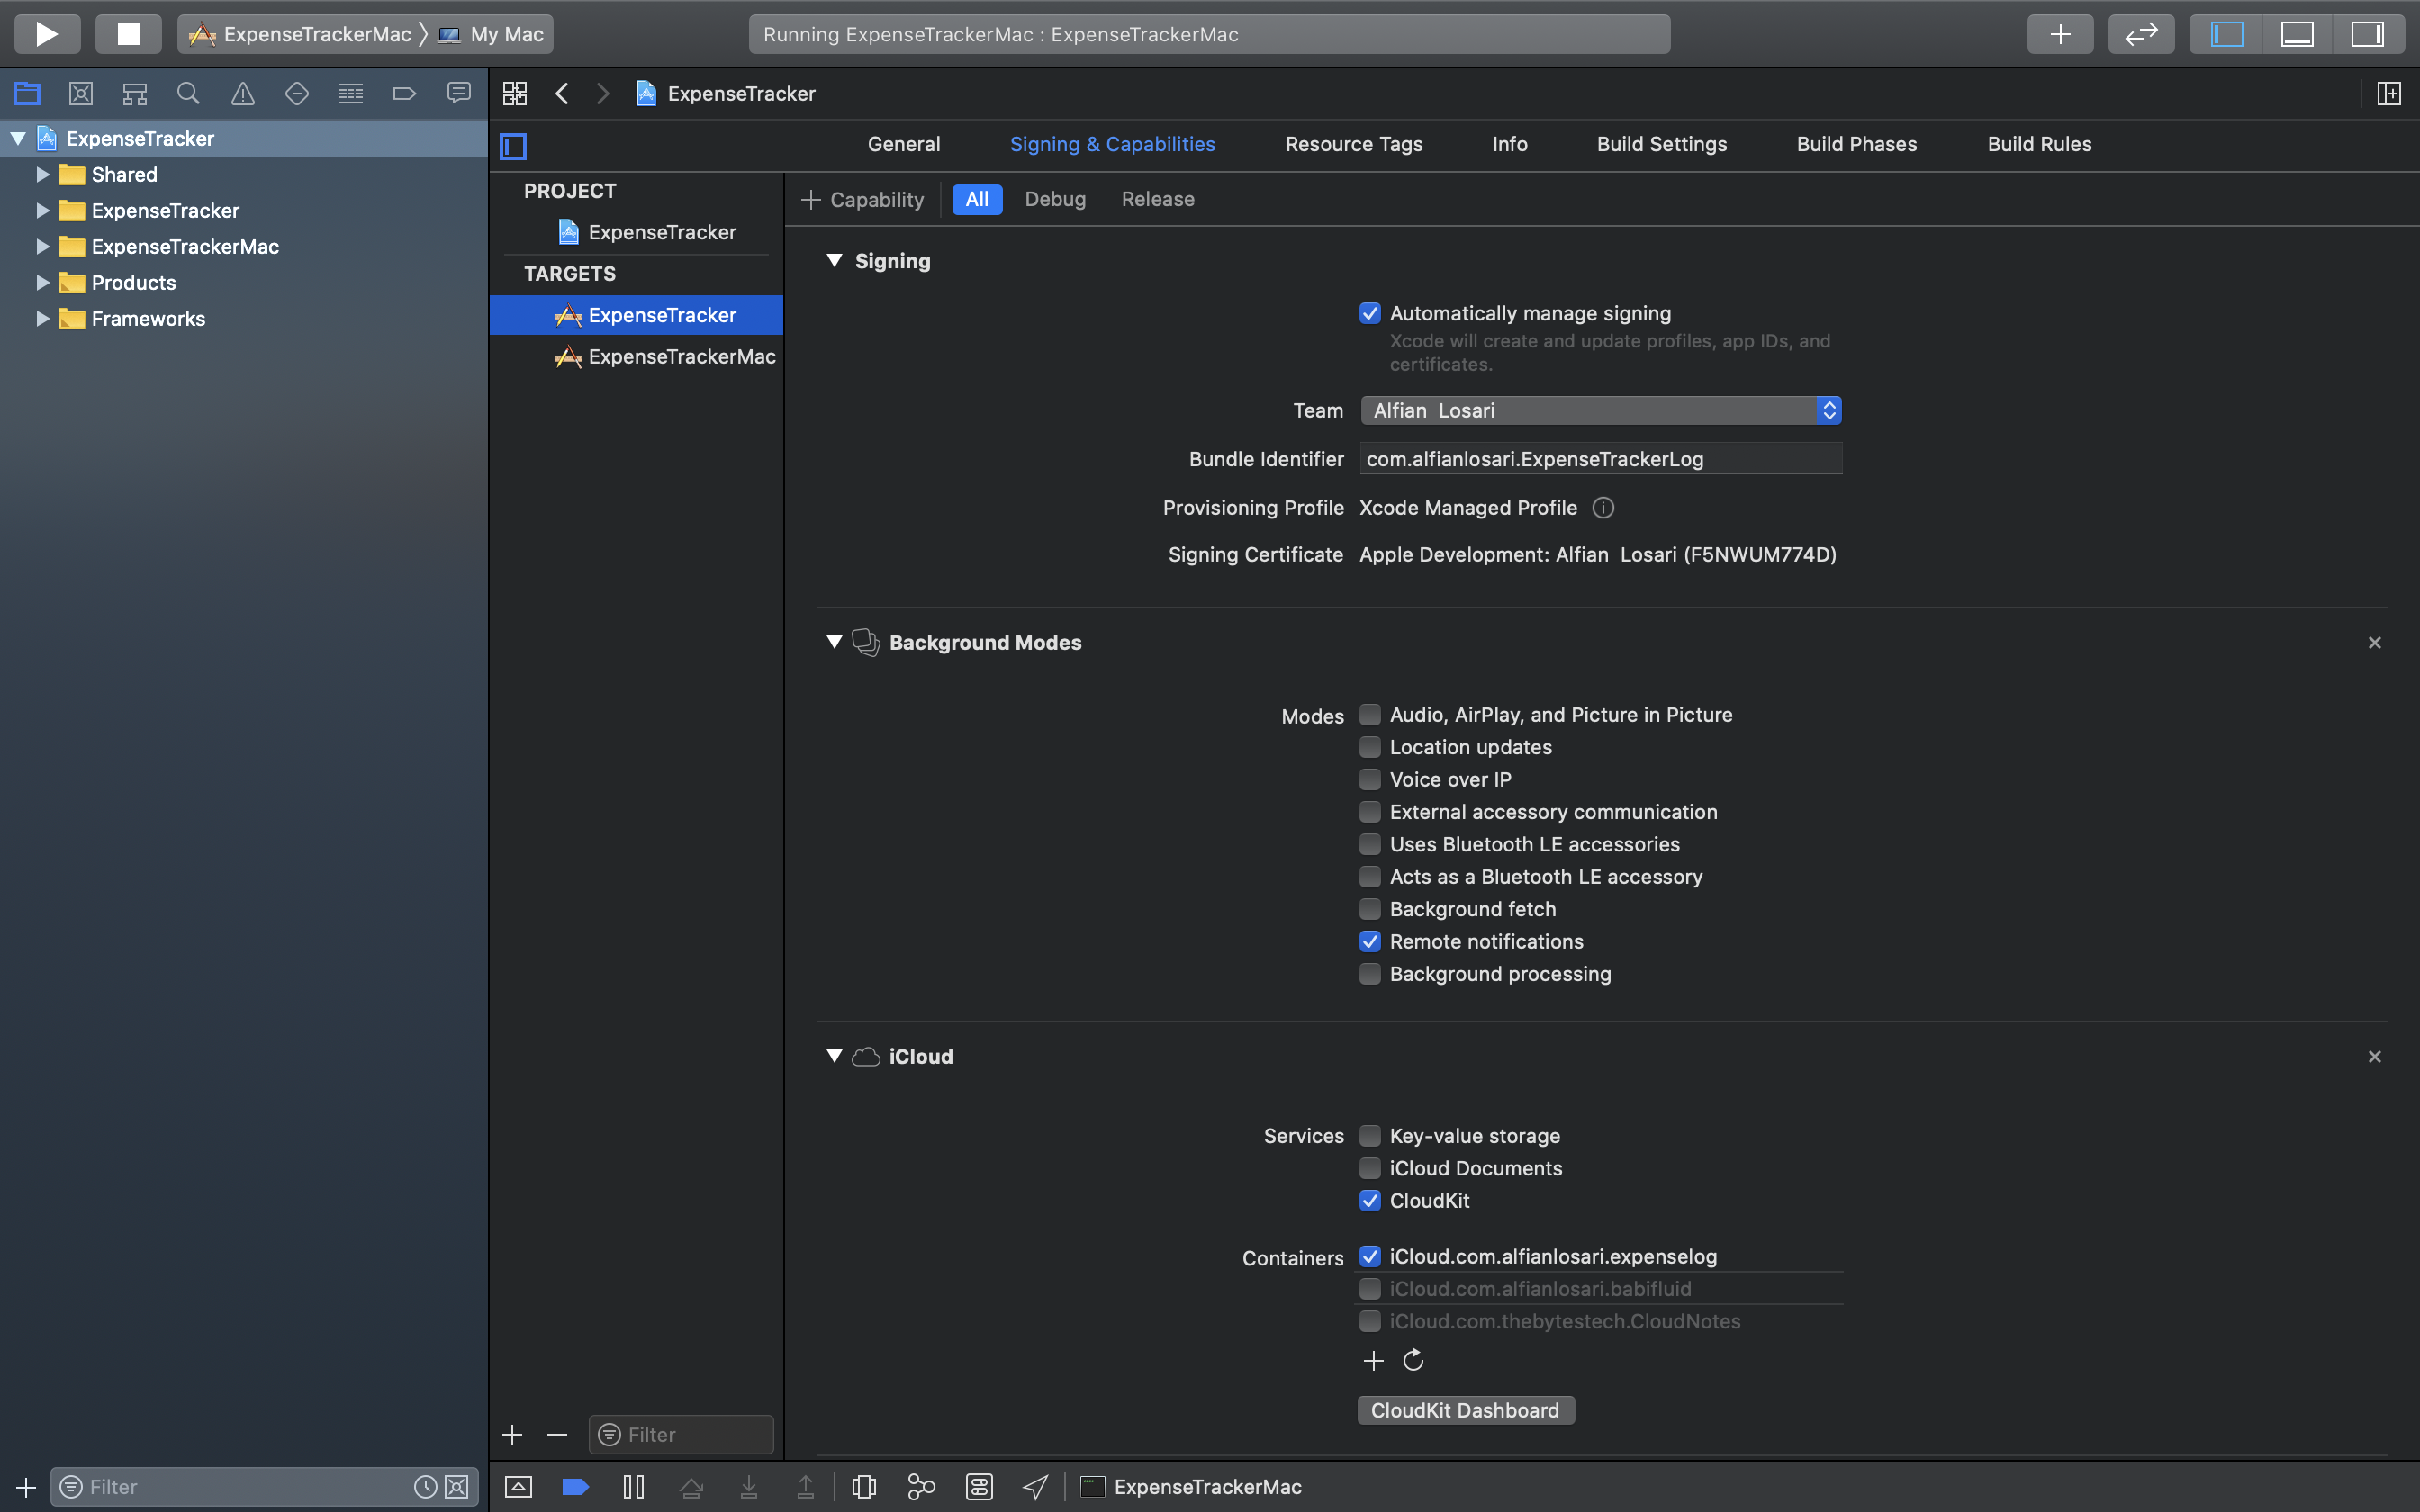
Click on the ExpenseTracker target from the list, then click on the Signing & Capabilities Tab. Provide your own unique App/bundle ID to the target. To add capabilities, click on the + button and type iCloud to the search text field to find and add it. Check the CloudKit checkbox to enable it. After that, add an iCloud container with your unique identifier. Make sure to check the box.
Next, we need also to add background mode capability so our App can be notified when new data arrives in the background via push notification. Click on the + button, search background mode from the search text field, and add it. Check the remote notification from the checkbox to enable it.
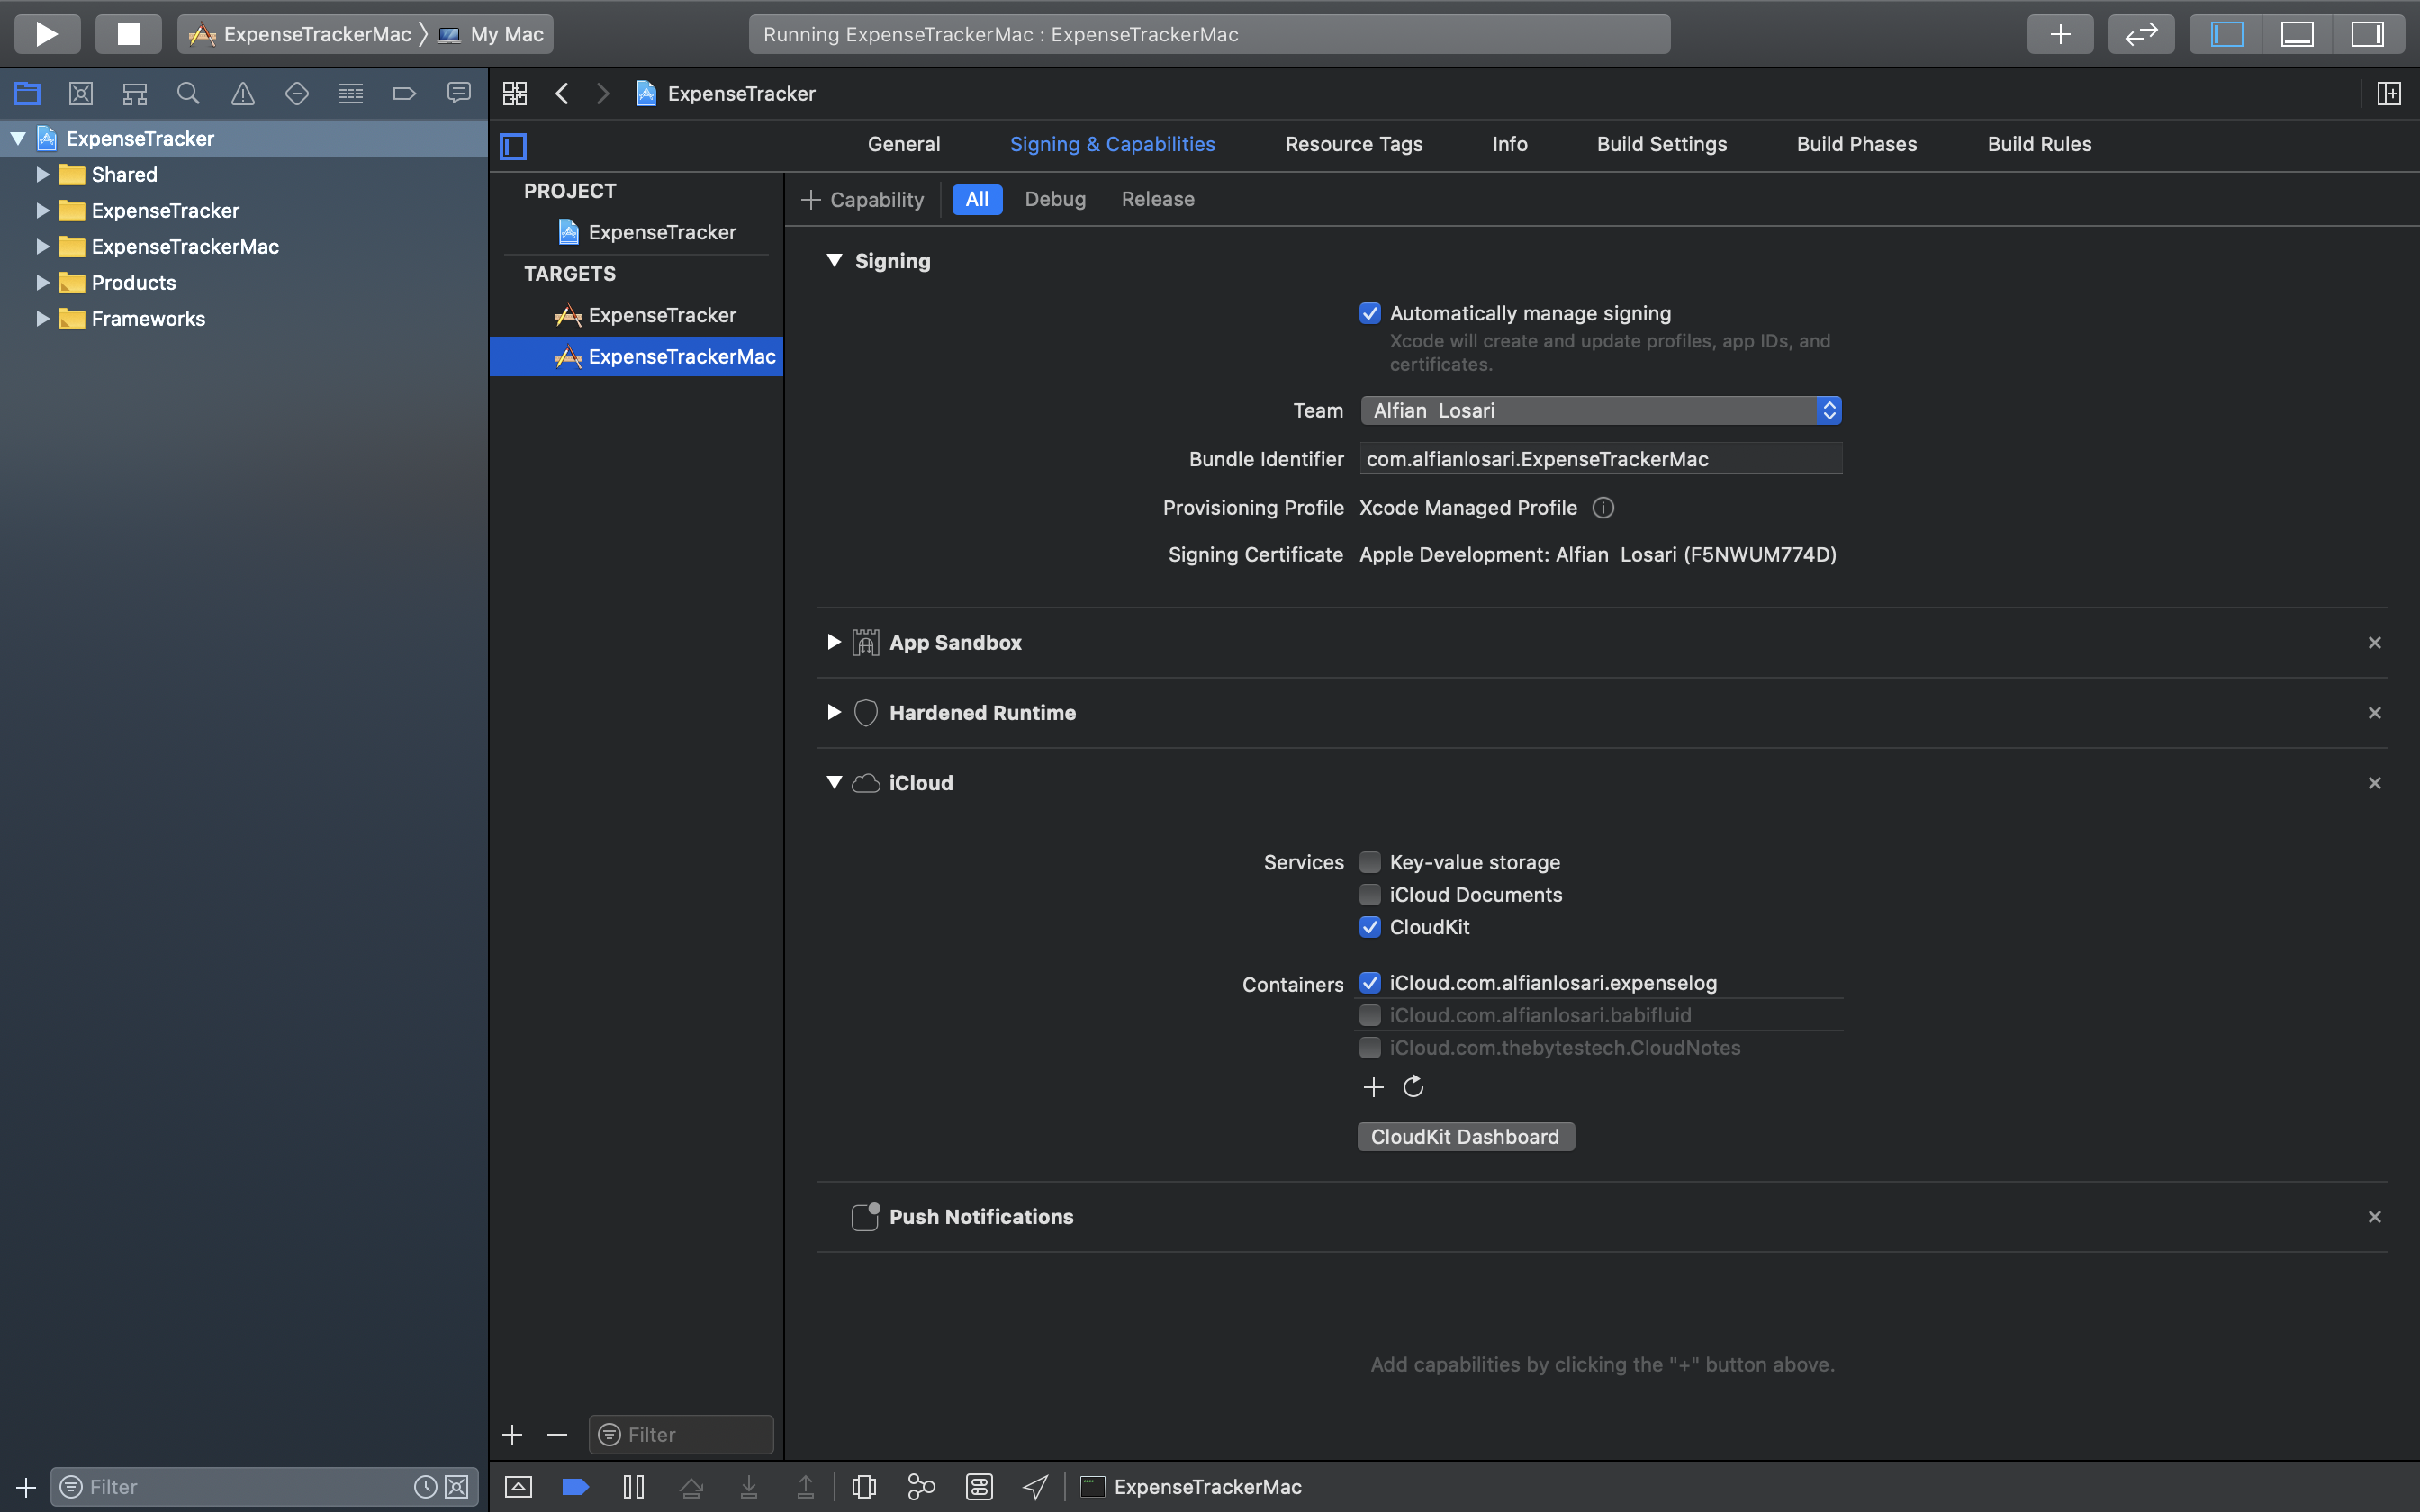
That's it! let's move to the ExpenseTrackerMac target and do the same steps to add capabilities.
Enable CloudKit in Core Data Managed Object Model
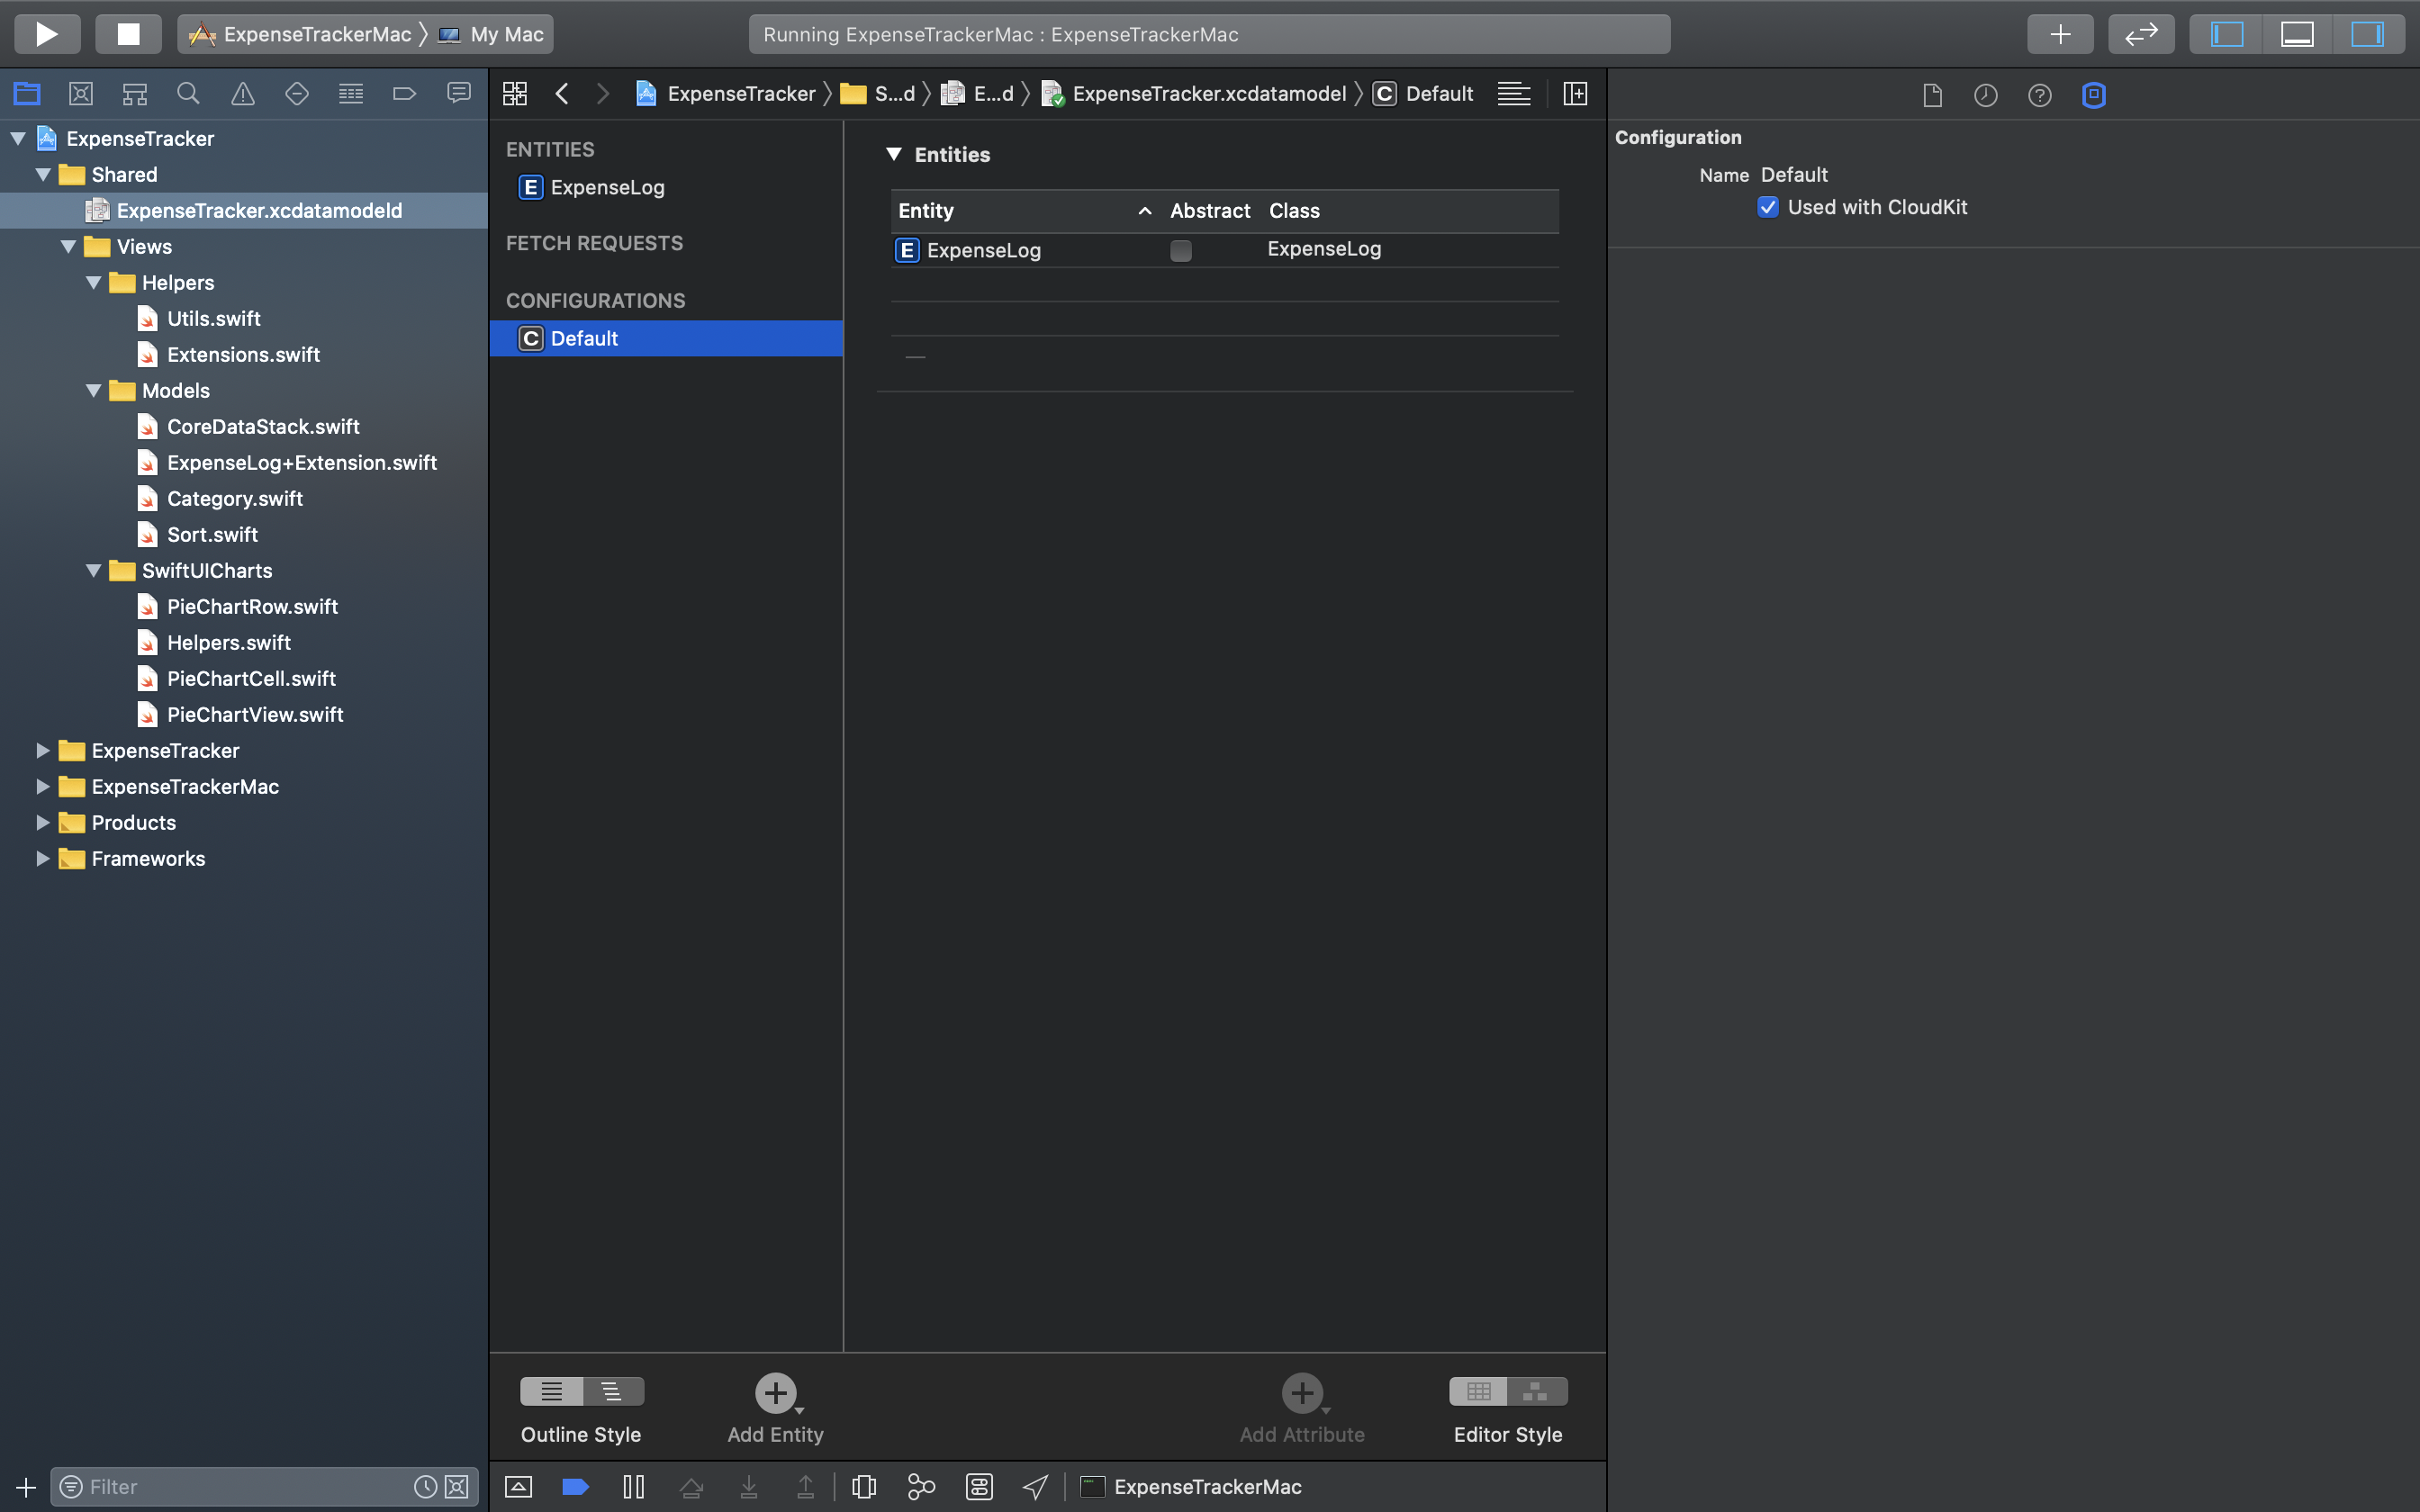
Next, find the ExpenseTracker.xcdatamodeld file from the project navigator, then click it to open the Core Data editor.
From the configuration section, click on default. As you can see, the ExpenseLog entity is already added by default. From the right Core Data Model inspector, check on used with CloudKit box to enable it.
That's it! We have enabled Core Data to our default store. Apple also provides multiple stores support to the NSPersistentCloudKitContainer, for example, a local-only store and a cloud store with CloudKit syncing. We can do this by adding configurations and explicitly add each store description when initializing NSPersistentCloudKitContainer.
Setup NSPersistentCloudKitContainer in Core Data Stack
From the project navigator, open the CoreDataStack.swift file. Here, we just need to change the default NSPersistentContainer to use NSPersistentCloudKitContainer. As we are using default configuration with a single store, we only need to initialize it and passing the managed object model name. By default, it will automatically use the CloudKit store description using the first CloudKit container identifier from the app capabilities entitlement.
Navigate to SceneDelegate.swift file in iOS target. Then, add the following line to the code.
class SceneDelegate: UIResponder, UIWindowSceneDelegate {
        // ...

    func scene(_ scene: UIScene, willConnectTo session: UISceneSession, options connectionOptions: UIScene.ConnectionOptions) {
        coreDataStack.viewContext.automaticallyMergesChangesFromParent = true
        // ...
    }
}
For macOS, we need to add it in the AppDelegate.swift file. Copy the following code.
class AppDelegate: NSObject, NSApplicationDelegate {

    //...

    func applicationDidFinishLaunching(_ aNotification: Notification) {
        coreDataStack.viewContext.automaticallyMergesChangesFromParent = true
        // ...
    }

}
The code will make sure the managed object context automatically merges and update the View whenever the store updates, for example, when syncing data using remote background notification.
That's it! We don't need to manually handle all the scenario for registering remote push notification, scheduling upload, and download tasks!
Running and Debugging the App
In this part, let's try the Core Data CloudKit syncing by running the App. Synchronization for CloudKit is not happening in real-time; it can take about 30 seconds to 1 minute before you can see your changes on other devices. Also, the device needs to enable push notification to make it work. Otherwise, the sync will only happen in the beginning each time the app restarts.
The simulator doesn't support remote push notification as of right now, Xcode 11.4 remote push notification simulation won't work with CloudKit syncing until we restart the App. I recommend you to use iOS physical device for testing. For macOS target, the remote push notification is working as expected when debugging with Xcode.
You also need to be signed in to your iCloud account in both targets as we are storing user records to their iCloud storage.
Build and run the App using both the target scheme, or you can run the App using multiple iOS physical devices. Create several expenses on one device, and your changes should be reflected on your other device from the expense list. (Dashboard view doesn't use @FetchRequest property wrapper, so it doesn't update the View in real-time when the store updated.
If the sync doesn't happen, check the debug log for error and try to make sure you have good internet connection on both devices, then restart the app. You can also see the Core Data and CloudKit debug log from the debug console if you want to have more insight.
Accessing CloudKit Web Dashboard
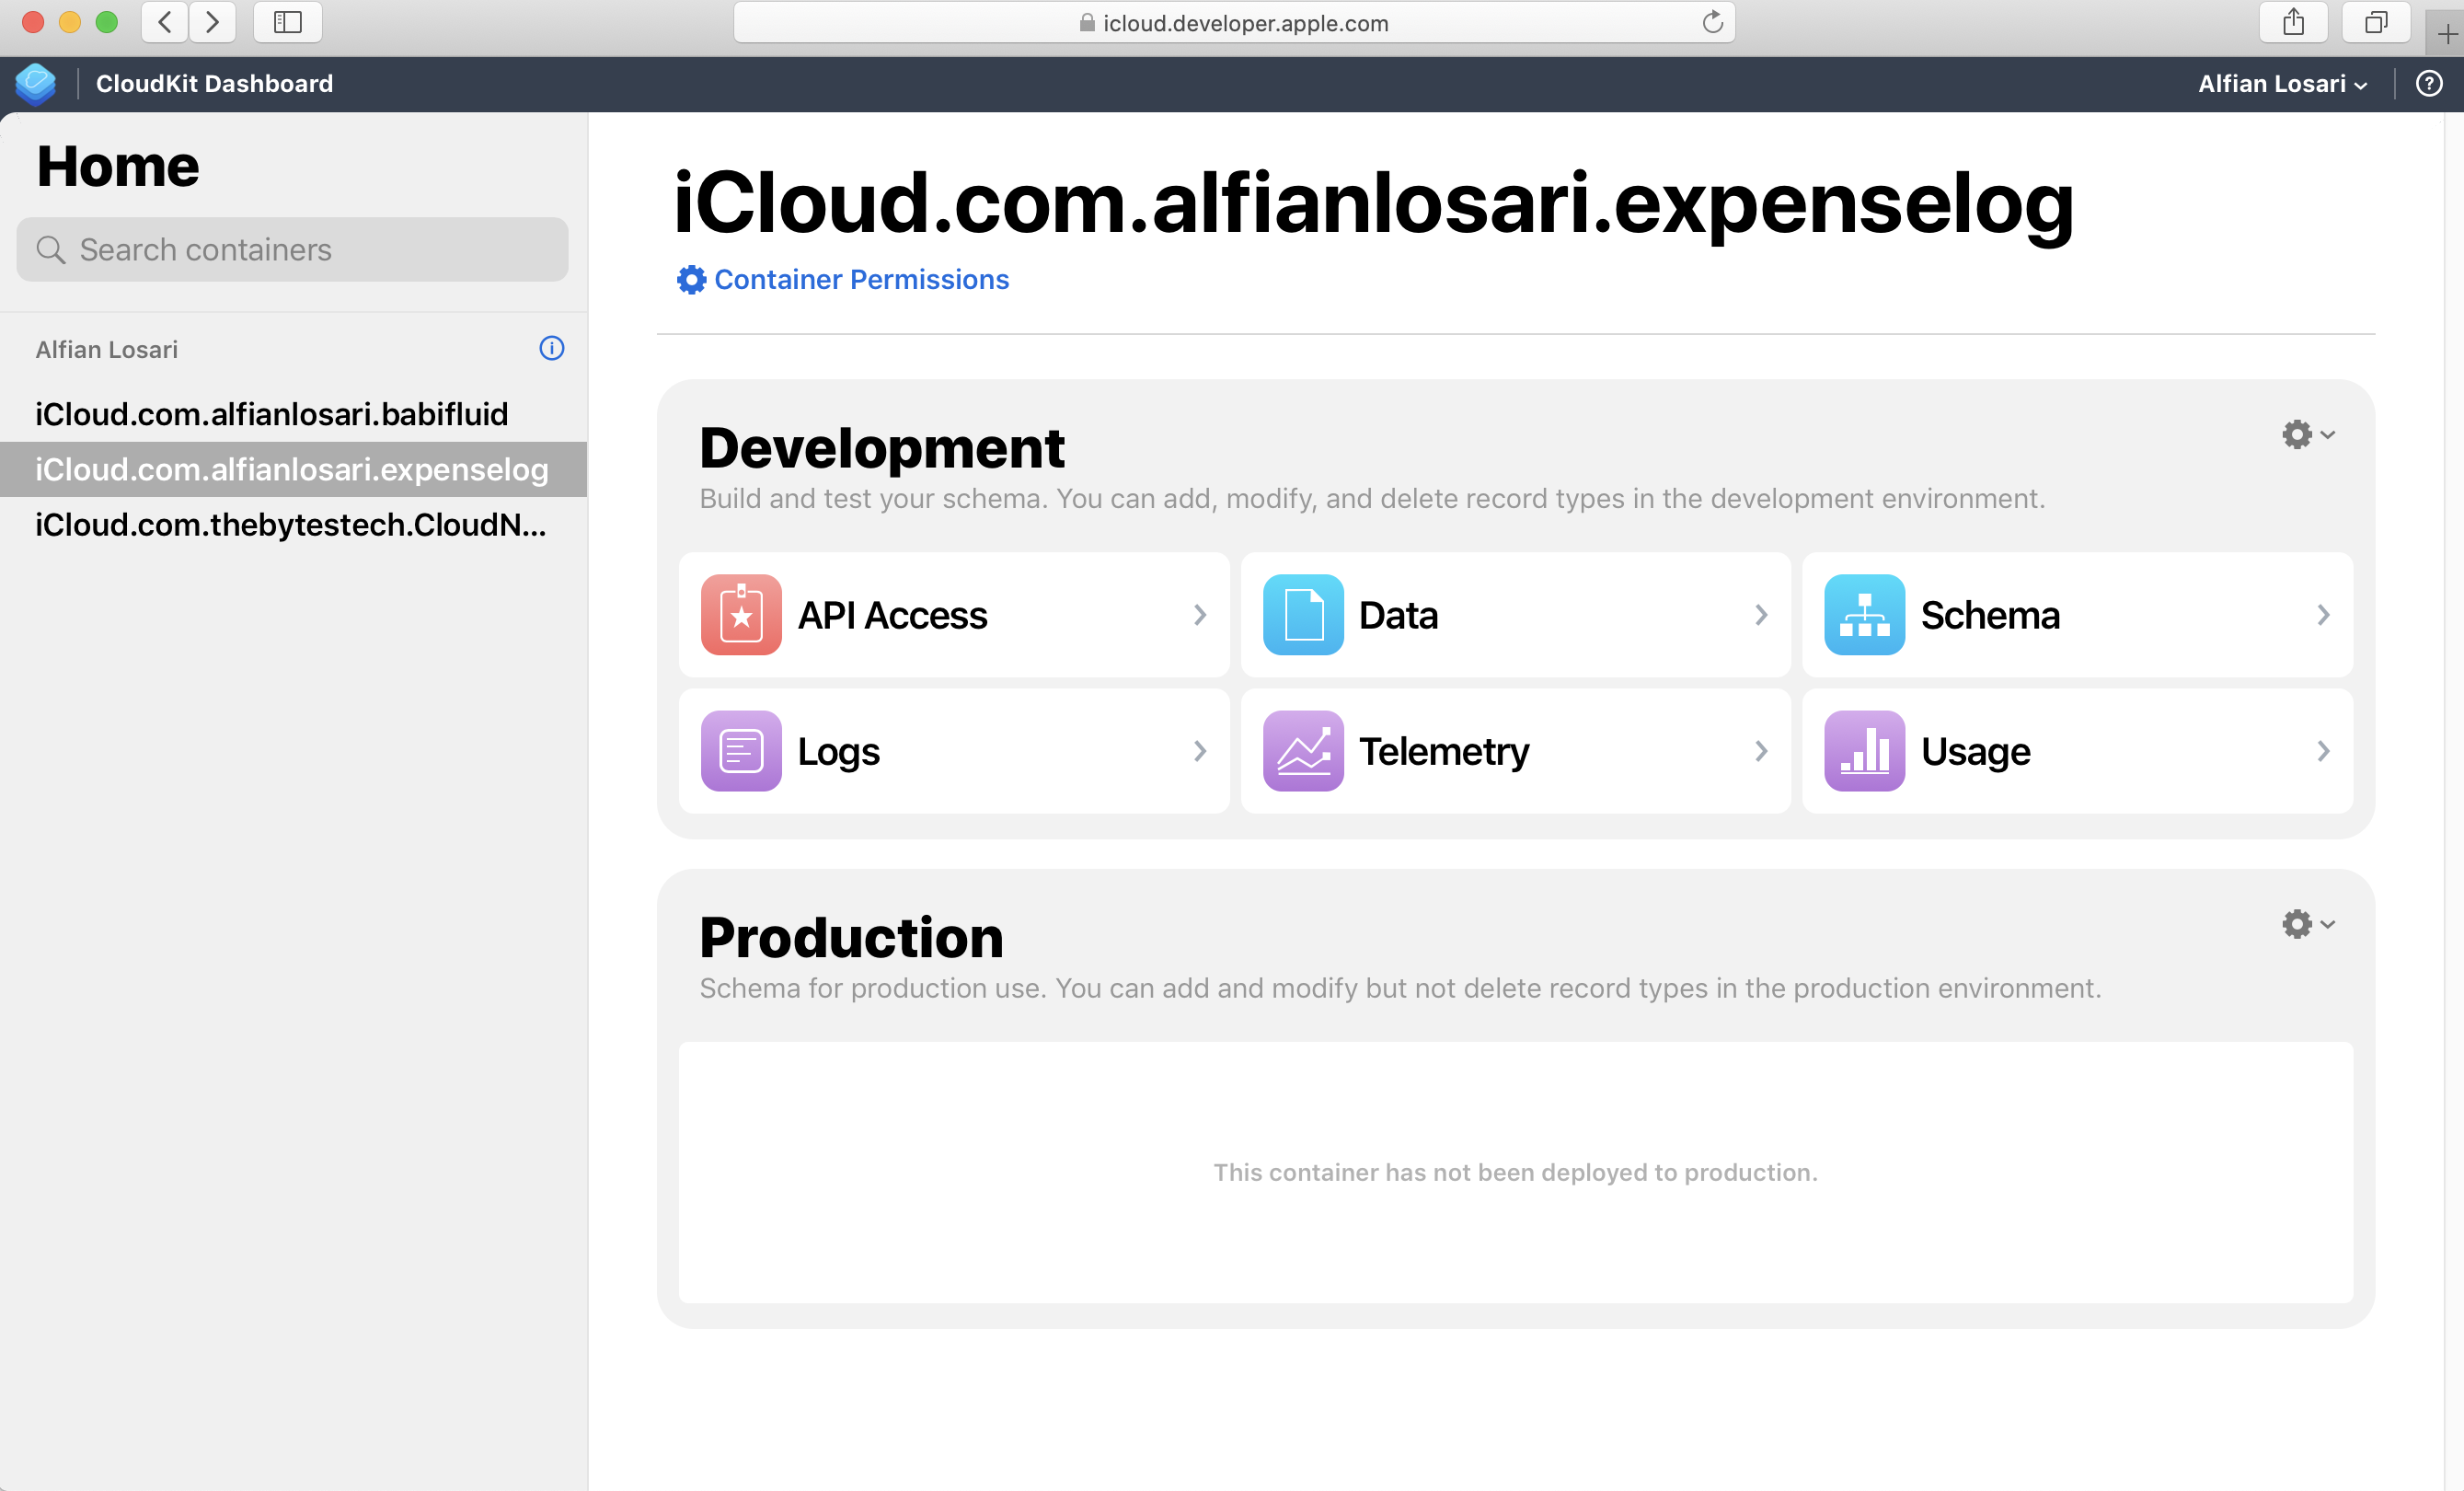
Finally, you can access the CloudKit Dashboard from the Web to fetch records, view usage stats, logs in a container created by your App.
Conclusion
Congratulations! You have successfully built a cross-platform SwiftUI App for both iOS & macOS with seamless Core Data synchronization using CloudKit. As our App has just one single entity, the integration process is pretty smooth and straightforward.
As our app complexity increases with more data entities, relationships, and collaboration models, we need to be extra careful when architecting our Core Data Schema as well as how to handle merge policy with conflict resolution.
I believe with the introduction of NSPersistentCloudKitContainer by Apple; it will be the base foundation of the improvement that we can expect Apple to build on over the years. I hope it will make our life as developers become so much easier to build apps with complex requirements with native data persistence solutions.
Until the next one, let's keep the lifelong learning goes on!