Building Flutter QR Code Generator, Scanner, and Sharing App
Published at Jun 30, 2018
In this article, we will build a Flutter application with the features of scanning QR Code using Camera, generating QR Code with text data, and sharing the image file of QR code to other apps using platform specific image sharing mechanism for both iOS and Android.
What our application consists of:
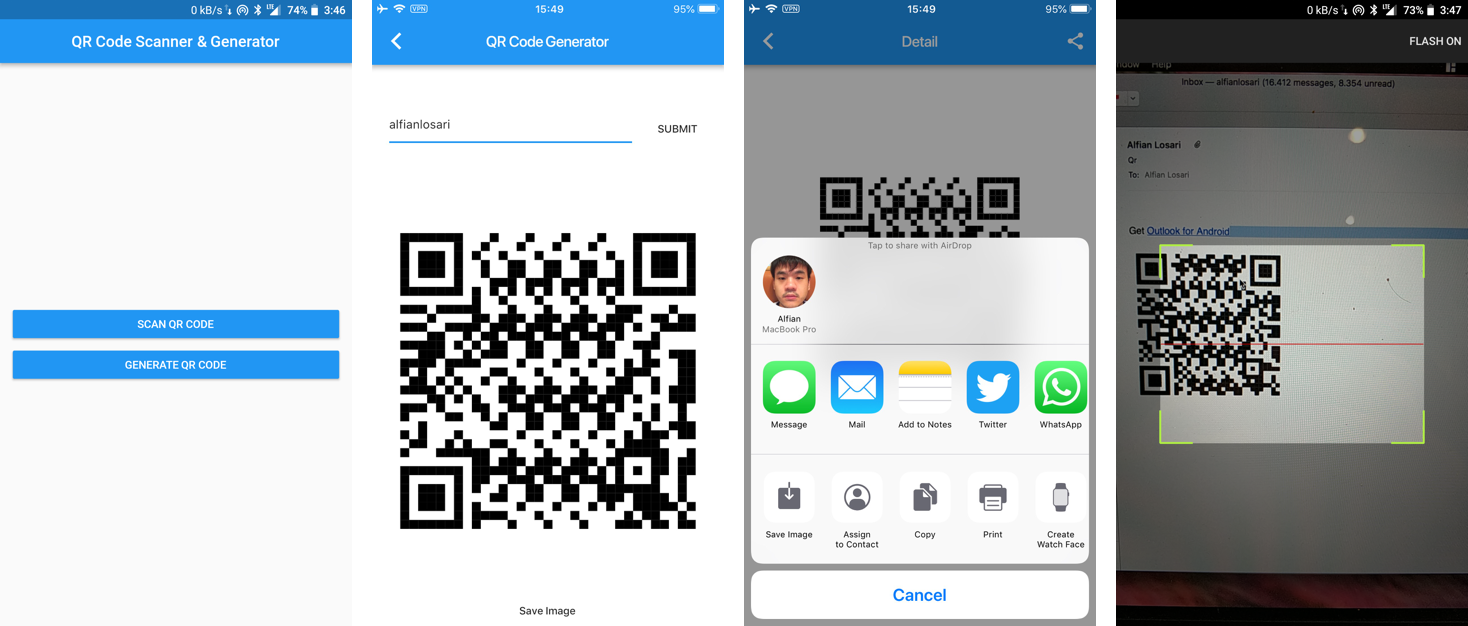
- Home Screen Widget for user to select scan QR Code or generate QR Code.
- QR Code Scanner Widget for user to scan QR code with device camera and view the text result of the QR code.
- QR Code Generator Widget for user to enter text data and generate QR Code Widget, convert widget to image file, and share image file to other application.
Project Dependencies
Our project pubspec.yaml file plugin dependencies consists of:
- path_provider by Flutter Team. A Flutter plugin for finding commonly used locations on the filesystem. Supports iOS and Android.
- barcode_scan by Matthew. A Flutter plugin for scanning 2D barcodes and QR codes as a wrapper using specific iOS mikebuss/MTBBarcodeScanner and Android dm77/barcodescanner library.
- qr_flutter by Luke Freeman. QR.Flutter is a QR code generation and rendering library for Flutter.
dependencies:
    ....
    path_provider: 0.4.1
    barcode_scan: ^0.0.4
    qr_flutter: ^1.1.1
Home Screen Widget
Our app home screen widget allow the user to select whether to perform scan or generate QR Code by tapping on button. The build widget return a Column with 2 RaisedButton as the children, one for routing to generating QR code screen and one for routing to scanning QR code screen when the button is tapped.
import 'package:flutter/material.dart';
import 'package:qr_scanner_generator/scan.dart';
import 'package:qr_scanner_generator/generate.dart';
import 'package:flutter/rendering.dart';

class HomeScreen extends StatelessWidget {

  @override
  Widget build(BuildContext context) {
    return Scaffold(
        appBar: AppBar(
          centerTitle: true,
          title: Text('QR Code Scanner & Generator'),
        ),
        body: Center(
            child:
              Column(
                mainAxisAlignment: MainAxisAlignment.center,
                crossAxisAlignment: CrossAxisAlignment.stretch,
                children: <Widget>[
                  Padding(
                      padding: EdgeInsets.symmetric(vertical: 8.0, horizontal: 16.0),
                      child: RaisedButton(
                          color: Colors.blue,
                          textColor: Colors.white,
                          splashColor: Colors.blueGrey,
                          onPressed: () {
                            Navigator.push(
                              context,
                              MaterialPageRoute(builder: (context) => Scan()),
                            );
                          },
                          child: const Text('SCAN QR CODE')
                      ),
                    ),
                   Padding(
                      padding: EdgeInsets.symmetric(vertical: 8.0, horizontal: 16.0),
                      child: RaisedButton(
                          color: Colors.blue,
                          textColor: Colors.white,
                          splashColor: Colors.blueGrey,
                          onPressed: () {
                            Navigator.push(
                              context,
                              MaterialPageRoute(builder: (context) => GenerateScreen()),
                            );
                          },
                          child: const Text('GENERATE QR CODE')
                      ),
                    ),
                ],
              )
          ),
        );
  }
}
Scan Screen QR Code Widget
The scan screen widget display the start scan with camera button and a Text widget that display the result of the camera QR code scan. It uses the Column Widget as the parent for the Text and Button children.
When user taps on Button, the async scan function is invoked. It will use the BarcodeScanner class from the barcode_scanner plugin dependencies to start the camera viewfinder both on iOS and Android for user to point and scan the QR Code.
If QR code is found, the result of the text will be returned and will be assigned to the barcode instance variable inside the setState function that will trigger widget render. The barcode instance variable will be assigned to Text Widget to display the result of the QR Code scan. If Error occurs, we just set the barcode property with the error message.
import 'dart:async';

import 'package:barcode_scan/barcode_scan.dart';
import 'package:flutter/material.dart';
import 'package:flutter/services.dart';

class ScanScreen extends StatefulWidget {
  @override
  _ScanState createState() => new _ScanState();
}

class _ScanState extends State<ScanScreen> {
  String barcode = "";

  @override
  initState() {
    super.initState();
  }

  @override
  Widget build(BuildContext context) {
    return Scaffold(
        appBar: new AppBar(
          title: new Text('QR Code Scanner'),
        ),
        body: new Center(
          child: new Column(
            mainAxisAlignment: MainAxisAlignment.center,
            crossAxisAlignment: CrossAxisAlignment.stretch,
            children: <Widget>[
              Padding(
                padding: EdgeInsets.symmetric(horizontal: 16.0, vertical: 8.0),
                child: RaisedButton(
                    color: Colors.blue,
                    textColor: Colors.white,
                    splashColor: Colors.blueGrey,
                    onPressed: scan,
                    child: const Text('START CAMERA SCAN')
                ),
              )
              ,
              Padding(
                padding: EdgeInsets.symmetric(horizontal: 16.0, vertical: 8.0),
                child: Text(barcode, textAlign: TextAlign.center,),
              )
              ,
            ],
          ),
        ));
  }

  Future scan() async {
    try {
      String barcode = await BarcodeScanner.scan();
      setState(() => this.barcode = barcode);
    } on PlatformException catch (e) {
      if (e.code == BarcodeScanner.CameraAccessDenied) {
        setState(() {
          this.barcode = 'The user did not grant the camera permission!';
        });
      } else {
        setState(() => this.barcode = 'Unknown error: $e');
      }
    } on FormatException{
      setState(() => this.barcode = 'null (User returned using the "back"-button before scanning anything. Result)');
    } catch (e) {
      setState(() => this.barcode = 'Unknown error: $e');
    }
  }
}
Generate Screen QR Code Widget
The Generate screen widget displays a TextField for user enter the text data that will be used to generate the QR Code widget using the qr_flutter plugin when the user tap on the submit Button. It also provides a Share Button in the Navigation bar to share the image png file to other apps in iOS and Android.
When user has filled the TextField and tap on the submit button, we assign the dataString property value inside the setState method that will trigger widget render. Our Widget will pass the dataString property to the QrImage widget that will process the text and render the qr using custom qr painter. We wrap the QrImage inside the RepaintBoundary widget with a GlobalKey property so we can get the RenderRepaintBoundary later with the key and use the built in Flutter to Image method on the RenderRepaintBoundary widget that will convert the widget to a png file.
import 'package:flutter/material.dart';
import 'package:qr_flutter/qr_flutter.dart';
import 'package:flutter/services.dart';
import 'dart:async';
import 'dart:typed_data';
import 'dart:ui';
import 'dart:io';
import 'package:flutter/rendering.dart';
import 'package:path_provider/path_provider.dart';

class GenerateScreen extends StatefulWidget {

  @override
  State<StatefulWidget> createState() => GenerateScreenState();
}

class GenerateScreenState extends State<GenerateScreen> {

  static const double _topSectionTopPadding = 50.0;
  static const double _topSectionBottomPadding = 20.0;
  static const double _topSectionHeight = 50.0;

  GlobalKey globalKey = new GlobalKey();
  String _dataString = "Hello from this QR";
  String _inputErrorText;
  final TextEditingController _textController =  TextEditingController();

  @override
  Widget build(BuildContext context) {
    return Scaffold(
      appBar: AppBar(
        title: Text('QR Code Generator'),
        actions: <Widget>[
          IconButton(
            icon: Icon(Icons.share),
            onPressed: _captureAndSharePng,
          )
        ],
      ),
      body: _contentWidget(),
    );
  }

  Future<void> _captureAndSharePng() async {
    try {
      RenderRepaintBoundary boundary = globalKey.currentContext.findRenderObject();
      var image = await boundary.toImage();
      ByteData byteData = await image.toByteData(format: ImageByteFormat.png);
      Uint8List pngBytes = byteData.buffer.asUint8List();

      final tempDir = await getTemporaryDirectory();
      final file = await new File('${tempDir.path}/image.png').create();
      await file.writeAsBytes(pngBytes);

      final channel = const MethodChannel('channel:me.alfian.share/share');
      channel.invokeMethod('shareFile', 'image.png');

    } catch(e) {
      print(e.toString());
    }
  }

  _contentWidget() {
    final bodyHeight = MediaQuery.of(context).size.height - MediaQuery.of(context).viewInsets.bottom;
    return  Container(
      color: const Color(0xFFFFFFFF),
      child:  Column(
        children: <Widget>[
          Padding(
            padding: const EdgeInsets.only(
              top: _topSectionTopPadding,
              left: 20.0,
              right: 10.0,
              bottom: _topSectionBottomPadding,
            ),
            child:  Container(
              height: _topSectionHeight,
              child:  Row(
                mainAxisSize: MainAxisSize.max,
                crossAxisAlignment: CrossAxisAlignment.stretch,
                children: <Widget>[
                  Expanded(
                    child:  TextField(
                      controller: _textController,
                      decoration:  InputDecoration(
                        hintText: "Enter a custom message",
                        errorText: _inputErrorText,
                      ),
                    ),
                  ),
                  Padding(
                    padding: const EdgeInsets.only(left: 10.0),
                    child:  FlatButton(
                      child:  Text("SUBMIT"),
                      onPressed: () {
                        setState((){
                          _dataString = _textController.text;
                          _inputErrorText = null;
                        });
                      },
                    ),
                  )
                ],
              ),
            ),
          ),
          Expanded(
            child:  Center(
              child: RepaintBoundary(
                key: globalKey,
                child: QrImage(
                  data: _dataString,
                  size: 0.5 * bodyHeight,
                  onError: (ex) {
                    print("[QR] ERROR - $ex");
                    setState((){
                      _inputErrorText = "Error! Maybe your input value is too long?";
                    });
                  },
                ),
              ),
            ),
          ),
        ],
      ),
    );
  }
}
Generate QR Code PNG Image and Sharing with Platform Specific Channel
When user taps on the sharing button we invoke the _captureAndSharePng function that will get the RepaintBoundary object with GlobalKey passed to RepaintBoundary widget. Then we call the toImage method that will convert the widget to Image object and convert the Image object using toByteData with png format.
After that we get the bytes data, get the application temporary directory and save the data inside the temporary directory. To share the image, we will use platform specific channel API method that will pass the image path and call shareImage on each platform for iOS and Android.
We need to add our shareImage function on each platform project, you can refer to this stack overflow post on how to integrate on both iOS and Android. https://stackoverflow.com/questions/44181343/how-do-i-share-an-image-on-ios-and-android-using-flutter.
On iOS the UIActivityViewController will be used and on Android it will use Intent.ACTION_SEND to send the image file, both will get the file from the temporary directory using the image path passed.
Future<void> _captureAndSharePng() async {
   try {
      RenderRepaintBoundary boundary = globalKey.currentContext.findRenderObject();
      var image = await boundary.toImage();
      ByteData byteData = await image.toByteData(format: ImageByteFormat.png);
      Uint8List pngBytes = byteData.buffer.asUint8List();       final tempDir = await getTemporaryDirectory();
      final file = await new File('${tempDir.path}/image.png').create();
      await file.writeAsBytes(pngBytes);
       final channel = const MethodChannel('channel:me.alfian.share/share');
      channel.invokeMethod('shareFile', 'image.png');
     } catch(e) {
      print(e.toString());
   }
}
Conclusion
It’s a wrap. We have built the Flutter App with the abilities to scan, generate, and share QR code that works both on iOS and Android. Flutter Platform Specific Channel API makes it easy for us to use native libraries such as QR code scanner, image sharing, and communicate back the result to the Flutter App. The project source code is available on GitHub repository. Happy Fluttering and stay tuned!