Building gRPC Client iOS Swift Note Taking App
Published at Sep 9, 2018
gRPC is an universal remote procedure call framework developed by Google that has been gaining interests among many software developers that were developing microservices in recent years because its open source, language neutral, compact binary size, HTTP/2 support, and cross platform compatibility. According to Google:
gRPC is a language-neutral, platform-neutral remote procedure call (RPC) framework and toolset developed at Google. It lets you define a service using Protocol Buffers, a particularly powerful binary serialization toolset and language. It then lets you generate idiomatic client and server stubs from your service definition in a variety of languages
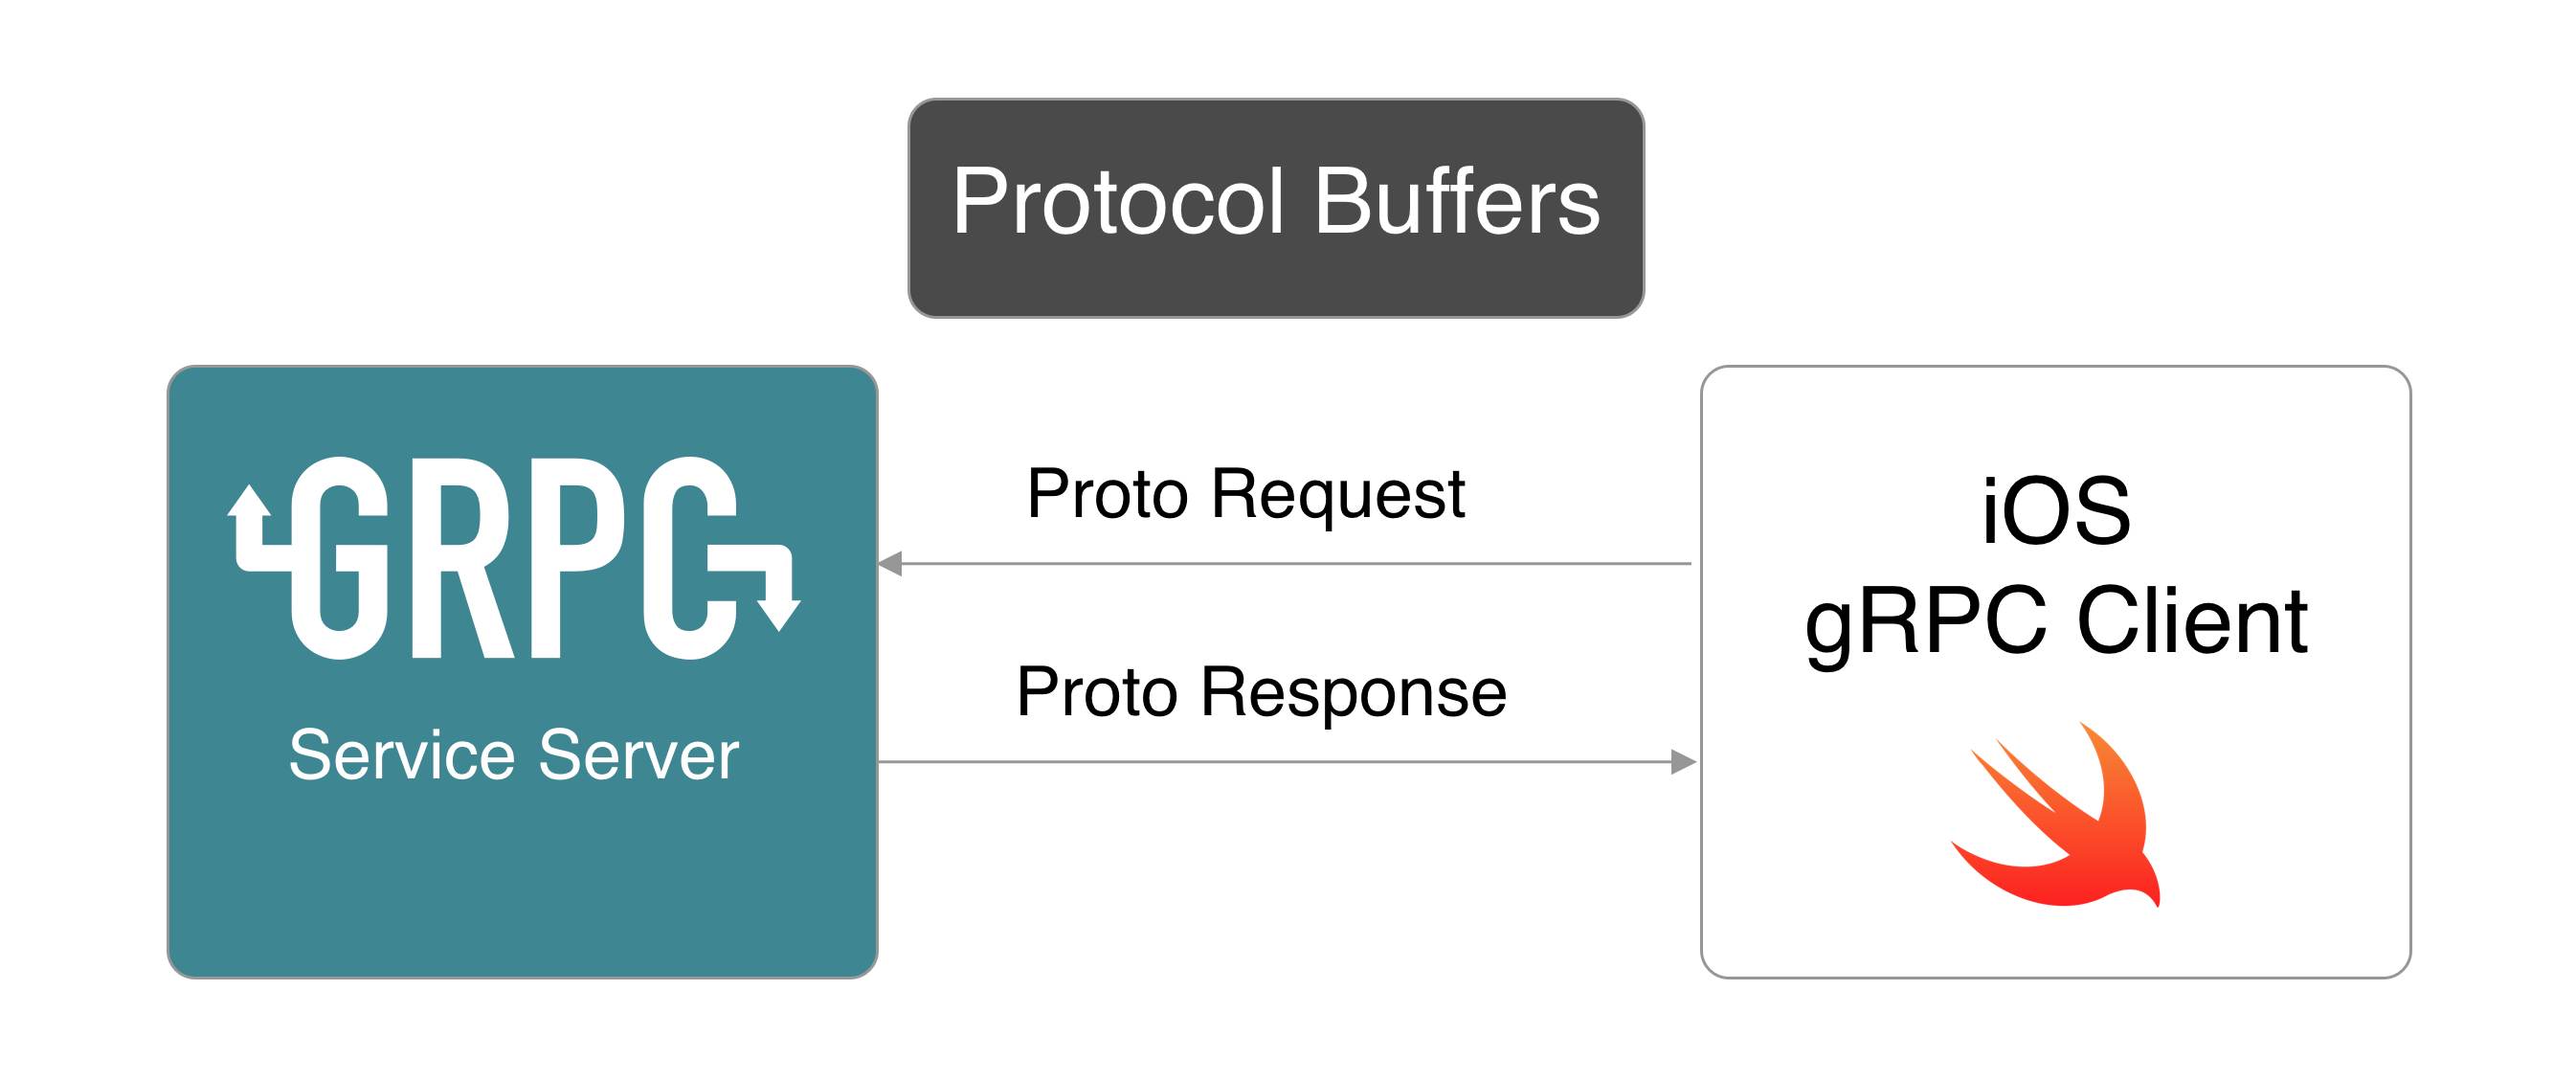
In a nutshell, gRPC server application distributes sets of service methods that can be directly call by the gRPC clients across different machines and platforms with the same parameter and return type. gRPC uses Protocol Buffer binary serialization for the request and response message format between the server and client. It is more compact than JSON and converts nicely to the native language data type using the Protocol Buffer compiler. The compiler accepts proto file that is declared using the Interface Definition Language and compiles it to the target language specified such as Swift or Java. This compact binary format is very well suited for connecting mobile application and web clients.
In this article, we are going to build a iOS Swift application that connects to the gRPC Server that runs locally. The server provides NoteService RPC Service that we can use to get list of notes, create new note, and delete note (CRUD) using iOS App we will build. The full source code for the project is also available at the project GitHub repository at alfianlosari/ios-grpc-note-crud-app.
The are some prerequisites software that you need to install in your machine to follow along this article:
- node.js: Our gRPC Server we will use is built using the node.js gRPC library.
- Xcode 9.4 with Swift 4.1
What we will build
Here are the things that we will be building through this article:
- Setup and Run gRPC Server Locally
- Overview of the Notes.proto file gRPC Service
- Setup Xcode Project and Cocoapod Dependencies
- Compile Proto File with Swift Protocol Buffer Compiler
- Swift Data Repository for gRPC Service
- List Notes
- Create New Note
- Delete Existing Note
Setup and Run gRPC Server Locally
The first step we are going to do is to clone the gRPC Server i have created from the GitHub Repository at alfianlosari/node-grpc-server-note-crud.
I also wrote a Medium article about building the gRPC Server using node.js if you are interested on how the server was built. You can read the detail if you want by clicking the link at alfianlosari/buidling-grpc-service-server-note-crud-api-with-nodejs.
Open Terminal and go to your preferred working directory, then type the command below to clone the project into your machine, install the dependencies for the project, and start the server locally.
$ git clone https://github.com/alfianlosari/node-grpc-server-note-crud.git
$ cd node-grpc-server-note-crud
$ npm install
$ npm startServer running at http://127.0.0.1:50051
Overview of the Notes.proto file gRPC Service
Inside the gRPC Server project directory there is a file with the name of notes.proto. This is the file where we declare our Protocol Buffer Messages and gRPC Service. It has 4 models which declared as message with their respective fields. Note that the NoteList Message has a repeated keyword in notes field, repeated means the type of the data is List/Array. It also declares the NoteService Service which provides 5 methods with parameter and return type to perform CRUD of Note. We will compile this notes.proto into Swift Data Type for our iOS App Client later using Swift Proto Buffer Compiler.
syntax = "proto3";

service NoteService {
    rpc List (Empty) returns (NoteList) {}
    rpc Get (NoteRequestId) returns (Note) {}
    rpc Insert (Note) returns (Note) {}
    rpc Update (Note) returns (Note) {}
    rpc Delete (NoteRequestId) returns (Empty) {}
}

message Empty {}

message Note {
    string id = 1;
    string title = 2;
    string content = 3;
}

message NoteList {
    repeated Note notes = 1;
}

message NoteRequestId {
    string id = 1;
}
Setup Xcode Project and Install Cocoapod Dependencies
Now, we are going to create iOS App using Xcode. Open Xcode and create new project with Single View App template. Enter the product name and uncheck all the checkboxes.

Close Xcode and Open the terminal and navigate to the just created Xcode Project working directory. Initialize Cocoapod using pod init, open Podfile using your favorite Text Editor.
$ pod init
$ vim Podfile
Update the Podfile dependencies following the one below:
# platform :ios, '9.0'target 'grpc_note' douse_frameworks!
pod 'SwiftGRPC'end
Save and close the Podfile. then run pod install to install the Cocoapod dependencies.
$ pod install
After the dependencies has been installed, open the project by clicking file with .xcworkspace extension. To be able to call our gRPC service locally, we need to allow insecure HTTP connection by adding key attributes to the info.plist file like the one below:

Compile Proto File with Swift Protocol Buffer Compiler
The next step is to compile the notes.proto file from the gRPC server folder that we had cloned from the GitHub repository earlier using Protocol Buffer and Swift Protobuf Compiler into Swift file.
First we need to download and install Google official Protocol Buffer Compiler. Type the command below into the Terminal to download the ProtocolBuffers v3.51 and install it to the /usr/local/bin $PATH location inside your machine.
$ curl -LOk https://github.com/protocolbuffers/protobuf/releases/download/v3.5.1/protoc-3.5.1-osx-x86_64.zip
$ unzip protoc-3.5.1-osx-x86_64.zip -d proto_buffer && cd proto_buffer
$ sudo cp bin/protoc /usr/local/bin
$ sudo cp -R include/google/protobuf/ /usr/local/include/google/protobuf
$ protoc --version
We also need to download and install Swift Protobuf Compiler 1.0.3 from from Apple GitHub Repository by cloning it from the repository, perform Makefile build, and install to the /usr/local/bin $PATH. Follow the command below inside the Terminal:
$ git clone https://github.com/grpc/grpc-swift.git
$ cd grpc-swift
$ git checkout tags/0.5.1
$ make
$ sudo cp protoc-gen-swift protoc-gen-swiftgrpc /usr/local/bin
Now we need to compile the notes.proto file into Swift file using the Swift Protocol Buffer Compiler we just installed. Inside the terminal, go to the gRPC Server project directory from the first step and run the following command in terminal:
$ protoc notes.proto \
    --swift_out=. \
    --swiftgrpc_out=Client=true,Server=false:.
$ ls | grep swift
There are 2 files that the compiler will create inside the directory, notes.pb.swift and notes.grpc.swift. Now we need to copy the files to our Xcode project. Make sure to check Copy Items if Needed.


Now build the Project to make sure the project build successfully. You can take a peek inside the Swift Files we just copied. We can see that the Protocol Buffer and gRPC Compiler generates Struct for our Message and Class for the NoteService gRPC client that we can use to call our gRPC server. We will start build our iOS App in the next steps!.
Swift Data Repository for gRPC Service
We will use a Data Repository Class as a centralized networking coordinator Singleton object that provides interface for calling the RPC CRUD methods.
Create a file called DataRepository.swift. For implementation, we use the shared Singleton pattern that exposes shared static properties to access the object. We also instantiate the client variable using the NoteServiceClient Class generated from the Swift gRPC Compiler passing the address of our server localhost and secure as false. We will add additional CRUD method function as we get along the article beginning from the List Notes.
import Foundation
import SwiftGRPC

class DataRepository {

    static let shared = DataRepository()
    private init() {}
    private let client = NoteServiceServiceClient.init(address: "127.0.0.1:50051", secure: false)}
List Notes
Our main screen is List Notes Screen that display list of notes in UITableView. We will use the DataRepository to get the Notes from the gRPC Server, so let’s add the listNotes function to the DataRepository that accepts a completion handler for notes and CallResult. Inside the function is invokes the client list function passing Empty Request as the parameter, in the completion handler, it provides 2 optional arguments, notes and result. The result is a CallResult object indicating whether theres is an error. For simplicity we just invoke our completion handler passing the notes array.
class DataRepository {

    ....
    func listNotes(completion: @escaping([Note]?, CallResult?) -> Void) {
        _ = try? client.list(Empty(), completion: { (notes, result) in
            DispatchQueue.main.async {
                completion(notes?.notes, result)
            }
        })
   }
}
Next, we will build the UI. In main.storyboard, delete the existing UIViewController the drag the UITableViewController from Object Library. Select Editor > Embed in Navigation Controller. Add 1 prototype cell with Subtitle style and set the identifier name to Cell. finally set the NavigationController as the initial ViewController.

Let’s create the NoteListViewController which is a UITableViewController subclass. We store the DataRepository and array containing the Note we will get from the server as instances variables. We create a refresh function that triggers the fetching of notes from the DataRepository. In viewDidLoad we add UIRefreshControl to the TableView with the selector of refresh so it will be invoked when user perform pull to refresh. Also we invoke refresh when the view is loaded for the first time.
import UIKit
class NoteListViewController: UITableViewController {
    let dataRepository = DataRepository.shared
    var notes = [Note]() {
        didSet {
            tableView.reloadData()
        }
    }

    override func viewDidLoad() {
        super.viewDidLoad()

        refreshControl = UIRefreshControl(frame: .zero)
        refreshControl?.addTarget(self, action: #selector(refresh), for: .valueChanged)
        tableView.register(UITableViewCell.self, forCellReuseIdentifier: "Cell")

        refresh()
     }

     @objc func refresh() {
         dataRepository.listNotes {[weak self] (notes, result) in
             self?.refreshControl?.endRefreshing()
             self?.notes = notes ?? []
         }
     }

     override func tableView(_ tableView: UITableView, numberOfRowsInSection section: Int) -> Int {
         return notes.count
     }

     override func tableView(_ tableView: UITableView, cellForRowAt indexPath: IndexPath) -> UITableViewCell {
         let cell = tableView.dequeueReusableCell(withIdentifier: "Cell", for: indexPath)
         let note = notes[indexPath.row]
         cell.textLabel?.text = note.title
         cell.detailTextLabel?.text = note.content
         return cell
     }
}
At last, make sure to assign the NoteListViewController as the class inside TableView in main.storyboard. Make sure the gRPC is already running locally and build the project to see list of notes fetched from the server is displaying inside the TableView.

Create New Note
Next, lets’ add insertNote method to our DataRepository. The insertNote method accepts Note as the parameter and a completion handler closure that will be invoked after the call to service is completed. Inside we invoke the client insert method passing the note, the completion handler passes 2 arguments, createdNote and CallResult. We just call our main thread passing the createdNote and result to completion closure.
We will also add custom initializer to the Note struct using Extension, so we can construct new Note object easier passing the title and content.
class DataRepository {

    ...
    func insertNote(note: Note, completion: @escaping(Note?, CallResult?) -> Void) {
        _ = try? client.insert(note, completion: { (createdNote, result) in
            DispatchQueue.main.async {
                completion(createdNote, result)
            }
        })
    }
}

extension Note {

    init(title: String, content: String) {
        self.title = title
        self.content = content
    }
}
To add note in our UI, we will display UIAlertController to the user when they tap on the Navigation Bar Button Item, then we provide textfields to enter the title and content inside the Note List Screen. After user fills the textfields and tap OK Button, we get the title and content String from the textfields, then create a Note object using the custom initializer we created before passing the title and content. Finally we invoke the DataRepository insert passing the Note and completion closure that will invoke refresh method to refresh the data.
class NoteListViewController: UITableViewController {
    ....
    func viewDidLoad() {
        ....
        navigationItem.rightBarButtonItem = UIBarButtonItem(barButtonSystemItem: .add, target: self, action: #selector(add))
        ....
    }

    @objc func add() {
        let alertController = UIAlertController(title: "Add Note", message: "Fill the fields", preferredStyle: .alert)
        alertController.addTextField { $0.placeholder = "Title" }
        alertController.addTextField { $0.placeholder = "Content" }
        alertController.addAction(UIAlertAction(title: "Save", style: .default, handler: { (_) in
            let titleTextField = alertController.textFields![0]
            let contentTextField = alertController.textFields![1]
            guard let title = titleTextField.text, !title.isEmpty,
                  let content = contentTextField.text, !content.isEmpty
            else {
                  return
            }
            let note = Note(title: title, content: content)
            self.dataRepository.insertNote(note: note, completion: {[weak self] (createdNote, _) in
                self?.refresh()
            })
        }))
        alertController.addAction(UIAlertAction(title: "Cancel", style: .cancel, handler: nil))
        present(alertController, animated: true, completion: nil)
    }
    ....

}
Build and run the project, then tap on the add button on the right navigation bar. Then fill the textfields and press ok to see the note is added to the list!

Delete Existing Note
At last for the sake of completeness, we will add the delete existing note method to the DataRepository. The delete note method accepts noteId String as the parameter and a completion handler closure that will be invoked after the call to service is completed. We also will create custom initializer for the NoteRequestId struct that accepts id as the parameter and assign it to the id property.
Inside the delete method we invoke the client delete method passing the NoteRequestID we initialized using the id passed from the function. Inside the completion handler we check if there is no error by checking the success response is exists. Then we invoke the completion handler passing true if it is exists and false if it is not exists.
class DataRepository {
    ....
    func delete(noteId: String, completion: @escaping(Bool) -> ()) {
        _ = try? client.delete(NoteRequestId(id: noteId), completion: { (success, result) in
            DispatchQueue.main.async {
                if let _ = success {
                    completion(true)
                } else {
                    completion(false)
                }
            }
        })
     }

}

    ...
extension NoteRequestId {

    init(id: String) {
        self.id = id
    }
}
Inside our Note List Screen, we will trigger the deletion when user performs swipe to delete interaction to the TableViewCell. We get note using the indexPath.row from the notes array, then invoke the dataRepository delete method passing the note id. At last, inside the completion handler we refresh the data if the completion is success.
class NoteListViewController: UITableViewController {
    ...
    override func tableView(_ tableView: UITableView, commit editingStyle: UITableViewCellEditingStyle, forRowAt indexPath: IndexPath) {
         guard editingStyle == .delete else {
              return
         }
         let note = notes[indexPath.row]
         dataRepository.delete(noteId: note.id) {[weak self](success) in
              if success {
                  self?.refresh()
              }
         }
    }
}
Build and run the project, then perform swipe to delete in one of the tableview cell to trigger the deletion!

Conclusion
We finally finished building our gRPC iOS Client App that has the features to display list of notes, display detail of note, create new note, and delete existing note. Using gRPC in iOS App is quite simple and easy, we don’t even have to care and implement the manual JSON decoding to Swift object. In real life scenario, there have already been many production Google iOS Client Library SDK that use gRPC and Protocol Buffer under hood to communicate between client and server. As a homework, you can add Get Note Detail gRPC method in a separate Note Detail Screen. Keep doing the best and Happy Lifelong Learning 😋.