Building Image Filter macOS app with SwiftUI
Published at Mar 1, 2020
SwiftUI enables developers to use unified tools and API for building full native applications across Apple platforms. We can target specific platforms and build the UI component without having expertise for each target specific framework such as UIKit (iOS & tvOS), AppKit (macOS), and WatchKit (watchOS). As a developer, we can build apps much faster with declarative syntax, safer with reactive binding and state management between UI and model. At last, we don't have to do context switching when building across platforms.
What We Will Build
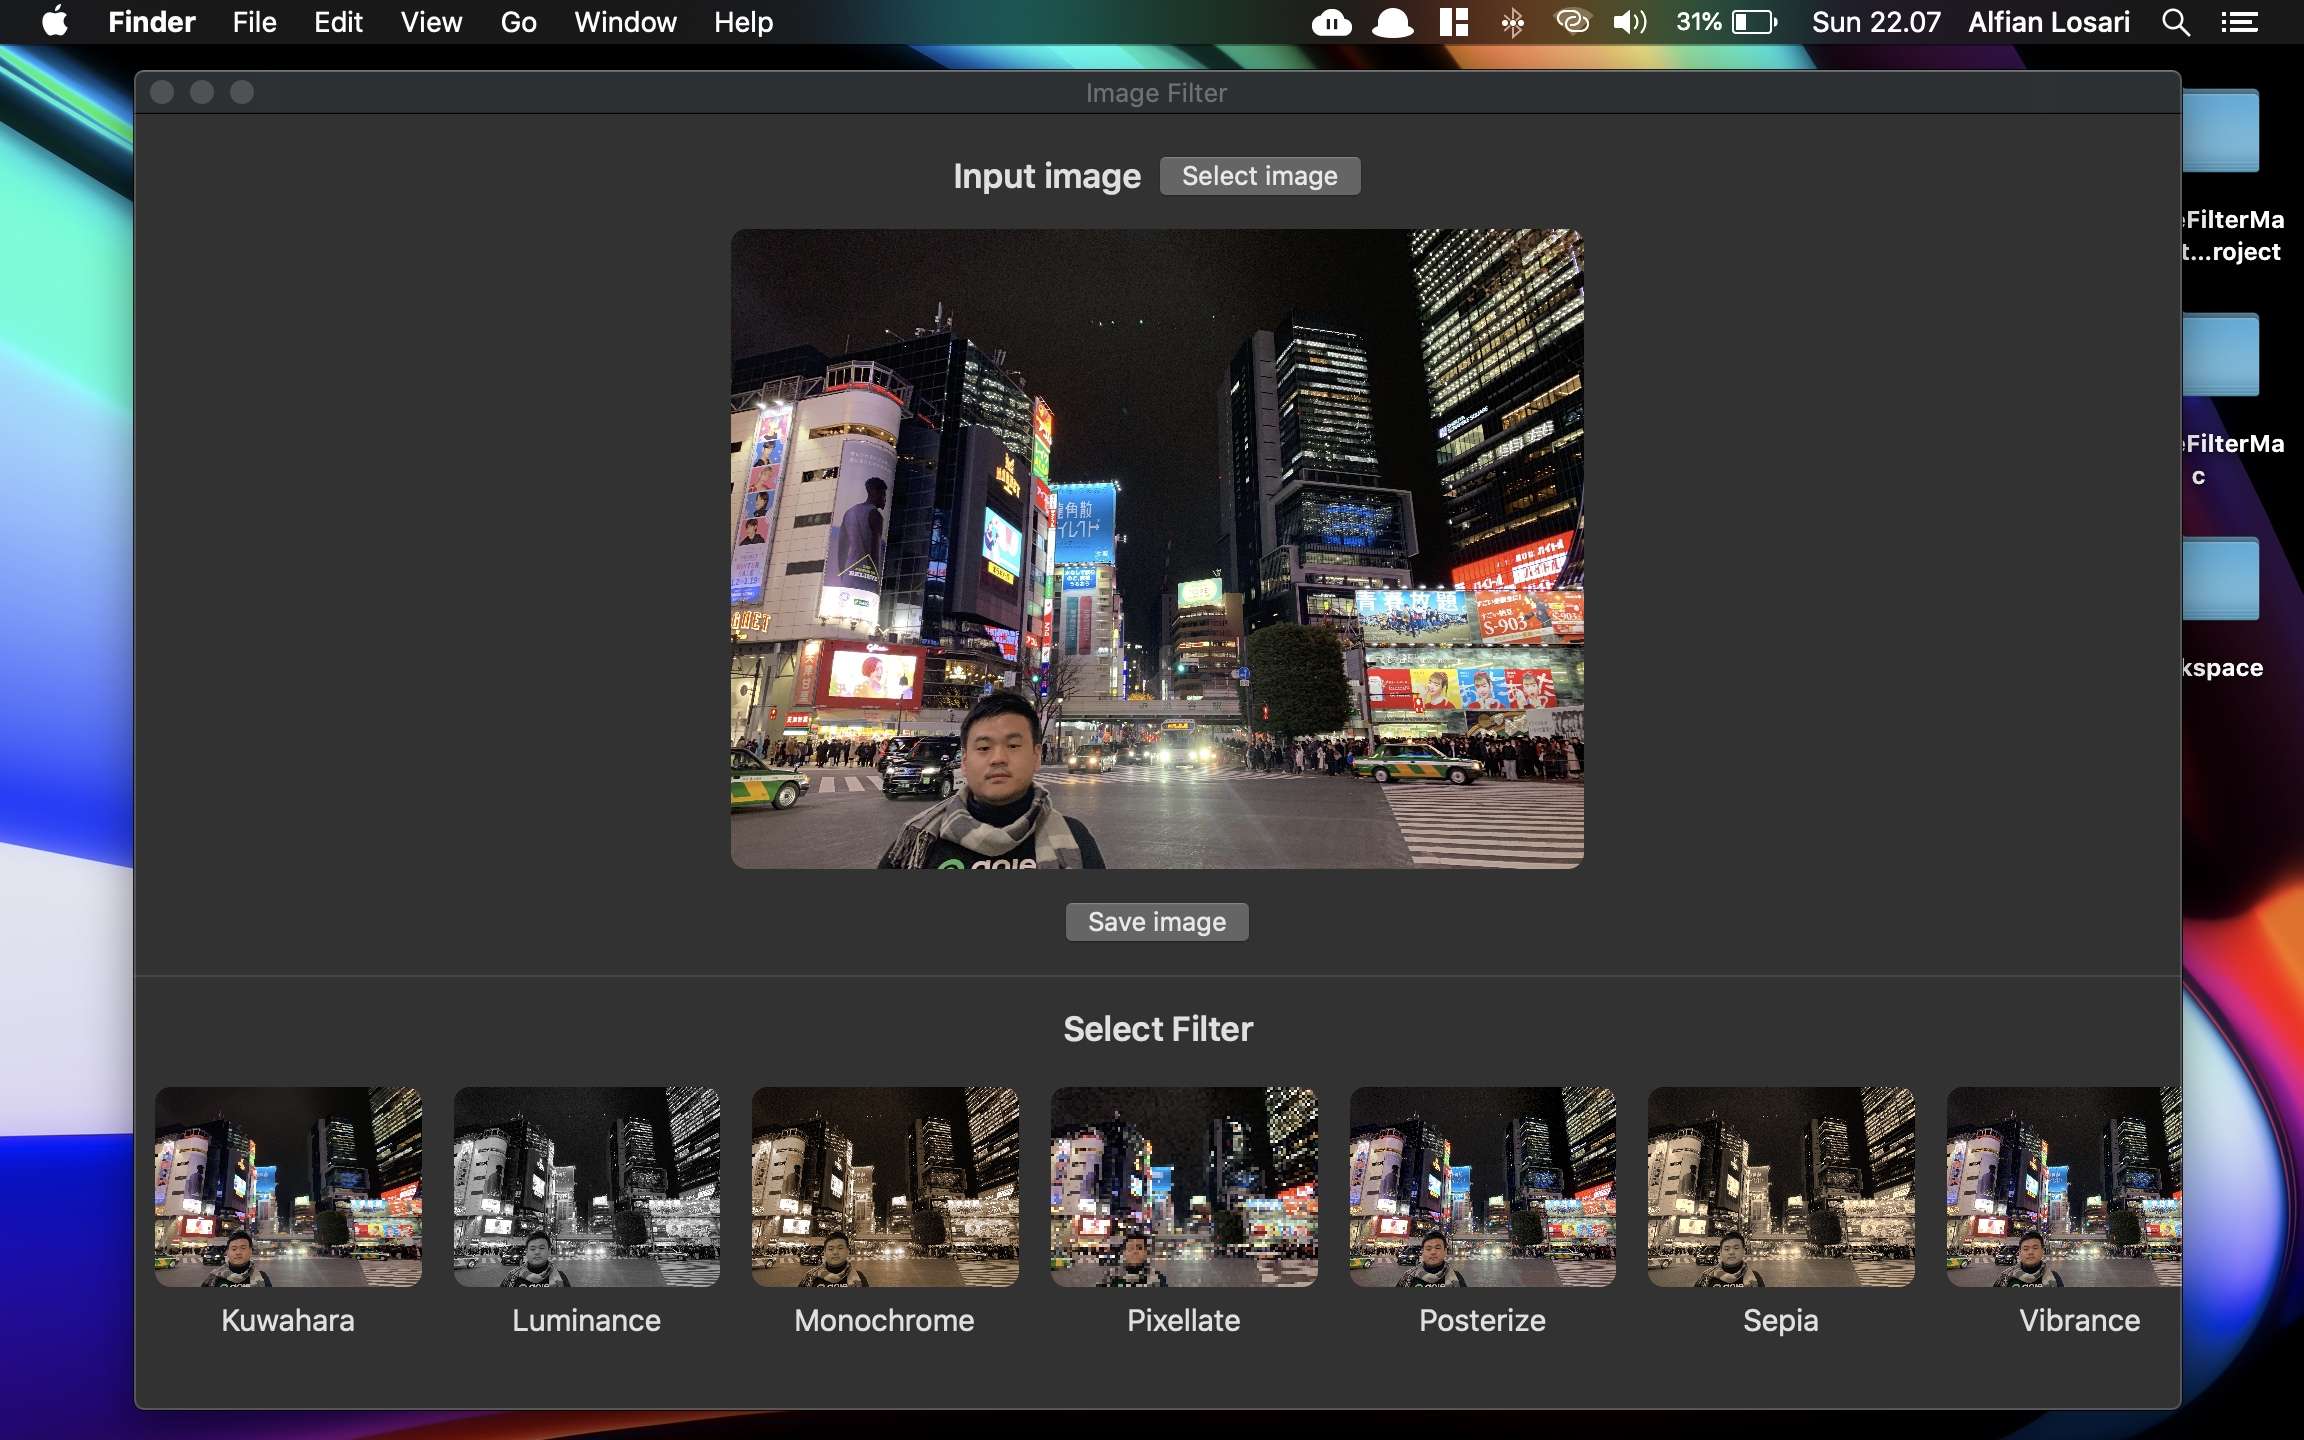
In this tutorial, we will build a native Image Filter macOS App with the following features:
- Filter image using predefined filters from the GPUImage2 Swift library.
- Select input image using macOS file panel (
NSOpenPanel). - Drag & Drop input image using SwiftUI View modifier.
- Save the filtered image using macOS file panel (
NSSavePanel). - App state management handling with
ObservableObjectandEnvironmentObject. - Lazy loading of filtering operation for image.
- Challenge section to convert closures callback to use
Bindingto update value from child view back to the parent view.
Before we begin, here are the minimum requirements you need to follow this tutorial:
- macOS 10.15 Catalina
- Xcode 11 (Download the latest version from Mac App Store or developer portal)
The Starter Project
To begin, you need to download the starter project from the GitHub repository at Starter Project Repository. You can also play around and download the completed project repository at Completed Project Repository.
The starter projects has already provided the following components:
GPUImage2dependency using Swift Package Manager.ImageFilterenum with predefined filter represented as cases. It also provided a helper method to filter anNSImagein a serial background thread using GPUImage pipeline.ProgessViewNSViewRepresentable struct. Because currentlySwiftUIhas no progressive indicator component, we can use theAppKit NSProgressIndicatorby wrapping it under theNSViewRepresentableprotocol.
Application Data State Flow
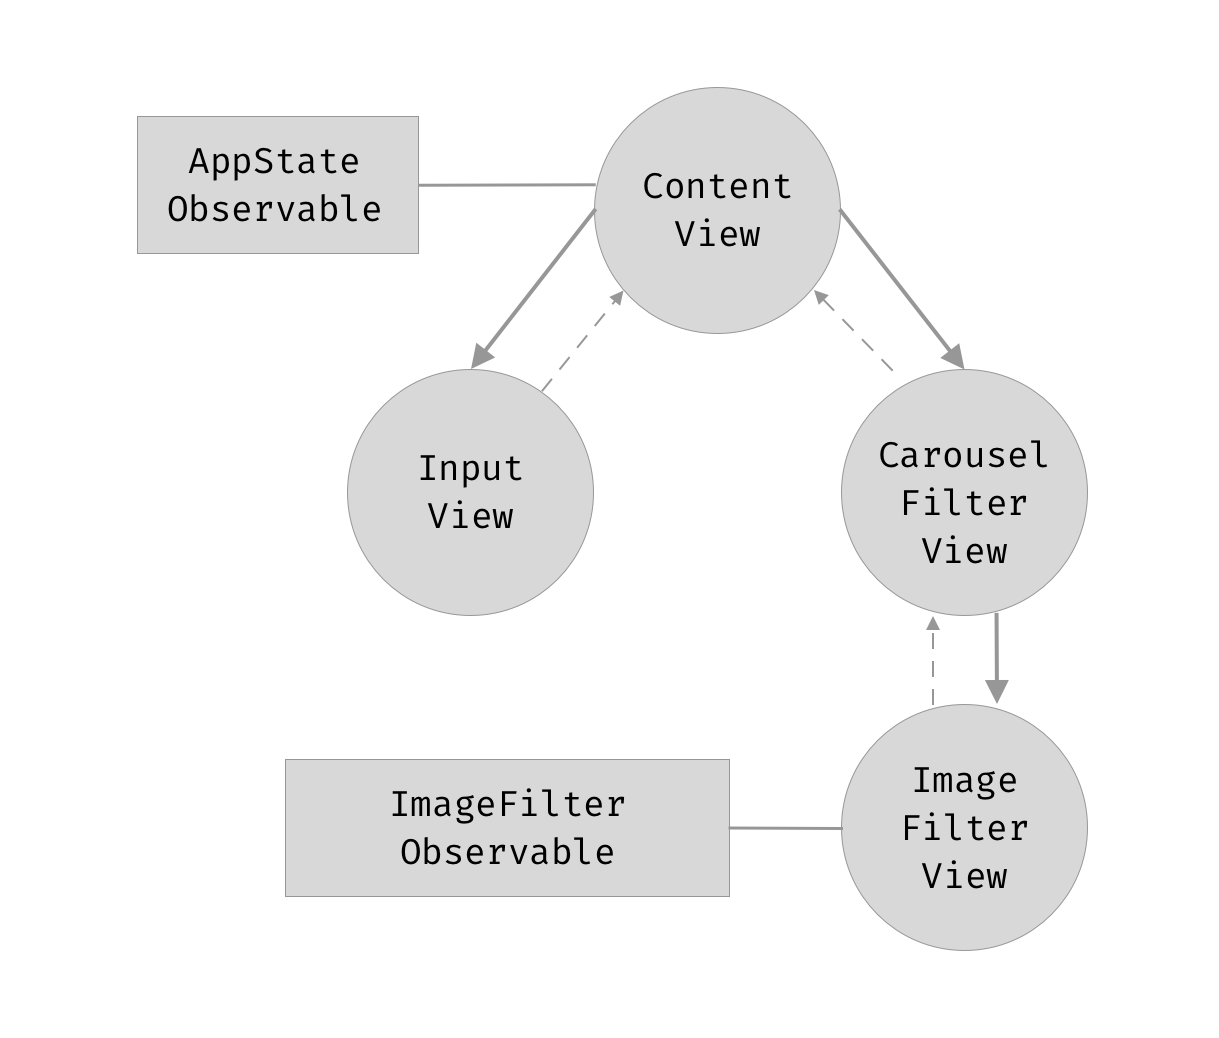
The application is divided into 2 main views:
InputView. The top part section of the UI, where the input image located. It also has a select input file button, and additionally save-image button for the filtered image.CarouselFilterView. The bottom part section of the UI that displays filters of the image in a horizontal carousel. It only is shown after the user has selected the input image.
For handling the application state, there are 2 observable objects:
AppState. It is the application state that has 2@Publishedproperties, the user-selected input image, and filtered image. Each time the input image is assigned, the selected filter image sets tonil.ImageFilter. The responsibility of this observed object is to handle the asynchronous image filter process when filtering usingGPUImage2. It's the best approach not to block the main thread by moving massive computational tasks to the background thread. Several predefined filters are smooth toon, vignette, polkadot, monochrome, sepia, and many more.
Take a closer look at the diagram above to understand the whole application UI and data state flow. Next, let's begin building our app by creating the AppState observable object!
Create the App State Observable Object
Create a new Swift file named AppState. Copy or type the following code.
import Combine
import Cocoa

class AppState: ObservableObject {

    // 1
    static let shared = AppState()
    private init() {}

    // 2
    @Published var image: NSImage? {
        didSet {
            // 4
            self.filteredImage = nil
        }
    }

    // 3
    @Published var filteredImage: NSImage?
}
Here is the explanation of each of the points for the class:
- The class is declared as
Singletonobject, which means there is only a single instance of this class in the runtime. It provides access viastatic sharedproperty. Initialization of this class outside is forbidden using theprivate initializer. - The
imageproperty is the stored property of the user-selected input image. The declaration uses@Publishedkeyword. This particular keyword is used by theSwiftUI Viewthat has reference to thisObservedObjectto trigger the update of theviewbody if the property is updated and used within the body declaration. - The
filteredImageproperty is the stored property of the user-selected filter image. It is also declared using@Publishedkeyword. - A Swift
didSetproperty observer is used to reset the filtered image tonilwhenever the user selects a new input image.
Next, open the AppDelegate.swift. In here, we will inject the app state using the environmentObject modifier added to the ContentView.
let appState = AppState.shared
let contentView = ContentView()
    .environmentObject(appState)
By using environmentObject at the root of the View, all the child nodes can access this observed object by using the @EnvironmentObject keyword when declaring the property. Remember to consider the usage of this pattern if your app has many complex nested views, as it can increase recalculating and update of the view hierarchy each time the properties in this object are updated.
Building the Input Image View.
Create a new SwiftUI file named InputImageView. Copy or type the following code.
struct InputImageView: View {

    let image: NSImage?
    let filteredImage: NSImage?

    var body: some View {
        ZStack {
            if image != nil {
                Image(nsImage: filteredImage != nil ? filteredImage! : image!)
                    .resizable()
                    .aspectRatio(contentMode: .fit)
            } else {
                Text("Drag and drop image file")
                    .frame(width: 320)
            }
        }
        .frame(height: 320)
        .background(Color.black.opacity(0.5))
        .cornerRadius(8)
    }
}
In this view, we use a ZStack as a container for the image or text. If the input image exists, we display the image by using a ternary operator checking if the filtered image exists, making sure to assign that image as the priority then fallback to the input image. We also use the provided resizable modifier combined with aspectRatio to make sure the content mode set to fit where the image size is adjusted to fit the view bounds while still maintaining the original aspect ratio.
If the Image doesn't exist, we display a Text to inform the user to drag and drop the image to the view. We will cover drag and drop in the next section. At last, we set the ZStack height frame to 320, background color to black with 0.5 opacity, and corner radius to 8 for making the edge a bit rounded. You can delete InputImageView_Previews struct for the sake of this tutorial as we are not going to use the instant preview feature at all.
Input Image View Drag and Drop Image Handler
Next, we're going to add the drag and drop capability to the InputImageView. This is pretty simple to achiever with SwiftUI. By adding a simple onDropmodifier to the ZStack , passing the supported file types, and the closure callback when the object is dropped. In this case, we support the public.file-url to retrieve the url file of the image in the file system.
In the completion callback, we just need to load the item URL, then initialize the NSImage with the URL to get the image data into our application. We need to declare an additional property with the type of closure with an input parameter of NSImage and return type of void to inform the user of this View as InputImageView has no observable properties.
struct InputImageView: View {

        ...
    let onDropHandler: (NSImage) -> ()

      var body: some View {
        ZStack {
           ...
        }
        ...
        .onDrop(of: ["public.file-url"], isTargeted: nil, perform: handleOnDrop(providers:))
    }

     private func handleOnDrop(providers: [NSItemProvider]) -> Bool {
        if let item = providers.first {
            item.loadItem(forTypeIdentifier: "public.file-url", options: nil) { (urlData, error) in
                DispatchQueue.main.async {
                    if let urlData = urlData as? Data {
                        let url = NSURL(absoluteURLWithDataRepresentation: urlData, relativeTo: nil) as URL
                        guard let image = NSImage(contentsOf: url) else {
                            return
                        }
                        self.onDropHandler(image)
                    }
                }
            }
            return true
        }
        return false
    }
Let's wait a bit before we can try this drag and drop in action. Next, we will add an InputView to contain InputImageView as well as additional buttons for selecting the image from file picker and saving the image to file.
The Input View with Open and Save Image File
Next, create a new SwiftUI file named InputView, also delete InputView_Previews at the bottom. This View consists of VStack containing Buttons for open file and saving file as well as our previous InputImageView component.
We also have the image and filteredImage properties that are passed from the ContentView as well as onImageReceived handler that will pass the selected or dropped image back to ContentView. The methods for opening and saving the file are being handled in this struct via selectFile and saveToFile methods.
struct InputView: View {

    let image: NSImage?
    let filteredImage: NSImage?
    let onImageReceived: (NSImage) -> ()

    var body: some View {
        VStack(spacing: 16) {
            HStack {
                Text("Input image")
                    .font(.headline)
                Button(action: selectFile) {
                    Text("Select image")
                }
            }

            InputImageView(image: image, filteredImage: filteredImage, onDropHandler: onImageReceived)

            if image != nil {
                Button(action: saveToFile) {
                    Text("Save image")
                }
            }
        }
    }

    private func selectFile() {
        NSOpenPanel.openImage { (result) in
            if case let .success(image) = result {
                self.onImageReceived(image)
            }
        }
    }

    private func saveToFile() {
        guard let image = filteredImage ?? image else {
            return
        }
        NSSavePanel.saveImage(image, completion: { _ in  })
    }
}
I already provided extension helper inside the FilePanel+Extension.swift file for dealing with opening and saving the image for both NSOpenPanel and NSSavePanel. If the user selects an image from the macOS file panel, we'll trigger the onImageReceived closure passing the selected image. For saving the image, we check if the filtered image exists with fallback to the input image before asking the user for the filename and location to save the image.
Connecting Input View to the Content View
Next, let's move to the root ContentView to put the InputView. First, we need to declare the AppState using @EnvironmentObject keyword. Inside the body, we use VStack as a container for the InputView passing the image and filteredImage from the AppState. We also provide the closure to handle onImageReceived by assigning the image to the AppState image property. This will trigger the view update to render the InputView with a new image.
struct ContentView: View {

    @EnvironmentObject var appState: AppState

    var body: some View {
        VStack(spacing: 16) {
            InputView(image: appState.image, filteredImage: appState.filteredImage, onImageReceived: { self.appState.image = $0 })

            Spacer()
        }
        .padding(.top, 32)
        .padding(.bottom, 16)
        .frame(minWidth: 768, idealWidth: 768, maxWidth: 1024, minHeight: 648, maxHeight: 648)
    }
}
We also set the frame height to a maximum and a minimum of 648. For the width, the user can expand the width to a maximum of 1024, but the minimum is 648. Now you can try to build and run the project. Try paying with drag and drop the image to the InputImageView as well as clicking on the button to select the image file from the file panel. Next, let's move to the main course, which is displaying and selecting image filters using the carousel!
Creating Image Filter Observable
Before we build our carousel image filter view, we need to create an image filter observable object. Create a new SwiftUI file named ImageFilterObservable. Copy or type the following code.
import Combine
import Cocoa

class ImageFilterObservable: ObservableObject {

    // 1
    @Published var filteredImage: NSImage? = nil

    // 2
    let image: NSImage
    let filter: ImageFilter
    init(image: NSImage, filter: ImageFilter) {
        self.image = image
        self.filter = filter
        self.filterImage()
    }

    // 3
    func filterImage() {
        self.filter.performFilter(with: self.image) {
            self.filteredImage = $0
        }
    }
}
Here is the explanation of each point:
- We declare a property
filteredImageusing the@Publishedkeyword. This image is the result of the asynchronous filter operation. - We store the
input imageandimage filter enumas a stored property. Both of them passed through the initializer parameters. - The
filterImagemethod performs the filter operation asynchronously. In the completion callback, it assigns thefilteredImageproperty with the output image. The process publishes the change that invokes the view update.
Building the Image Filter View
Next, we will build the ImageFilterView to display the image that has been filtered. Create a new SwiftUI file named ImageFilterView. Copy or type the following code into the file.
struct ImageFilterView: View {

    @ObservedObject var observableImageFilter: ImageFilterObservable
    let onImageSelected: (NSImage) -> ()

    var body: some View {
        VStack {
            ZStack {
                Image(nsImage: observableImageFilter.filteredImage != nil ? observableImageFilter.filteredImage! : observableImageFilter.image)
                    .resizable()
                    .aspectRatio(contentMode: .fit)
                    .frame(height: 100)
                    .cornerRadius(8)

                if observableImageFilter.filteredImage == nil {
                    ProgressView()
                }
            }

            Text(observableImageFilter.filter.rawValue)
                .font(.subheadline)
        }
        .onTapGesture(perform: handleOnTap)
    }

    private func handleOnTap() {
        guard let filteredImage = observableImageFilter.filteredImage else {
            return
        }
        onImageSelected(filteredImage)
    }
}
Because the filtering operation is asynchronous, the view needs to have state. In this case, we can use the ImageFilterObservable as the observed object. First, we display the input image with a loading progress view overlay, and then after the image filtering operation finishes, we display the filtered image.
The view accepts and stores the ImageFilterObservable via the initializer. It also has the onImageSelected closure to handle passing the filtered image to the parent view when the user taps on the view.
The VStack is the main container. Inside, the ZStack is used to display the image based on the condition of the filtered image. With the frame modifier, the height of the image is constrained to 100, and content mode is set to fit. The Loading progress view will be displayed on top of the image when the filter operation is executing. Below the ZStack, we have the text to display the name of the filter based on the enum case. Next, let's build the carousel for displaying all the ImageFilter enum inside the ImageFilterView.
Building Carousel Filter View
Create a new SwiftUI file named CarouselFilterView. Copy or paste the following code.
struct CarouselFilterView: View {

    // 1
    let image: NSImage?
    let onImageFilterSelected: (NSImage) -> Void

    // 2
    let imageFilters: [ImageFilter] = ImageFilter.allCases

    // 3
    var body: some View {
        VStack {
            if image != nil {
                Text("Select Filter")
                    .font(.headline)

                // 4
                ScrollView(.horizontal, showsIndicators: true) {
                    HStack(alignment: .top, spacing: 0) {
                        ForEach(imageFilters) { filter in
                            // 5
                        ImageFilterView(observableImageFilter: ImageFilterObservable(image: self.image!, filter: filter), onImageSelected: self.onImageFilterSelected)
                                .padding(.leading, 16)
                                .padding(.trailing, self.imageFilters.last == filter ? 16 : 0)
                        }
                    }
                    .frame(height: 140)
                }
            }
        }
    }
}
Here is the explanation of each of the points:
- There are 2 stored properties,
image NSImageandonImageFilterSelected closure. The image is the input image passed from theContentViewwhile the closure will be invoked when user tap on the image, passing the selected filtered-image back to theContentView. - The
imageFiltersconstant is initialized with a default value, which isImageFilterenum array. BecauseImageFilterenum conforms toCaseIterableprotocol, the compiler automatically synthesize theallCasesproperty that returns all the enum cases in an array. - The body uses
VStackas the main container. Inside, it also checks the input image existence before displaying all theSelect Filter TextandScrollView Carousel. - To display the carousel, we use
ScrollViewwith thehorizontalaxis. The important things are to useHStackcombined with usingForEach. We initializeForEachpassing the image filters enum array.ImageFilterenum already conforms toIdentifiableso it can be used bySwiftUIto perform the diffing operation of the list when the state is updated. - In the
ImageFilterViewinitializer, we pass the initializedImageFilterObservablepassing the input image and the current enumerated filter. We also add additional paddings modifier for the leading. For trailing padding, we only set it to 16 if it is the last enumerated filter. We also constraint the height of theHStackusing to 140 using theframemodifier.
Connecting Carousel Filter View to ContentView
Last, we need to put the FilterCarouselView inside the ContentView. Copy or type the following code.
import SwiftUI

struct ContentView: View {
    ...

    var body: some View {
        VStack(spacing: 16) {
            ...

            Divider()
            CarouselFilterView(image: appState.image) {
                self.appState.filteredImage = $0
            }
            ...
        }
        ...
    }
}
With this, we pass the appState image property to the CarouselFilterView. It updates the view whenever the AppState property changes. Try to build and run the app to see app the image filtering in action!
Improving the Image Filter Observable with Lazy Loading
Currently, whenever we instantiate the ImageFilterView inside the ForEach, we also initialize a new ImageFilterObservable object and performing filter operation. This is not very efficient if we add more filters in the future, as this will initialize and filter even before the filter view appears on the screen. To improve, first we need to understand how ForEach works under the hood. ForEach accepts an array of objects that conforms to Identifiable. It is used by the SwiftUI for diffing the collection whenever the view and state updates. Currently, we only pass the ImageFilter enum array, so SwiftUI won't be able to understand the difference when the input image is updated. It is working currently, because we are initializing and invoking filterImage inside the ImageFilterObservable.
To solve this, we can create a new fileprivate struct named CarouselImageFilter that stores the image and filter, also conforming to Identifiable protocol providing the unique combination ImageFilter rawValue and Image hashValue as the identifier.
fileprivate struct CarouselImageFilter: Identifiable {

    var id: String {
        filter.rawValue + String(image.hashValue)
    }

    var filter: ImageFilter
    var image: NSImage
}
Next, we need to update the CarouselFilterView to map array of ImageFilter to the new CarouselImageFilter and use it in the ForEach statement.
struct CarouselFilterView: View {

    ...
    fileprivate var imageFilters: [CarouselImageFilter] {
        guard let image = self.image else { return [] }
        return ImageFilter.allCases.map { CarouselImageFilter(filter: $0, image: image) }
    }

    var body: some View {
        VStack {
            if image != nil {
                ...

                ScrollView(.horizontal, showsIndicators: true) {
                    HStack(alignment: .top, spacing: 0) {
                        ForEach(imageFilters) { imageFilter in
                            ImageFilterView(observableImageFilter: ImageFilterObservable(image: imageFilter.image, filter: imageFilter.filter), filteredImage: self.$filteredImage)
                                .padding(.leading, 16)
                                .padding(.trailing, self.imageFilters.last!.filter == imageFilter.filter ? 16 : 0)
                        }
                    }
                    .frame(height: 140)
                }
            }
        }
    }
}
Next, update the ImageFilterObservable by removing the filterImage invocation in the initializer.
class ImageFilterObservable: ObservableObject {

    ...
    init(image: NSImage, filter: ImageFilter) {
        self.image = image
        self.filter = filter
    }
    ...
}
At last, inside the ImageFilterView add the onAppear modifier that invokes the imageFilterObservable filterImage method. This will make sure to filter the image when the view appears on screen!
struct ImageFilterView: View {

    // ...
    var body: some View {
        // ...
        .onAppear(perform: self.observableImageFilter.filterImage)
        // ...
    }
}
One Last Thing
There is one small bug that we can fix to improve the overall UX of the app. Try to run the app and select the filter, each time you select the filter, the CarouselFilterView will be rendering again performing all the filter operations.
It happens because, in the ContentView, we pass the AppState image property to the CarouselFilterView. It means, whenever one of the AppState is updated, the ContentView will be updated, and all the child view will be rendered again. To avoid this, we need to tell SwiftUI that our view needs to be updated only in a specific condition. In this case, whenever the previous and current input image is equal.
To do this, we need to make the CarouselFilterView implements the Equatable protocol and override the static == function to perform this equality check.
extension CarouselFilterView: Equatable {

    static func == (lhs: CarouselFilterView, rhs: CarouselFilterView) -> Bool {
        return lhs.image == rhs.image
    }
}
After this, you need to add equatable modifier after the CarouselFilterView in ContentView.
...
CarouselFilterView(image: appState.image) {
  self.appState.filteredImage = $0
}
.equatable()
...
Try to run the app to see the final result!
Challenge
As you can see, there are so many closures callbacks from the child's views back to parent view in our application. We can improve this by using @Binding keyword that we can declare in the child's views. The parent view will pass the state binding for the property to the children. To update the value, the children can just assign the new value to the binding property, and the state will get updated. The challenge is for you all to remove all the callback closure handler and replace it with Binding property. You can visit the GitHub completed project repository if you get stuck to see the final solution, I already provided the link above at the Starter Project section.
Conclusion
Congratulations! We have built the Image Filter macOS app using SwiftUI. We don't even have to learn and understand many of the AppKit UI components to accomplish this big achievement. SwiftUI really is the future of front end development across Apple platforms. Unlike UIKit that needs to have two separate codes to handle UI and updating the model, SwiftUI declarative syntax unified both the UI declaration and state management.
Next, my challenge to you all is to keep learning, build, and share more amazing SwiftUI things to the community. Let's keep lifelong learning goes on!