Chatbot Inventory Tracking iOS & Android App with Flutter, DialogFlow, and GCP
Published at Jul 15, 2018
Creating Chatbot powered Machine Learning apps is becoming much more easier for developers using Dialogflow from Google. According to Google:
Dialogflow is an end-to-end development suite for building conversational interfaces for websites, mobile applications, popular messaging platforms, and IoT devices. Developers can use it to build interfaces (e.g., chatbots) that are capable of natural and rich interactions between users and businesses. It is powered by machine learning to recognize the intent and context of what a user says, allowing the conversational interface to provide highly efficient and accurate responses.
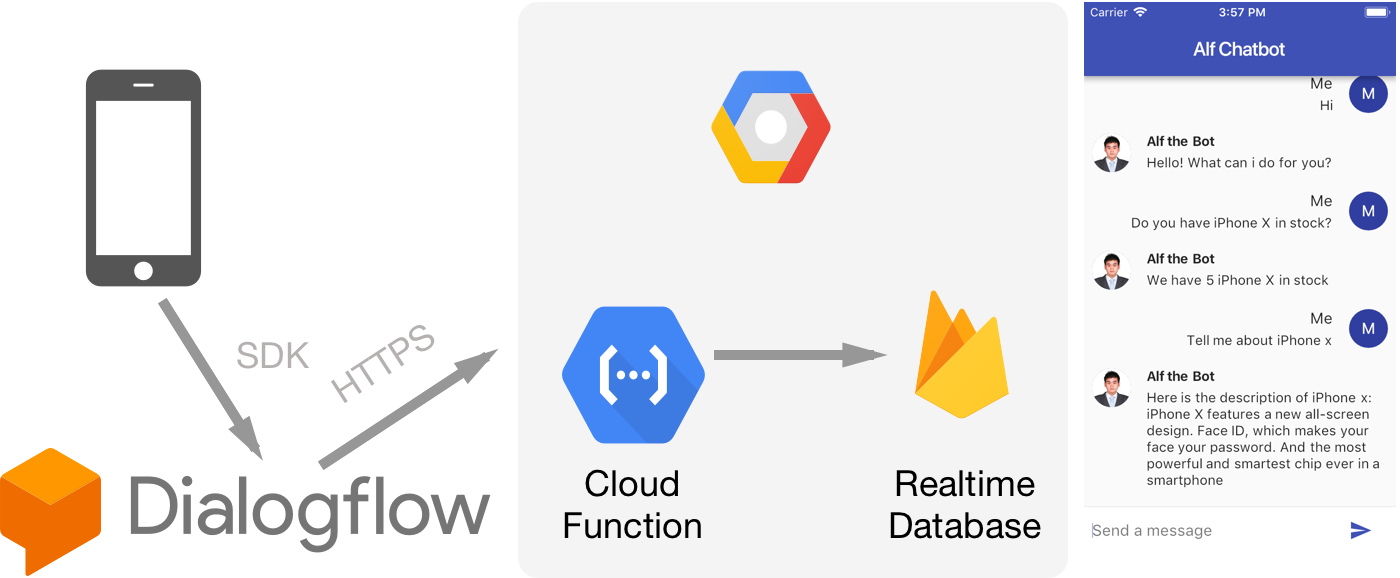
In this article, we will build a Chatbot inventory tracking app using Dialogflow, for simplicity we will use Firebase Realtime Database to store our product description and in stock quantity. We will use Dialogflow fulfillment webhook that will trigger the Google Cloud Function and handle the response depending on the action. The app will use Flutter, so it runs on iOS and Android. The project GitHub repository can be accessed inside here.
What we will build
Here are the things that we will build through this article:
- Dialogflow Entity For Product: The entity will provide specific context for user action/intent.
- Dialogflow Intent for Product Description and Product Quantity. The intents represents specific action that user intents to ask.
- Firebase Realtime Database: we store our products data containing the description and quantity in stock inside the database so the Fullfillment webhook can query what user search and provide the response.
- Dialogflow Fulfillment Webhook using Google Cloud Function: The webhook will get the request query action and parameters, then depending on user action, query the database for description or quantity.
- Flutter Project, the mobile front end app: The app displays the chat list UI for user to, provide input for user to ask, then display and speak the responses.
Setting Up Dialogflow
Before we begin, go to Dialogflow website, click on Go to console at the top right corner. You need to sign in and authorize with Google Account to use Dialogflow.

After sign in, we need to create new Agent. The Agent is the Chatbot we will be using to communicate with our app. Give the name you want for your bot, make sure to associate the Agent with Google Project. You can create a Google Project by creating a Firebase project in here. We will need this so we can utilize Firebase Function for our webhook fulfillment.

Dialogflow uses intent and entities to recognize what user want and the context of user ‘s statement, so the bot can map the user request to an action.
An intent represents a mapping between what a user says and what action should be taken by your software.
Entities are powerful tools used for extracting parameter values from natural language inputs. Any important data you want to get from a user’s request, will have a corresponding entity.
An action corresponds to the step your application will take when a specific intent has been triggered by a user’s input.
By default, Dialogflow provides 2 default intents, Default Welcome Intent and Default Fallback Intent.
Create Product Entity
Click on add entities on the left panel, name the entity Products, check on allow automated expansion. We will use Dialogflow prebuilt system entity to handle on associating a product name into the entity.

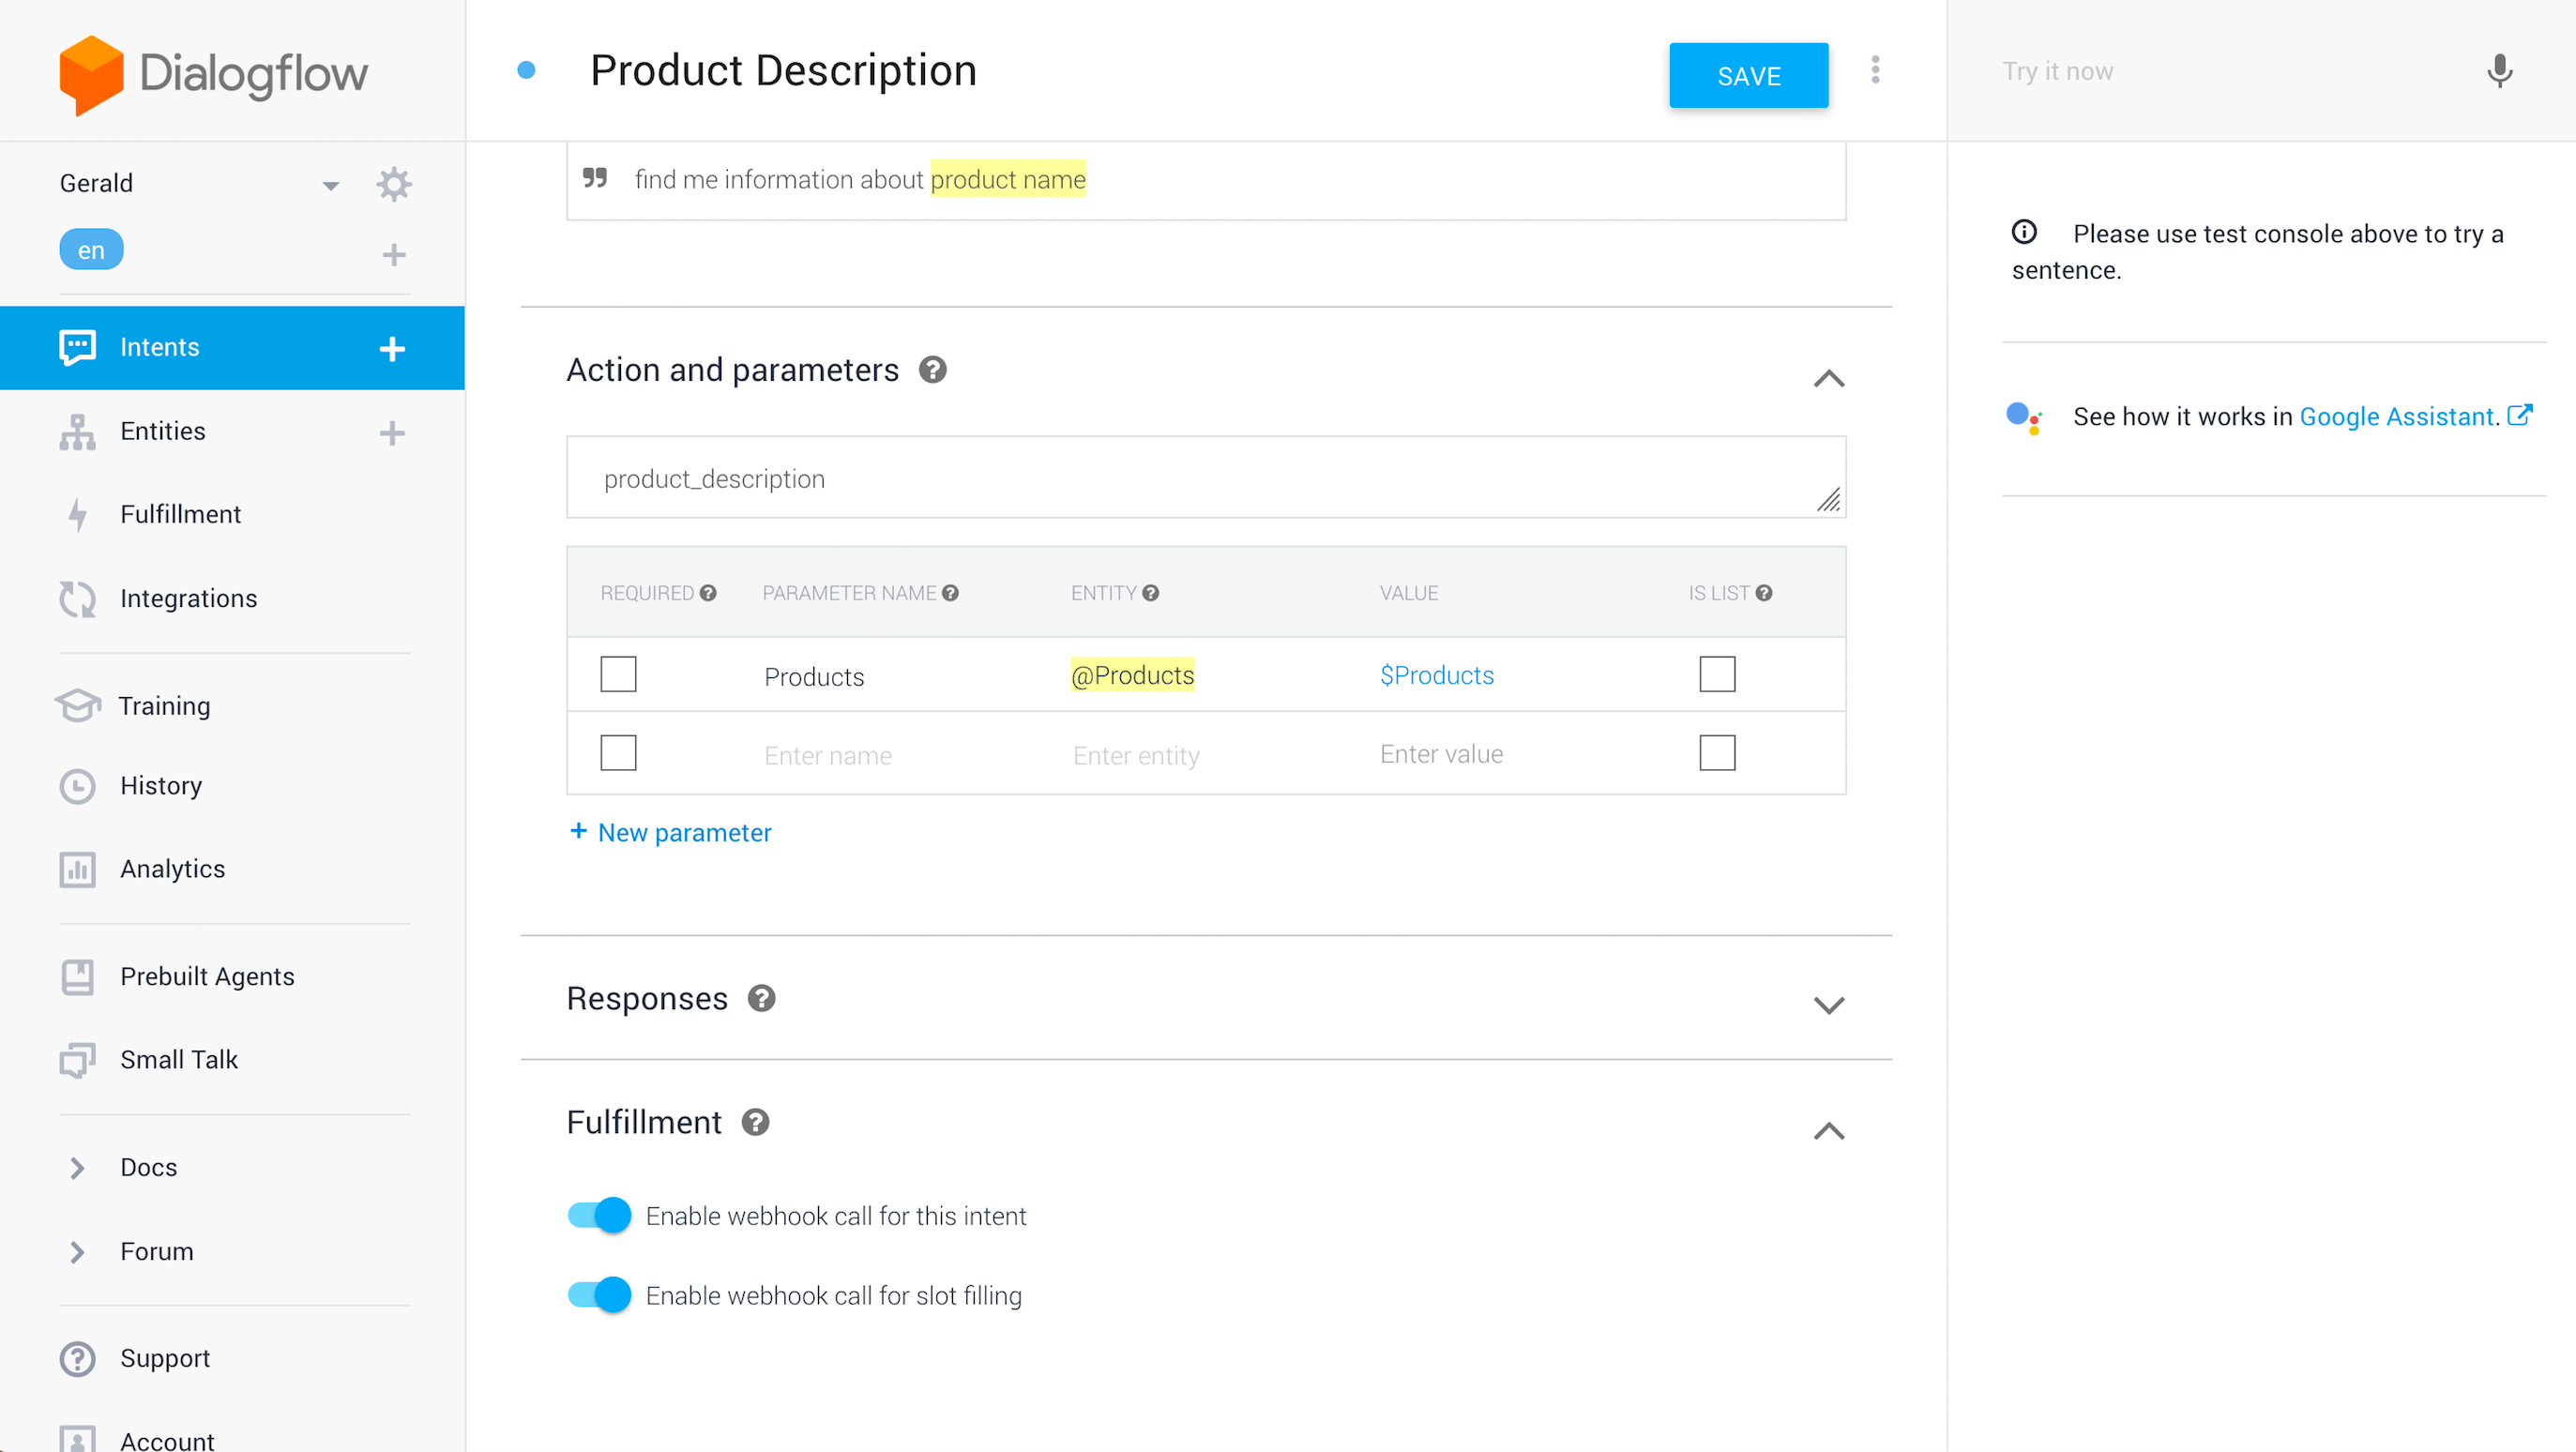
Create Product Description Intent
Click on the add intent on the left panel, then name the intent Product Description. This intent will handle user action when they ask for detail/description about a product. Click on Training Phrases tab, then enter training phrases expressions below, make sure to select the product name and associate it with Products Entity we created before. I have provided various variations that user might ask when they want to get product information.

Click on Action and Parameters, then add product_description as the Intent action. Click on Fulfillment and make sure to enable the webhook call for this intent.
Create Product Quantity Intent
Like before, click on the add intent on the left panel, then name the intent Product Quantity. This intent will handle user action when they ask whether a product is available or is in stock. Click on Training Phrases tab, then enter training phrases expressions below, make sure to select the product name and associate it with Products Entity we created before. I have provided various variations that user might ask when they want to ask whether a product is available or is in stock.
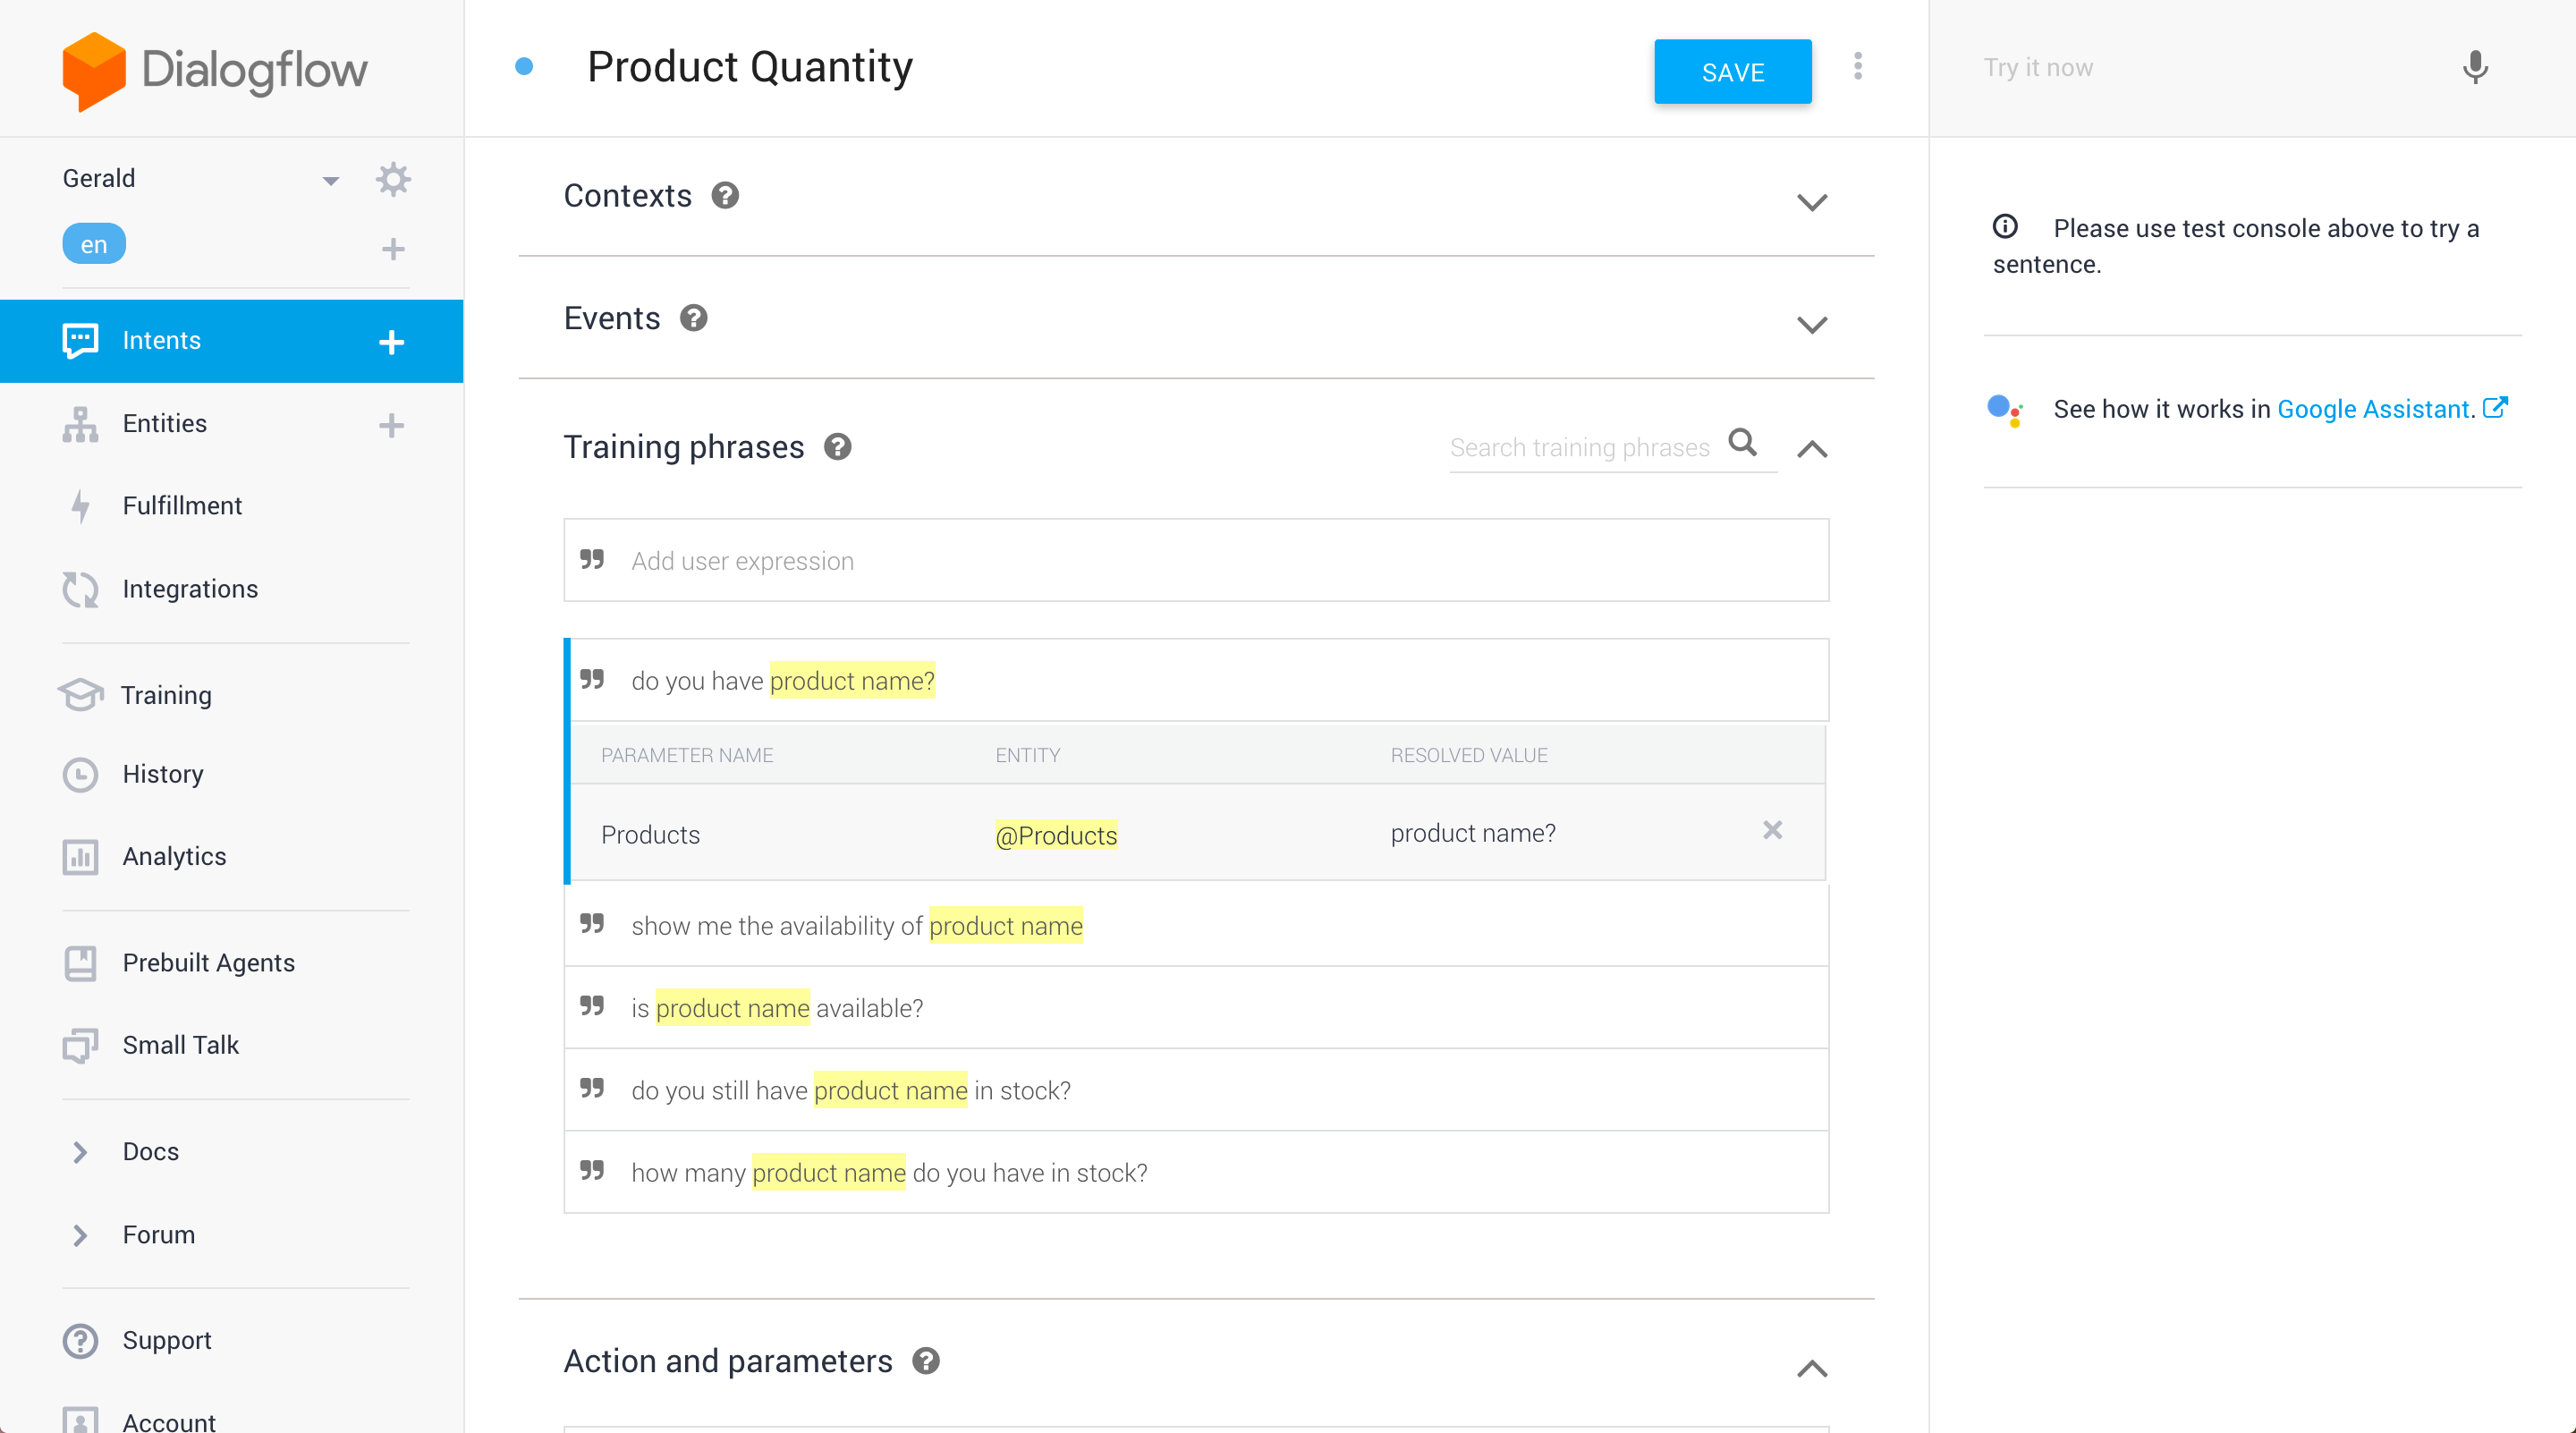
Click on Action and Parameters, then add product_quantity as the Intent action. Click on Fulfillment and make sure to enable the webhook call for this intent.

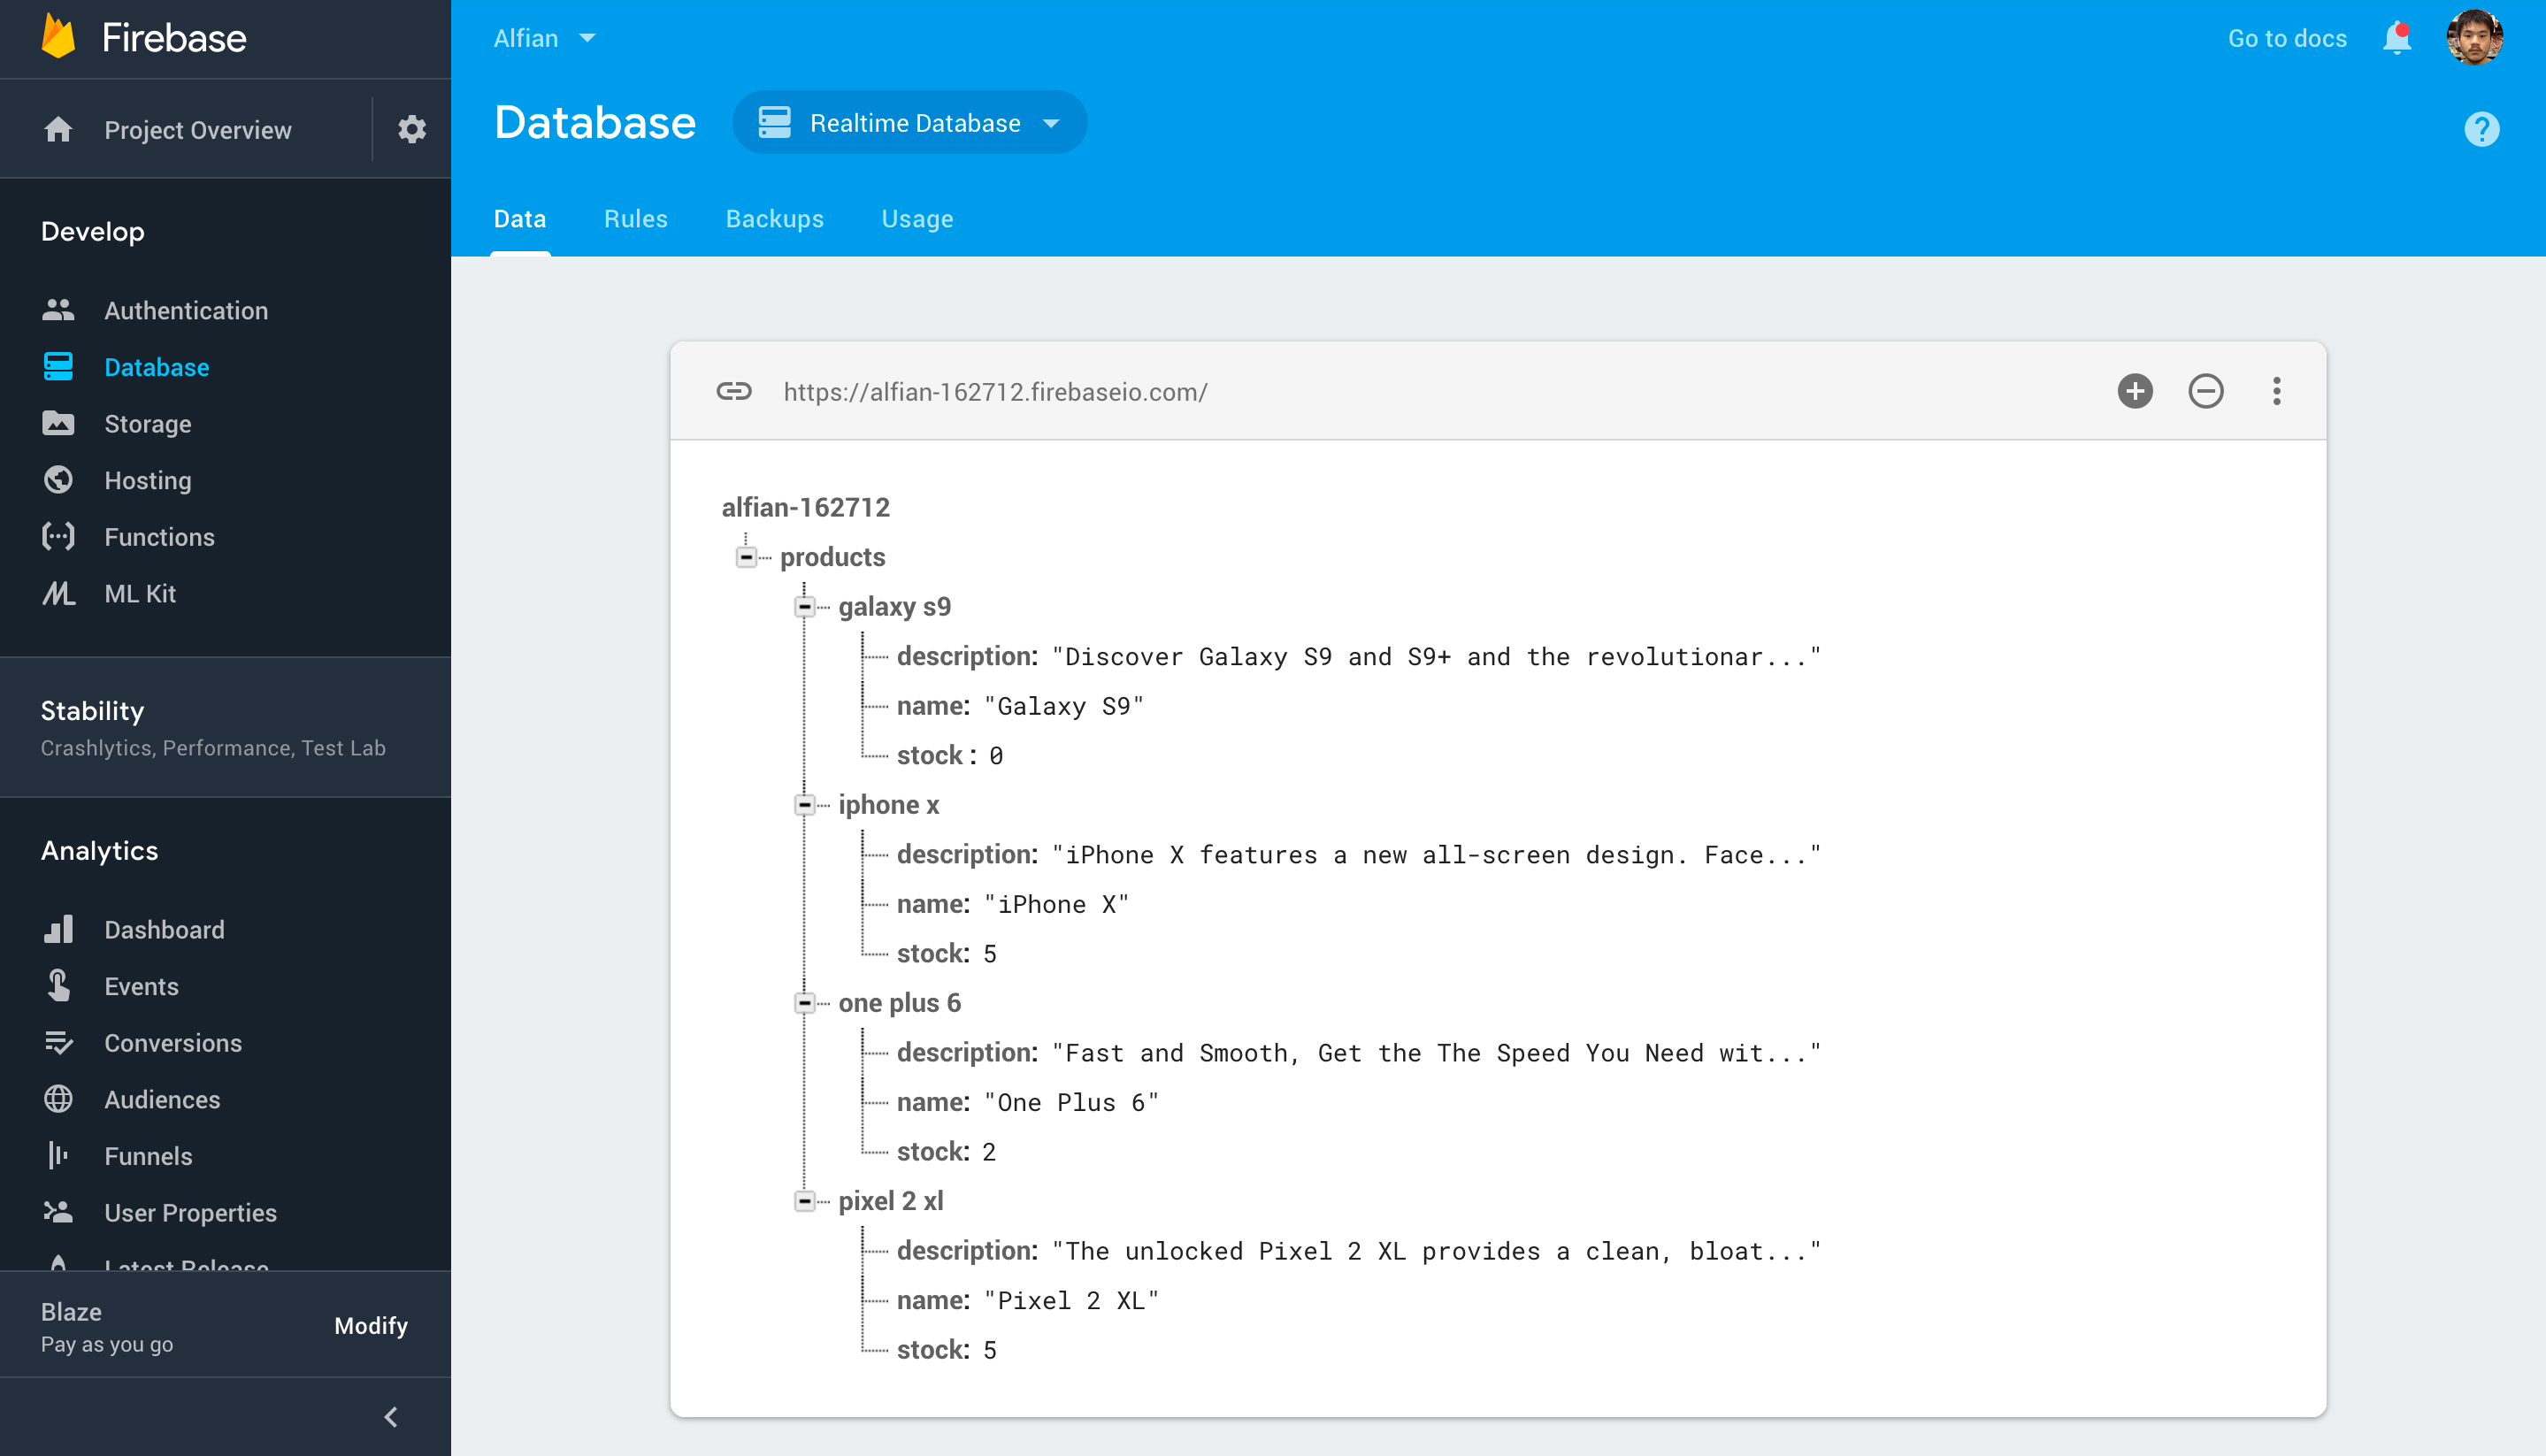
Store Product Data in Firebase Realtime Database
Create a new project in Firebase or use the one you already have. We will store our product inventory data inside the Realtime Database. Below is the schema and dummy data we will be using. The products parent has children of products containing the description, name, and stock. The key of the child will be used when we query the database for a particular product name. We use Firebase database for simplicity, you can use your own Postgres or MongoDB database if you want more complex querying and aggregation.
Webhook Fulfillment Implementaion
To fulfill the intent action response we will use webhook to Google Cloud Function using Dialogflow inline editor to edit and deploy our webhook to the GCP. Make sure to enable the switch for Inline Editor. You can also provide your custom webhook endpoint if you want.

Click on package.json tab and paste the dependencies below.
{
  "name": "dialogflowFirebaseFulfillment",
  "description": "This is the default fulfillment for a Dialogflow agents using Cloud Functions for Firebase",
  "version": "0.0.1",
  "private": true,
  "license": "Apache Version 2.0",
  "author": "Google Inc.",
  "engines": {
    "node": "~6.0"
  },
  "scripts": {
    "start": "firebase serve --only functions:dialogflowFirebaseFulfillment",
    "deploy": "firebase deploy --only functions:dialogflowFirebaseFulfillment"
  },
  "dependencies": {
    "actions-on-google": "2.0.0-alpha.4",
    "firebase-admin": "^5.11.0",
    "firebase-functions": "^1.0.0",
    "dialogflow": "^0.1.0",
    "dialogflow-fulfillment": "0.3.0-beta.3"
  }
}
In the index.js inside the firebase functions https onRequest handler we receive the request body containing the queryResult of the Dialogflow, we can access the intent action from the query result. Also we can access the Products entity parameter from the query result. We initialize the Firebase admin module so we can use it to access our Firebase Realtime Database.
We check if the action equals to product_description, then this fulfillment must be from the Product Description intent, the same for Product Quantity intent. Then we perform Firebase query for the children of products using the product parameter we retrieve from the query result of Products entity. We then return the the response json containing the fullfillmentText key with the value of the description of quantity in stock.
'use strict';

const functions = require('firebase-functions');
const admin = require('firebase-admin');
admin.initializeApp();

process.env.DEBUG = 'dialogflow:debug'; // enables lib debugging statements

exports.dialogflowFirebaseFulfillment = functions.https.onRequest((request, response) => {
    console.log('Dialogflow Request headers: ' + JSON.stringify(request.headers));
    console.log('Dialogflow Request body: ' + JSON.stringify(request.body));

    const db = admin.database();
    const action = request.body.queryResult.action;
    if (action === 'product_description') {
        const product = request.body.queryResult.parameters.Products.trim();
        const ref = db.ref(`products/${product.toLowerCase()}/description`);
        ref.once('value').then((snapshot) => {
            const result = snapshot.val();
            if (result === null) {
                response.json({
                    fulfillmentText: `Product does not exists in inventory`
                });
                return;
            }
            response.json({
                fulfillmentText: `Here is the description of ${product}: ${result}`,
                source: action
            });

        }).catch((err) => {
            response.json({
                fulfillmentText: `I don't know what is it`
            });

        })
    } else if (action === 'product_quantity') {
        const product = request.body.queryResult.parameters.Products.trim();
        const ref = db.ref(`products/${product.toLowerCase()}`);
        ref.once('value').then((snapshot) => {
            const result = snapshot.val();
            if (result === null) {
                response.json({
                    fulfillmentText: `Product does not exists in inventory`
                });
                return;
            }
            if (!result.stock) {
                response.json({
                    fulfillmentText: `Currently ${product} is out of stock`,
                    source: action
                });
            } else {
                response.json({
                    fulfillmentText: `We have ${result.stock} ${product} in stock`,
                    source: action
                });
            }
        }).catch((err) => {
            response.json({
                fulfillmentText: `I don't know what is it`
            });
        })
    } else {
        response.json({
            fulfillmentText: `I don't know what is it`
        });
    }

});
That’s it for the Dialogflow implementation, make sure to deploy the webhook using the deploy button provided. You can test the intent and response by using the right hand panel in Dialogflow website. Next we will build the mobile app using Flutter.
Building The Flutter App
The Flutter app uses several dependencies such as:
- flutter_dialogflow: The flutter_dialogflow makes it easy to integrate dialogflow with Flutter project by Victor Alfonso Rodas.
- tts: A text to speech plugin for flutter by Alex Blount.
Here is our pubscpec.yaml dependencies:
dependencies:
flutter:
  sdk: flutter

flutter_dialogflow: ^0.0.1
tts: ^1.0.1
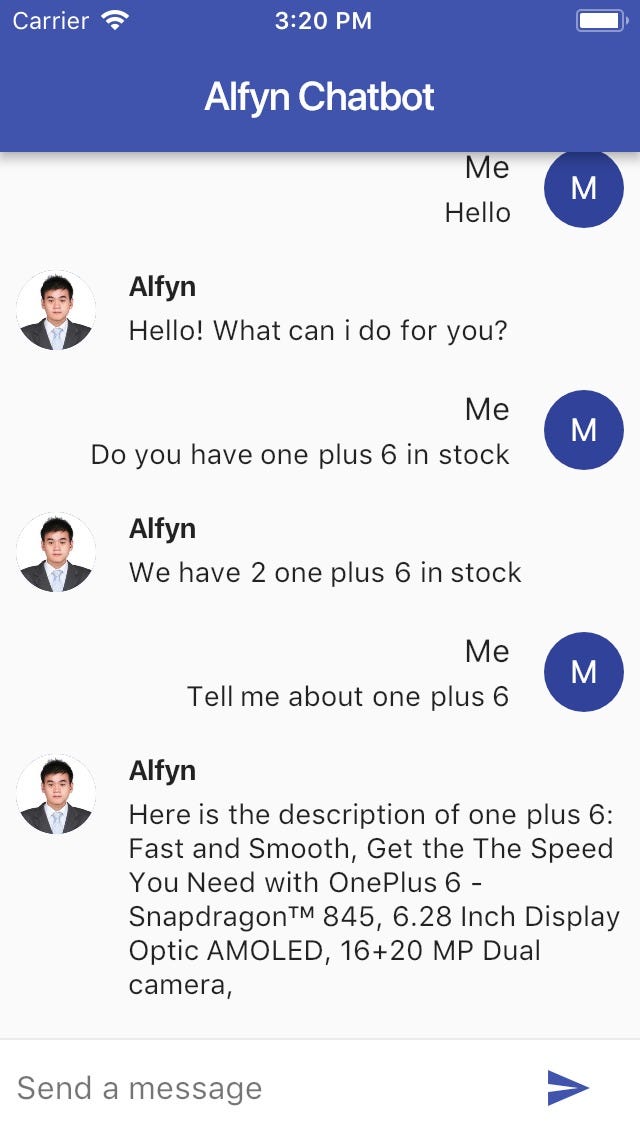
Inside the main.dart file. We create a Stateful Widget containing the array of ChatMessage Stateless Widget to display and a TextController for user to enter the message they want to sent to the Chatbot.
When the user tap on send button, the handleSubmit method, the Response method will be invoked with the query text as the argument. Using the flutter_dialogflow dependencies, we initialize the Dialogflow object passing our Dialogflow API token, the token can be retrieved in the web console. We then invoke the sendQuery method passing the query. After the response has been received, we instantiate new ChatMessage object passing the messageResponse and add it to the ChatMessage array inside the setState method to trigger a new render containing the response. We also use the tts package Tts object speak method passing the response message to trigget the text to speech for the response.
import 'package:flutter/material.dart';
import 'package:flutter_dialogflow/flutter_dialogflow.dart';
import 'package:tts/tts.dart';

void main() => runApp(new MyApp());

class MyApp extends StatelessWidget {
  // This widget is the root of your application.
  @override
  Widget build(BuildContext context) {
    return new MaterialApp(
      title: 'Alf Chatbot',
      theme: new ThemeData(
        primarySwatch: Colors.indigo,
      ),
      home: new MyHomePage(title: 'Alf Chatbot'),
      debugShowCheckedModeBanner: false,
    );
  }
}

class MyHomePage extends StatefulWidget {
  MyHomePage({Key key, this.title}) : super(key: key);
  final String title;

  @override
  _MyHomePageState createState() => new _MyHomePageState();
}

/* https://github.com/VictorRancesCode/flutter_dialogflow/blob/master/example/lib/main.dart */

class _MyHomePageState extends State<MyHomePage> {

  final List<ChatMessage> _messages = <ChatMessage>[];
  final TextEditingController _textController = new TextEditingController();

  Widget _buildTextComposer() {
    return new IconTheme(
      data: new IconThemeData(color: Theme.of(context).accentColor),
      child: new Container(
        margin: const EdgeInsets.symmetric(horizontal: 8.0),
        child: new Row(
          children: <Widget>[
            new Flexible(
              child: new TextField(
                controller: _textController,
                onSubmitted: _handleSubmitted,
                decoration:
                new InputDecoration.collapsed(hintText: "Send a message"),
              ),
            ),
            new Container(
              margin: new EdgeInsets.symmetric(horizontal: 4.0),
              child: new IconButton(
                  icon: new Icon(Icons.send),
                  onPressed: () => _handleSubmitted(_textController.text)),
            ),
          ],
        ),
      ),
    );
  }

  void Response(query) async {
    _textController.clear();
    Dialogflow dialogflow =Dialogflow(token: "Enter API KEY Here");
    AIResponse response = await dialogflow.sendQuery(query);
    ChatMessage message = new ChatMessage(
      text: response.getMessageResponse(),
      name: "Alf the Bot",
      type: false,
    );
    Tts.speak(response.getMessageResponse());
    setState(() {
      _messages.insert(0, message);
    });
  }

  void _handleSubmitted(String text) {
    _textController.clear();
    ChatMessage message = new ChatMessage(
      text: text,
      name: "Me",
      type: true,
    );
    setState(() {
      _messages.insert(0, message);
    });
    Response(text);
  }

  @override
  Widget build(BuildContext context) {
    return new Scaffold(
      appBar: new AppBar(
        title: new Text(widget.title),
      ),
      body: new Column(children: <Widget>[
        new Flexible(
            child: new ListView.builder(
              padding: new EdgeInsets.all(8.0),
              reverse: true,
              itemBuilder: (_, int index) => _messages[index],
              itemCount: _messages.length,
            )),
        new Divider(height: 1.0),
        new Container(
          decoration: new BoxDecoration(color: Theme.of(context).cardColor),
          child: _buildTextComposer(),
        ),
      ]),
    );
  }
}

class ChatMessage extends StatelessWidget {
  ChatMessage({this.text, this.name, this.type});

  final String text;
  final String name;
  final bool type;

  List<Widget> otherMessage(context) {
    return <Widget>[
      new Container(
        margin: const EdgeInsets.only(right: 16.0),
        child: new CircleAvatar(child: new Image.asset("img/placeholder.png")),
      ),
      new Expanded(
        child: new Column(
          crossAxisAlignment: CrossAxisAlignment.start,
          children: <Widget>[
            new Text(this.name, style:new TextStyle(fontWeight:FontWeight.bold )),
            new Container(
              margin: const EdgeInsets.only(top: 5.0),
              child: new Text(text),
            ),
          ],
        ),
      ),
    ];
  }

  List<Widget> myMessage(context) {
    return <Widget>[
      new Expanded(
        child: new Column(
          crossAxisAlignment: CrossAxisAlignment.end,
          children: <Widget>[
            new Text(this.name, style: Theme.of(context).textTheme.subhead),
            new Container(
              margin: const EdgeInsets.only(top: 5.0),
              child: new Text(text),
            ),
          ],
        ),
      ),
      new Container(
        margin: const EdgeInsets.only(left: 16.0),
        child: new CircleAvatar(child: new Text(this.name[0])),
      ),
    ];
  }

  @override
  Widget build(BuildContext context) {
    return new Container(
      margin: const EdgeInsets.symmetric(vertical: 10.0),
      child: new Row(
        crossAxisAlignment: CrossAxisAlignment.start,
        children: this.type ? myMessage(context) : otherMessage(context),
      ),
    );
  }
}
Conclusion
That’s it we have build a Chatbot app that utilizes Machine Learning. The era of Machine Learning, artificial intelligence technologies has come and we as a developer has just barely scratched the surface on what we can use this technologies to build an application that can empower people life. There are so many advancements in computer vision and Natural Language Processing such as Dialogflow that as a developer we can utilize to create a product that solves people and business problems. Happy Fluttering and stay tuned!