Refactor MVC iOS App to MVVM with RxSwift in Minutes
Published at Mar 14, 2019

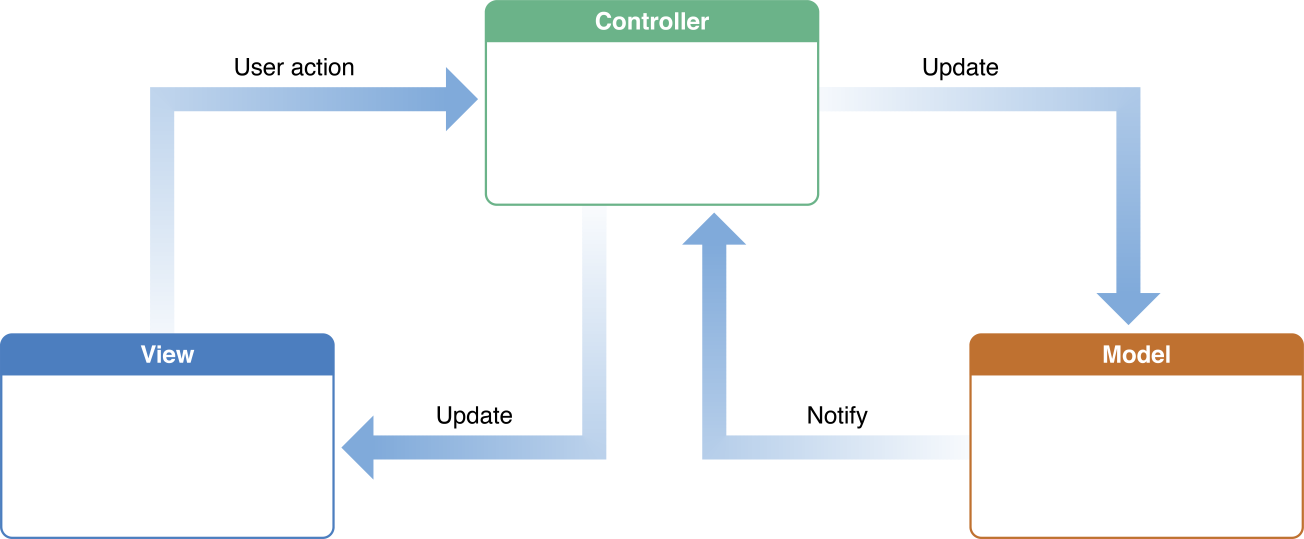
MVC is the app architecture that Apple recommends to the developers when developing iOS application. It provides clear separation between view, model, and controller. The controller sits at the middle and acts as a glue between view and model. Almost all the logic, data transformation from model to view is thrown inside the controller.
Overtime as the features and requirements grow, the view controller become so massive by all the logic, state management, data transformation, it will become tightly coupled and become very hard to test as an unit. Although is not always the case, if we carefully manage it properly. See Dave De Long blog post on better MVC.
Introducting MVVM
Model View View Model is the application architecture that was first actually invented by Microsoft with their .NET framework back in 2005 as a way to build event driven user interface.
MVVM as an architecture provide several main responsibilities, such as:
- As an interface that provide representation of the application state.
- As a pipeline of data transformation from the model that will be displayed into the view.
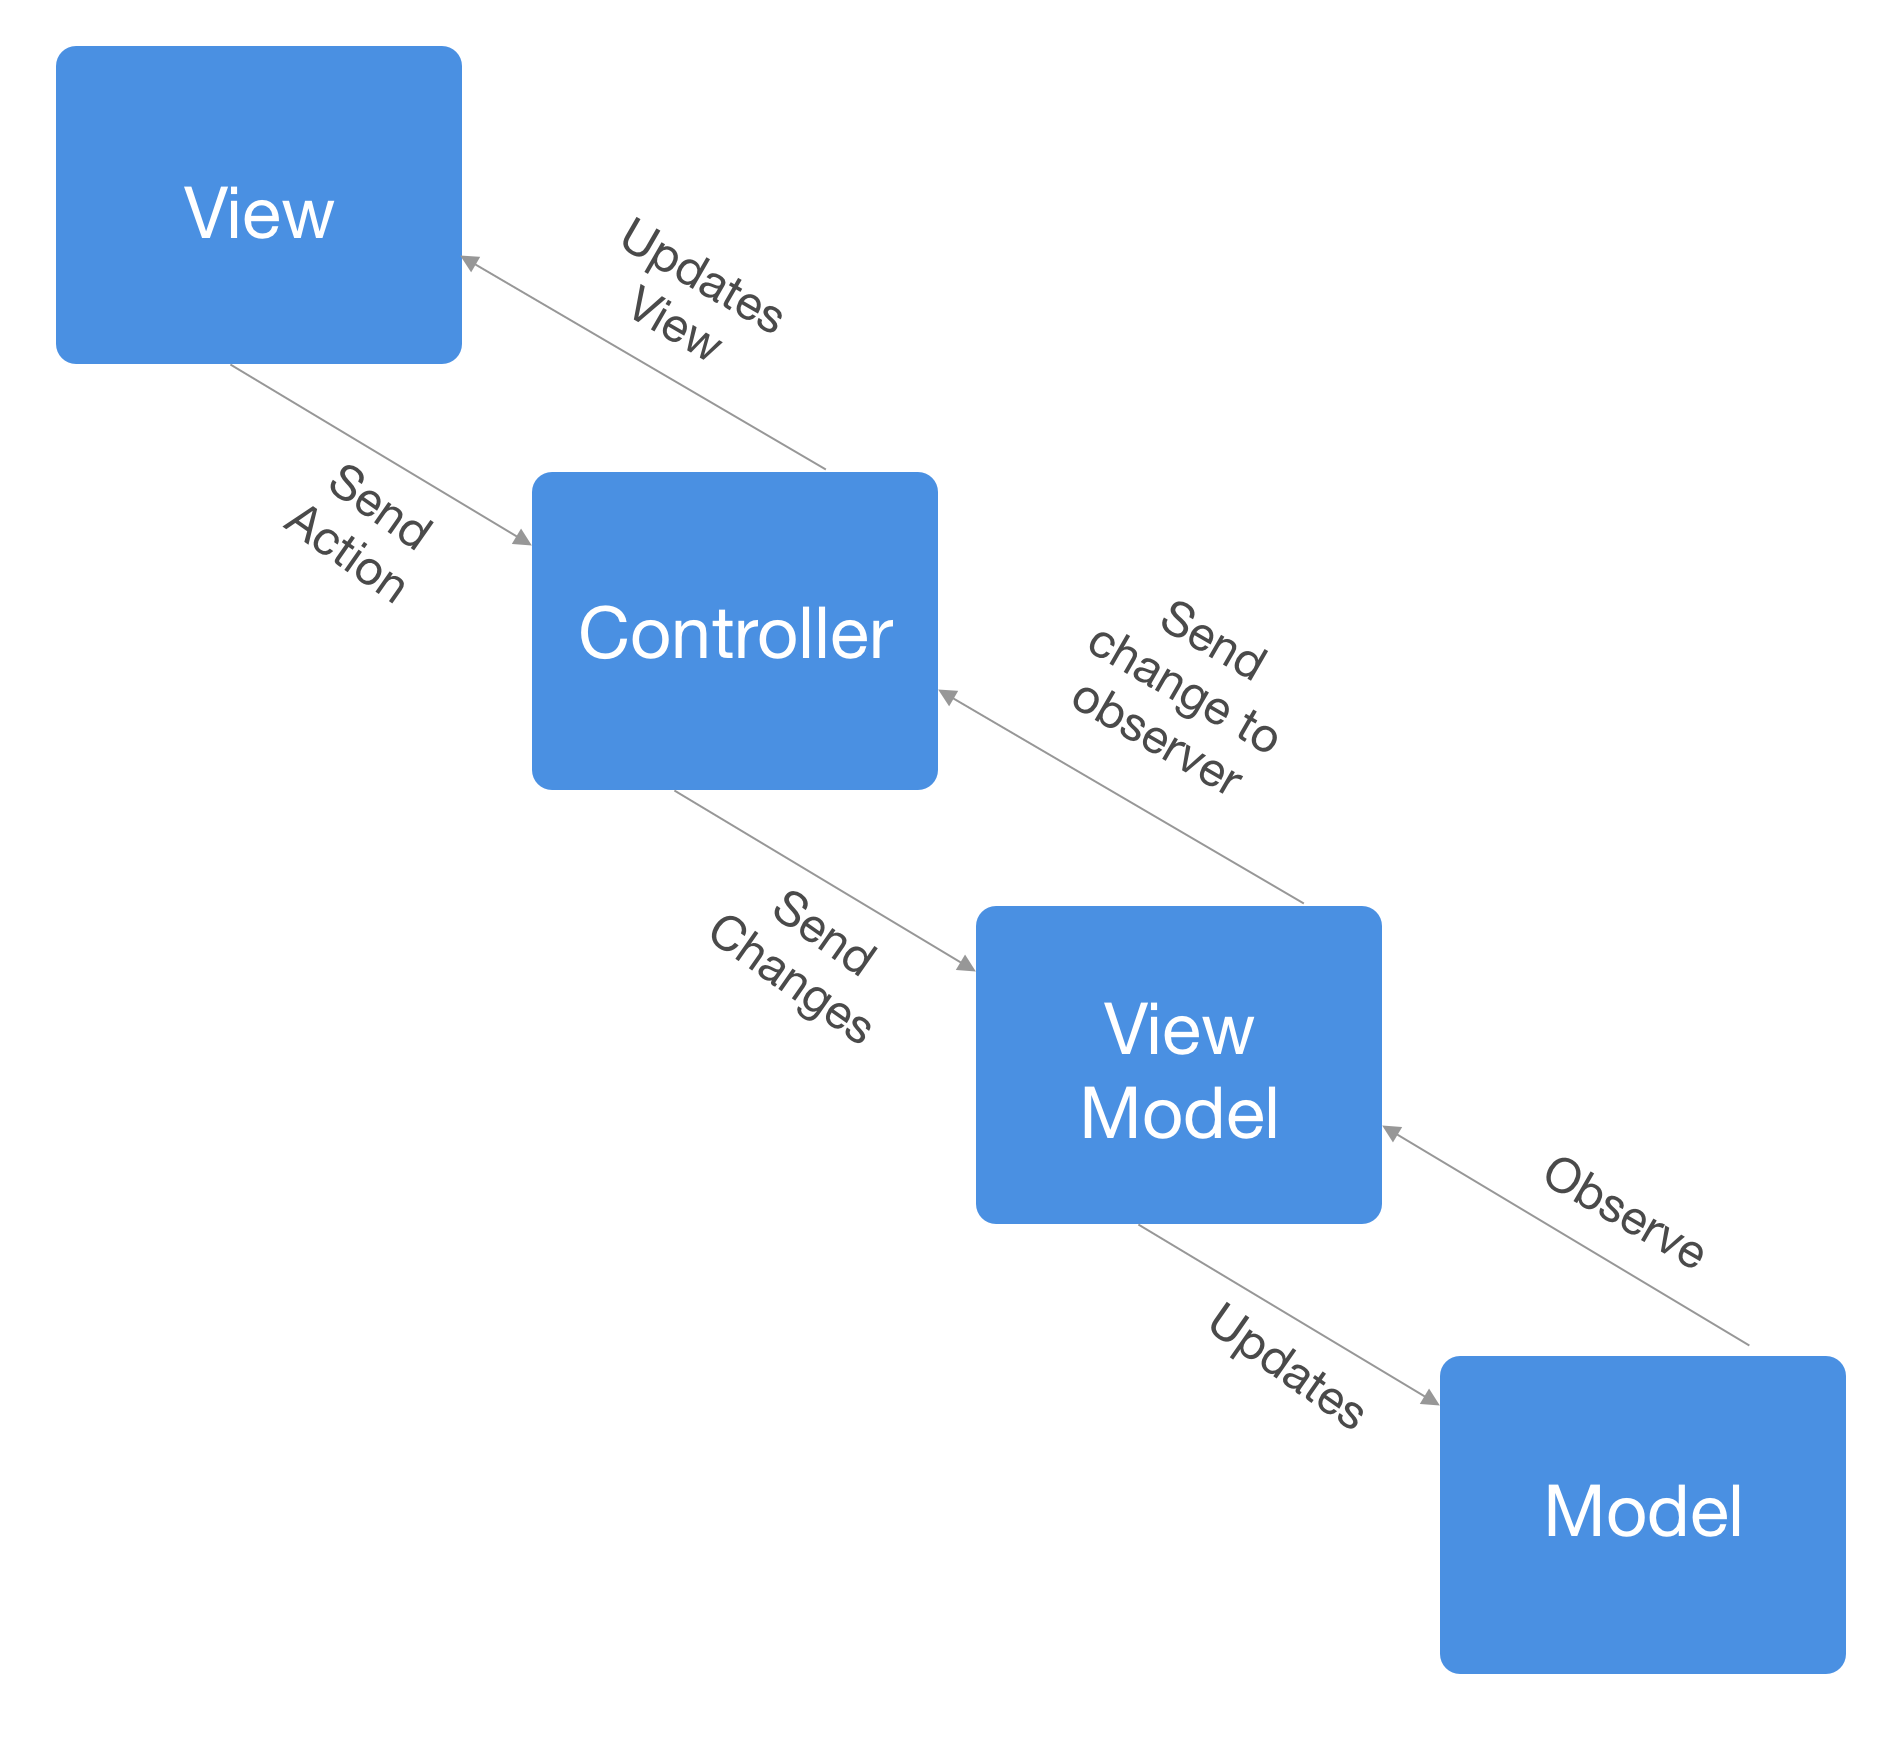
With MVVM, all the data transformation from model, for example formatting date to be displayed as a text in UILabel will be implemented by the View Model and exposed to the controller as property. View Controller responsibility is to configure the binding of properties from the View Model into the View and to send all the action from the view back to View Model. This way, the application state will always be in sync between the view and the View Model.
There are several important rules that applies:
- Model is owned by the View Model and it doesn’t know anything about the View Model.
- View Model is owned by the View Controller and it doesn’t know anything about the Controller
- The Controller owns the View Model and doesn’t know anything about the Model.
MVVM provides better encapsulation of the business logic and data transformation from the model, it is also very easy to test as an unit. Not all View Model need to provide binding to their properties, it can still be a lightweight object that can be used to configure view with the data transformation as we will see later when building our app.
Several of the binding options are available, like using key value observing and closures. In this article, we are going to use RxSwift library that provide reactive observable sequence to build our MVVM app.
What we will build
What we will build
In this article, we are going to refactor current iOS app that used MVC as its app architecture into MVVM. It is a movie info app that uses The Movie Database (TMDb) API with several main features:
- Fetch list of movies by most trending, popular, recent.
- Search movie using a search bar.
We will see how the MVVM architecture will help us build a much more lighter view controller and several View Models that have their own responsibility.
Please register and get your API Key from TMDb. https://www.themoviedb.org/documentation/api.
You can clone the starter project in the GitHub repository at alfianlosar/MovieInfoStarterProject.
Starter Project
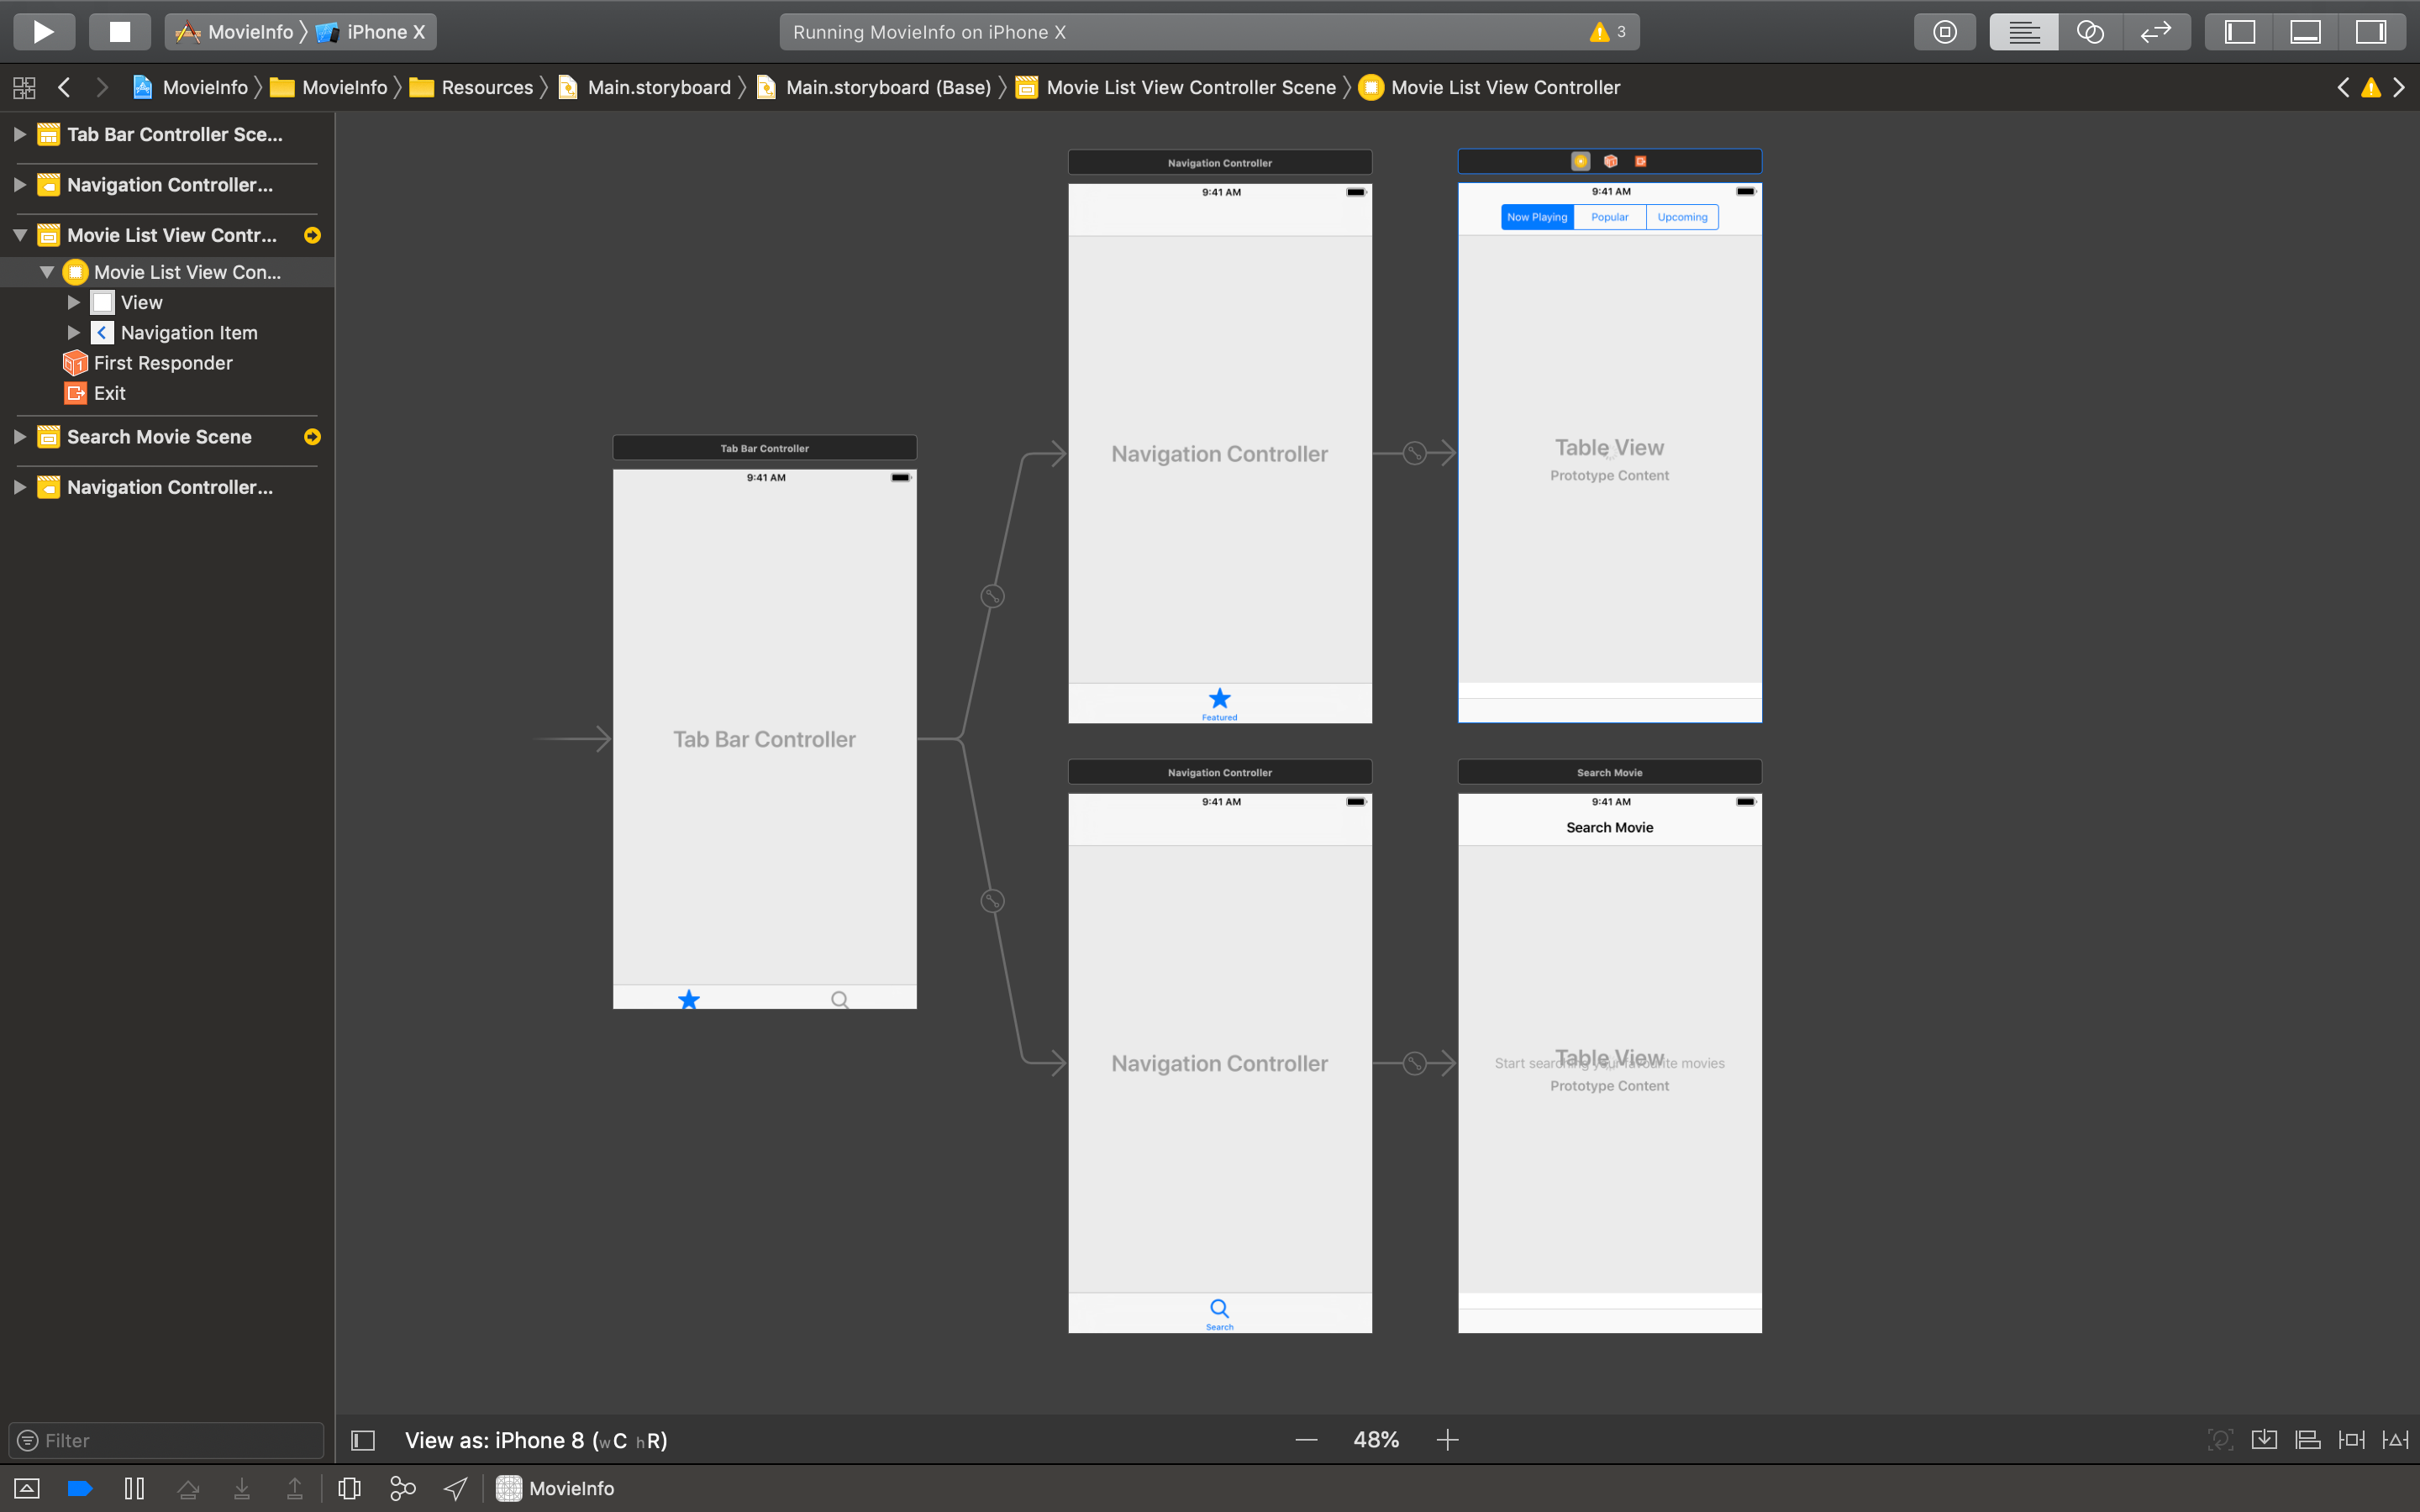
The starter project uses storyboard to configure its view controllers. Take a peek at the Main.storyboard file to view the configuration.

The app’s initial view controller is a Tab Bar Controller with 2 children, each of them is embedded into a Navigation Controller. Here’s a quick introduction the children:
- MovieListViewController. Display list of movies based on the several filter such as now playing, popular, and upcoming that user can select.
- MovieSearchViewController. Display a search bar for user to type and search the movie they want to search.
Both of the View Controllers use TableView to display the list of movies using MovieCell that is configured to display the data in tableView(_:cellForRowAt:) table view data source method.
The app has the models object inside the Movie.swift file. There are several models inside the files that already implements the Codable protocol and can be used out of the box to decode the response from TMDb API.
The app also has the MovieStore object that implements the MovieService protocol. The MovieStore object uses the TMDb API to perform url session request to the specified enpdoint, decode the result into the response object, and invoke the successful handler closure passing the response.
Make sure to open the MovieStore.swift file and paste your own API Key into the apiKey constant inside the class, then build and run the project. Play with it for a while to understand the app features. Next, we will start our refactoring process step by step starting from the configuration of the movie cell to display the data.
The MovieViewViewModel
The first refactoring will be pretty simple, take a look inside both MovieListViewController and MovieSearchViewController tableView(_:cellForRowAt:) method. We can see that all the data transformation especially the release date and rating text is performed inside it before they are being set into the Movie Cell ui elements, the View Controller should not handle this data transformation.
func tableView(_ tableView: UITableView, cellForRowAt indexPath: IndexPath) -> UITableViewCell {
    let cell = tableView.dequeueReusableCell(withIdentifier: "MovieCell", for: indexPath) as! MovieCell
    let movie = movies[indexPath.row]    cell.titleLabel.text = movie.title
    cell.releaseDateLabel.text = dateFormatter.string(from: movie.releaseDate)
    cell.overviewLabel.text = movie.overview
    cell.posterImageView.kf.setImage(with: movie.posterURL)    let rating = Int(movie.voteAverage)
    let ratingText = (0..<rating).reduce("") { (acc, _) -> String in
        return acc + "⭐️
    }
    cell.ratingLabel.text = ratingText
    return cell
}
Let’s begin by create a new file for our View Model which we call MovieViewViewModel. Here are several things that it will do:
- Accepts a Movie object inside the initializer and store it inside a private property.
- Exposes property for the title, overview, poster url, formatted release date text, and formatted rating text.
- Handles the data transformation of release date to text using DateFormatter.
- Handles the data transformation of rating number into the ⭐️ text.
import Foundation

struct MovieViewViewModel {

    private var movie: Movie

    private static let dateFormatter: DateFormatter = {
        $0.dateStyle = .medium
        $0.timeStyle = .none
        return $0
    }(DateFormatter())

    init(movie: Movie) {
        self.movie = movie
    }

    var title: String {
        return movie.title
    }

    var overview: String {
        return movie.overview
    }

    var posterURL: URL {
        return movie.posterURL
    }

    var releaseDate: String {
        return MovieViewViewModel.dateFormatter.string(from: movie.releaseDate)
    }

    var rating: String {
        let rating = Int(movie.voteAverage)
        let ratingText = (0..<rating).reduce("") { (acc, _) -> String in
            return acc + "⭐️"
        }
        return ratingText
    }

}
For the next part, we can update the MovieCell class so it provide a configure method that accepts a MovieViewViewModel.
import UIKit
import Kingfisher

class MovieCell: UITableViewCell {

    @IBOutlet weak var posterImageView: UIImageView!
    @IBOutlet weak var titleLabel: UILabel!
    @IBOutlet weak var overviewLabel: UILabel!
    @IBOutlet weak var releaseDateLabel: UILabel!
    @IBOutlet weak var ratingLabel: UILabel!

    func configure(viewModel: MovieViewViewModel) {
        titleLabel.text = viewModel.title
        overviewLabel.text = viewModel.overview
        releaseDateLabel.text = viewModel.releaseDate
        ratingLabel.text = viewModel.rating
        posterImageView.kf.setImage(with: viewModel.posterURL)
    }

}
At last, inside both the view controllers we can update the tableView(_:cellForRowAt:) method so it can initialize the MovieViewViewModel and invoke the MovieCell configure method passing the view model to configure the cell UI.
func tableView(_ tableView: UITableView, cellForRowAt indexPath: IndexPath) -> UITableViewCell {
    let cell = tableView.dequeueReusableCell(withIdentifier: "MovieCell", for: indexPath) as! MovieCell
    let movie = movies[indexPath.row
    let viewModel = MovieViewViewModel(movie: movie)
    cell.configure(viewModel: viewModel)
    return cell
}
That’s it for our first View Model!. We simply move all the logic to transform data inside the view controller into a separate View Model object that doesn’t have to know about the controller or the view. P.S, you can also delete the DateFormatter property inside the view controllers for the sake of lean view controller 😋. Run and build the project to make sure it still works.
Brief introduction about Reactive Programming with RxSwift
Before we begin our next refactoring, i’m going to provide a simple introduction about reactive programming with RxSwift in case some of you never try it before. It can also be a refresher if you have already using reactive programming before. In Reactive programming, data is a flow of sequence (stream) that starts at publisher, going to several transformation using operator, and then ends at the subscribers. Take a look the marble diagram below for better visualization:
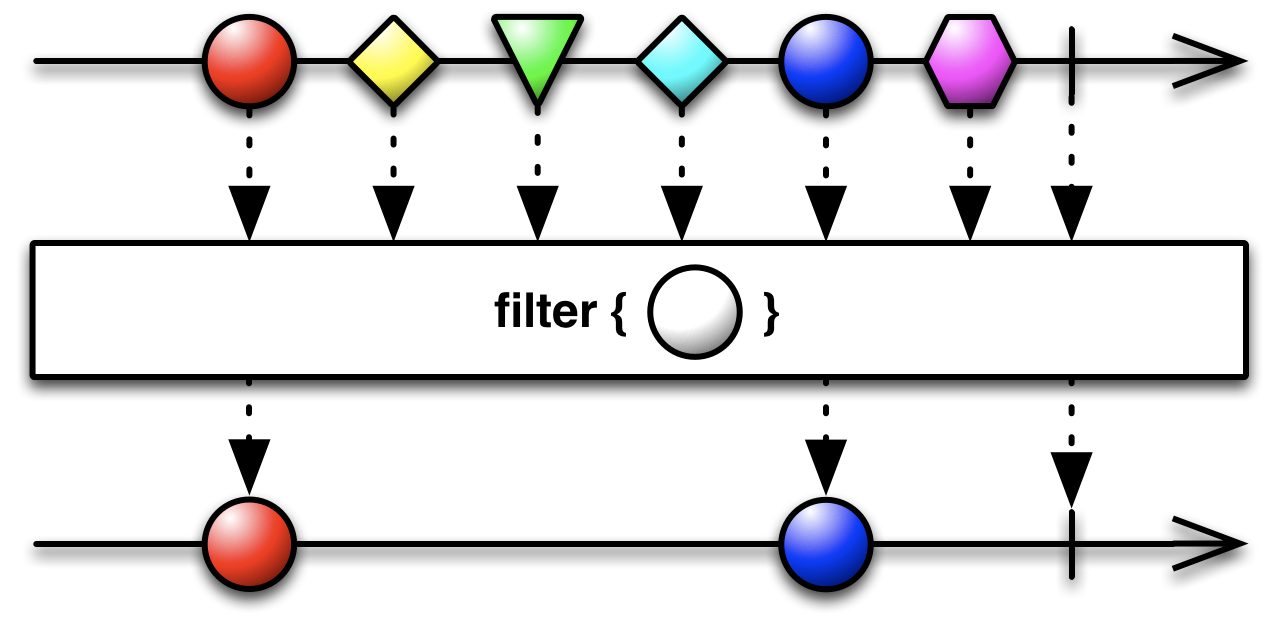
The line at the top of diagram are the observables sequence that are published, then filter transformation is applied at the middle, and at the end the observer/subscribe will only receive the value that has passed through the transformation. There are many more operators like combine, zip, merge, throttle, that we can use as transformation in the pipeline. Make sure to check the RxSwift documentation to learn for more.
http://reactivex.io/documentation/operators.html
There are several key terms that we need to know and understand to use RxSwift properly:
- Observable: It’s a sequence of data that we can apply transformation, then observe/subscribe to.
- Subject: It’s a sequence of data like the observable, but we can also publish next value to the subject
- Driver: It’s the same as observable, but in this case it will be guaranteed to be scheduled to run on main thread.
- BehaviorRelay: It’s a specialized Subject that we can use to set and get value like a normal variable.
That’s all for the quick intro about Reactive programming with RxSwift, let’s begin our next refactoring for MovieListViewController!
MovieListViewController Current MVC State
import UIKit

class MovieListViewController: UIViewController {

    @IBOutlet weak var tableView: UITableView!
    @IBOutlet weak var activityIndicatorView: UIActivityIndicatorView!
    @IBOutlet weak var infoLabel: UILabel!
    @IBOutlet weak var segmentedControl: UISegmentedControl!

    let movieService: MovieService = MovieStore.shared
    var movies = [Movie]() {
        didSet {
            tableView.reloadData()
        }
    }

    var endpoint = Endpoint.nowPlaying {
        didSet {
            fetchMovies()
        }
    }

    override func viewDidLoad() {
        super.viewDidLoad()

        segmentedControl.addTarget(self, action: #selector(segmentChanged(_:)), for: .valueChanged)
        setupTableView()
        fetchMovies()
    }

    private func fetchMovies() {
        self.movies = []
        activityIndicatorView.startAnimating()
        infoLabel.isHidden = true

        movieService.fetchMovies(from: endpoint, params: nil, successHandler: {[unowned self] (response) in
            self.activityIndicatorView.stopAnimating()
            self.movies = response.results
        }) { [unowned self] (error) in
            self.activityIndicatorView.stopAnimating()
            self.infoLabel.text = error.localizedDescription
            self.infoLabel.isHidden = false
        }
    }

    private func setupTableView() {
        tableView.tableFooterView = UIView()
        tableView.rowHeight = UITableView.automaticDimension
        tableView.estimatedRowHeight = 100
        tableView.register(UINib(nibName: "MovieCell", bundle: nil), forCellReuseIdentifier: "MovieCell")
    }

    @objc func segmentChanged(_ sender: UISegmentedControl) {
        endpoint = sender.endpoint
    }
}

extension MovieListViewController: UITableViewDataSource, UITableViewDelegate {

    func tableView(_ tableView: UITableView, numberOfRowsInSection section: Int) -> Int {
        return movies.count
    }

    func tableView(_ tableView: UITableView, cellForRowAt indexPath: IndexPath) -> UITableViewCell {
        let cell = tableView.dequeueReusableCell(withIdentifier: "MovieCell", for: indexPath) as! MovieCell
        let movie = movies[indexPath.row]
        let viewModel = MovieViewViewModel(movie: movie)
        cell.configure(viewModel: viewModel)
        return cell
    }
}
Let’s take a look at the current MovieListViewController implementation. There are several responsibilities it currently has:
- It stores array of Movies as instance property, this will be used to store the movies and drive the table view data source. It is using the didSet property observer to reload the table view whenever new value is assigned.
- The endpoint property property reflects the segment that is currently being selected in Segmented Control. A target action selector is added to the Segmented Control that will assign the property based on the selected index of segmented control using extension. It is also using didSet property observer to fetch movies based on the selected endpoint.
- MovieService will be used to fetch the movies using TMDb API based on the point. It is invoked in the fetchMovies method. Inside this method, before making an API call the activity indicator view is set to start animating, and also info label view is set to hidden. In the closure success handler, the movies property is assigned new value from the response. While on the closure error handler, the info label text is assigned with the value of error description and is set to be shown in UI. In both of the handlers, the activity indicator view animation will be stopped.
- In the tableView(_:cellForRowAt:) method, after the cell is dequeued and movie is retrieved using the indexPath row. The MovieViewViewModel is instantiated with the movie and is passed to the cell configure(viewModel:) method configure the UI of the cell.
There are many tasks that MovieListViewController need to perform, from state management when fetching movies, storing, and tracking all the properties. All of this logic and state make the View Controller tightly coupled and hard to test in encapsulation. So, let’s reduce all the burden of the View Controller and move to our next refactoring, which is to create a MovieListViewViewModel.
Refactor into MovieListViewViewModel
Let’s create new file for our View Model using MovieListViewViewModel as the filename. Next, let’s import the RxSwift and RxCocoa frameworks, then declare the class.
import Foundation
import RxSwift
import RxCocoa

class MovieListViewViewModel {
    private let movieService: MovieService
    private let disposeBag = DisposeBag()
    private let _movies = BehaviorRelay<[Movie]>(value: [])
    private let _isFetching = BehaviorRelay<Bool>(value: false)
    private let _error = BehaviorRelay<String?>(value: nil)
    var isFetching: Driver<Bool> {
        return _isFetching.asDriver()
    }    var movies: Driver<[Movie]> {
       return _movies.asDriver()
    }    var error: Driver<String?> {
       return _error.asDriver()
    }    var hasError: Bool {
       return _error.value != nil
    }    var numberOfMovies: Int {
       return _movies.value.count
    }
}
Let’s break down all the declarations into several points:
- MovieService property will be used to fetch movies from the API. This property will be assigned using dependency injection via initalizer.
- DisposeBag is a RxSwift special object that will be used to automatically manage the deallocation of observables subscription when the object is deallocated.
- The movies, isFetching, _error properties uses BehaviorRelay so it can be used to publish new value and also be observed. These properties are declared as private.
- The movies, isFetching, error properties are computed variables that return Driver from each of respective private property. Driver is an observable that always scheduled to be run on UI Thread. These properties will be used by the View Controller to observe the value and bind the View to.
- numberOfMovies returns the total count of movies stored inside the _movies property which stores the array of movies.
Next, let’s declare the initializer and methods for this View Model.
class MovieListViewViewModel {    ...

    init(endpoint: Driver<Endpoint>, movieService: MovieService) {
        self.movieService = movieService
        endpoint
            .drive(onNext: { [weak self] (endpoint) in
                self?.fetchMovies(endpoint: endpoint)
            }).disposed(by: disposeBag)
    }

    func viewModelForMovie(at index: Int) -> MovieViewViewModel? {
        guard index < _movies.value.count else {
            return nil
        }
        return MovieViewViewModel(movie: _movies.value[index])
    }

    func fetchMovies(endpoint: Endpoint) {
        self._movies.accept([])
        self._isFetching.accept(true)
        self._error.accept(nil)

        movieService.fetchMovies(from: endpoint, params: nil, successHandler: {[weak self] (response) in
            self?._isFetching.accept(false)
            self?._movies.accept(response.results)
        }) { [weak self] (error) in
            self?._isFetching.accept(false)
            self?._error.accept(error.localizedDescription)
        }
    }
}
Let’s break down all of it into several main points:
- The initializer accepts Driver with the type of Endpoint and also MovieService as the parameters. The movieService is then assigned to the instance property. Then, we subscribe to the Driver, whenever the next value is assigned, we invoke the fetchMovies passing the endpoint.
- The fetchMovies method will call TMDb API and publish all the values to the specified BehaviorRelay properties such as movies, isFetching, _error using accept method. All the states such as fetching, error, and success fetching are managed by the View Model.
- The viewModelForMovie(at index:) is a helper method that will return the MovieViewViewModel at specified index. This will be used in the table view tableView(_:cellForRowAt:) method in the view controller.
Next, we need to update the MovieListViewController to use the View Model we just created.
...
import RxSwift
import RxCocoa
class MovieListViewController: UIViewController {
    ...
     var movieListViewViewModel: MovieListViewViewModel!
     let disposeBag = DisposeBag()

     override func viewDidLoad() {
          super.viewDidLoad()
          movieListViewViewModel = MovieListViewViewModel(endpoint: segmentedControl.rx.selectedSegmentIndex
              .map { Endpoint(index: $0) ?? .nowPlaying }
              .asDriver(onErrorJustReturn: .nowPlaying)
              , movieService: MovieStore.shared)

              movieListViewViewModel.movies.drive(onNext: {[unowned self] (_) in
               self.tableView.reloadData()
          }).disposed(by: disposeBag)

          movieListViewViewModel
             .isFetching
             .drive(activityIndicatorView.rx.isAnimating)
             .disposed(by: disposeBag)

          movieListViewViewModel
              .error
              .drive(onNext: {[unowned self] (error) in
                   self.infoLabel.isHidden = !self.movieListViewViewModel.hasError
                   self.infoLabel.text = error
               }).disposed(by: disposeBag)

          setupTableView()
    }
    ....
}
In here, there are several things that we have updated:
- We import the RxSwift and RxCocoa framework to the file.
- We declare 2 new instance properties, MovieListViewViewModel and disposeBag .
- In viewDidLoad , we initialize the MovieListViewViewModel passing the driver. The driver itself use RxCocoa extension on the UISegmentedControl selectedSegmentIndex property. With this, we can observe new value whenever selected segment index is updated. In here, we also use map operator to transform the index as an Endpoint enum using the optional initializer with index. We also pass the MovieService to the initializer, you can also pass mock object that returns stub here instead of calling TMDb API for testing purposes.
- Next, we observe the movies property from the View Model. Whenever the value is updated, we just invoke table view reload data to update the list.
- Next, we use binding on the isFetching property to the activity indicator view RxCocoa isAnimating property. So whenever isFetching value is true, it will automatically animate the activity indicator.
- At last, we observe the error property, so whenever it gets updated and it exists, we will show the error using the infoLabel property , otherwise we hide the infoLabel.
At last, let’s update the table view data source implementation to use our new View Model.
extension MovieListViewController: UITableViewDataSource, UITableViewDelegate {

    func tableView(_ tableView: UITableView, numberOfRowsInSection section: Int) -> Int {
        return movieListViewViewModel.numberOfMovies
    }

    func tableView(_ tableView: UITableView, cellForRowAt indexPath: IndexPath) -> UITableViewCell {
        let cell = tableView.dequeueReusableCell(withIdentifier: "MovieCell", for: indexPath) as! MovieCell
        if let viewModel = movieListViewViewModel.viewModelForMovie(at: indexPath.row) {
            cell.configure(viewModel: viewModel)
        }
        return cell
    }
}
In here, we just need to update the numberOfRowsInSection method to just return the MovieListViewViewModel numberOfMovies property. In tableView(_:cellForRowAt:) , we can use the MovieListViewViewModel viewModelForMovieAtIndex: to return the MovieViewViewModel on the respective indexPath row.
That’s it for the MovieListViewController refactoring to use MVVM. We can also delete all the properties and method that we don’t actually use anymore. They have been moved into the MovieListViewViewModel for better encapsulation!
MovieSearchViewController Current MVC State
import UIKit

class MovieSearchViewController: UIViewController {

    @IBOutlet weak var tableView: UITableView!
    @IBOutlet weak var infoLabel: UILabel!
    @IBOutlet weak var activityIndicatorView: UIActivityIndicatorView!

    var service: MovieService = MovieStore.shared
    var movies = [Movie]() {
        didSet {
            tableView.reloadData()
        }
    }

    override func viewDidLoad() {
        super.viewDidLoad()

        setupNavigationBar()
        setupTableView()
    }

    private func setupNavigationBar() {
        navigationItem.searchController = UISearchController(searchResultsController: nil)
        self.definesPresentationContext = true
        navigationItem.searchController?.dimsBackgroundDuringPresentation = false
        navigationItem.searchController?.hidesNavigationBarDuringPresentation = false

        navigationItem.searchController?.searchBar.sizeToFit()
        navigationItem.searchController?.searchBar.delegate = self
        navigationItem.hidesSearchBarWhenScrolling = false
        navigationController?.navigationBar.prefersLargeTitles = true
    }

    private func setupTableView() {
        tableView.tableFooterView = UIView()
        tableView.rowHeight = UITableView.automaticDimension
        tableView.estimatedRowHeight = 100
        tableView.register(UINib(nibName: "MovieCell", bundle: nil), forCellReuseIdentifier: "MovieCell")
    }

    private func searchMovie(query: String?) {
        guard let query = query, !query.isEmpty else {
            return
        }

        self.movies = []
        activityIndicatorView.startAnimating()
        infoLabel.isHidden = true
        service.searchMovie(query: query, params: nil, successHandler: {[unowned self] (response) in

            self.activityIndicatorView.stopAnimating()
            if response.totalResults == 0 {
                self.infoLabel.text = "No results for \(query)"
                self.infoLabel.isHidden = false
            }
            self.movies = Array(response.results.prefix(5))
        }) { [unowned self] (error) in
            self.activityIndicatorView.stopAnimating()
            self.infoLabel.isHidden = false
            self.infoLabel.text = error.localizedDescription
        }

    }

}

extension MovieSearchViewController: UITableViewDataSource, UITableViewDelegate {

    func tableView(_ tableView: UITableView, numberOfRowsInSection section: Int) -> Int {
        return movies.count
    }

    func tableView(_ tableView: UITableView, cellForRowAt indexPath: IndexPath) -> UITableViewCell {
        let cell = tableView.dequeueReusableCell(withIdentifier: "MovieCell", for: indexPath) as! MovieCell
        let movie = movies[indexPath.row]
        let viewModel = MovieViewViewModel(movie: movie)
        cell.configure(viewModel: viewModel)

        return cell
    }

}

extension MovieSearchViewController: UISearchBarDelegate {

    func searchBarSearchButtonClicked(_ searchBar: UISearchBar) {
        searchBar.resignFirstResponder()

        searchMovie(query: searchBar.text)
    }

    func searchBarCancelButtonClicked(_ searchBar: UISearchBar) {
        searchBar.resignFirstResponder()

        self.movies = []
        self.infoLabel.text = "Start searching your favourite movies"
        self.infoLabel.isHidden = false
    }

    func searchBar(_ searchBar: UISearchBar, textDidChange searchText: String) {
        self.movies = []
        if searchText.isEmpty {
            self.infoLabel.text = "Start searching your favourite movies"
            self.infoLabel.isHidden = false
        }
    }

}
Let’s take a look at the current MovieSearchViewController implementation. It has many many similarities with the MovieListViewController such as:
- It stores array of Movies as instance property.
- The MovieService to fetch the data from TMDb API
- tableView(_:cellForRowAt:) method to return MovieViewView model based on the indexPath row.
- UI elements like table view, activity indicator , and info label.
For the sake of not repeating what those things are, you can refer to the detail in MovieListViewController current MVC state section of this article.
Instead, we will focus on the differences, here they are:
- Instead of using Segmented Control to filter the result of the movies, here UISearchBar is used to query the movies based on the keyword that the user type.
- Instead of calling MovieService fetchMovies at specified endpoint, it will call the MovieService searchMovie passing the query as the parameter.
- The MovieSearchViewController will be assigned as the delegate of the Search Bar, whenever the user tap return it will invoke the searchMovie method passing the search bar text. When user tap cancel, it will clear the movies from the list, and set a placeholder on the info label to invite user to search.
That’s all for the detail of the current state, let’s move on to refactoring by creating MovieSearchViewViewModel.
Refactor into MovieSearchViewViewModel
Let’s create new file for our View Model using MovieSearchViewViewModel as the filename. Next, let’s import the RxSwift and RxCocoa frameworks, then declare the class.
import Foundation
import RxSwift
import RxCocoa

class MovieSearchViewViewModel {
    private let movieService: MovieService
    private let disposeBag = DisposeBag()
    private let _movies = BehaviorRelay<[Movie]>(value: [])
    private let _isFetching = BehaviorRelay<Bool>(value: false)
    private let _info = BehaviorRelay<String?>(value: nil)
    var isFetching: Driver<Bool> {
        return _isFetching.asDriver()
    }
    var movies: Driver<[Movie]> {
       return _movies.asDriver()
    }
    var info: Driver<String?> {
       return _info.asDriver()
    }
    var hasInfo: Bool {
       return _info.value != nil
    }
    var numberOfMovies: Int {
       return _movies.value.count
    }
}
The properties are almost pretty much identical compared to MovieListViewViewModel , the only differences here is we replace error property with the info property. In search, we are also displaying placeholder text when the search bar text is empty. You can see more detail about those properties in the Refactoring into MovieListViewViewModel section of this article.
Next, let’s declare the initializer and methods that will be pretty different compared to MovieListViewViewModel.
import Foundation
import RxSwift
import RxCocoa

class MovieSearchViewViewModel {
    init(query: Driver<String>, movieService: MovieService) {
         self.movieService = movieService
            .query
             .throttle(1.0)
             .distinctUntilChanged()
             .drive(onNext: { [weak self] (queryString) in
                 self?.searchMovie(query: queryString)
                 if queryString.isEmpty {
                     self?._movies.accept([])
                     self?._info.accept("Start searching your favorite movies")
                 }
             }).disposed(by: disposeBag)
     }

     func viewModelForMovie(at index: Int) -> MovieViewViewModel? {
         guard index < _movies.value.count else {
             return nil
         }
         return MovieViewViewModel(movie: _movies.value[index])
     }

     private func searchMovie(query: String?) {
         guard let query = query, !query.isEmpty else {
             return
         }
         self._movies.accept([])
         self._isFetching.accept(true)
         self._info.accept(nil)
         movieService.searchMovie(query: query, params: nil, successHandler: {[weak self] (response) in
             self?._isFetching.accept(false)
             if response.totalResults == 0 {
                  self?._info.accept("No result for \(query)")
             }
             self?._movies.accept(Array(response.results.prefix(5)))
         }) { [weak self] (error) in
             self?._isFetching.accept(false)
             self?._info.accept(error.localizedDescription)
         }
     }
}
Let’s break down all of it into several main points:
- The initializer accepts Driver with the type of String and also MovieService as the parameters. The movieService is then assigned to the instance property. When subscribing to driver, we are also applying the throttle operator, this will limit the stream in a specified period of time which in this case we set it to 1 second. We are avoiding too many requests for each keyword that user types to the TMDb API. The distinctUntilChanged operator prevent the same keyword to be applied. Whenever we receive the next query, we invoke the searchMovies passing the query. Also we check if the query length is empty, we add the placeholder text to the info subject.
- The searchMovie method will call the TMDb API and publish all the values to the specified BehaviorRelay properties such as movies, isFetching, _error using accept method. All the states such as fetching, error, and success fetching are managed by the View Model.
- The viewModelForMovie(at index:) is a helper method that will return the MovieViewViewModel at specified index. This will be used in tableView(_:cellForRowAt:) method in the view controller.
Next, we need to update the MovieSearchViewController to use the View Model we just created.
import UIKit
import RxCocoa
import RxSwift

class MovieSearchViewController: UIViewController {

    @IBOutlet weak var tableView: UITableView!
    @IBOutlet weak var infoLabel: UILabel!
    @IBOutlet weak var activityIndicatorView: UIActivityIndicatorView!
    var movieSearchViewViewModel: MovieSearchViewViewModel!
    let disposeBag = DisposeBag()

    override func viewDidLoad() {
        super.viewDidLoad()
        setupNavigationBar()
        let searchBar = self.navigationItem.searchController!.searchBar
        movieSearchViewViewModel = MovieSearchViewViewModel(query:
        searchBar.rx.text.orEmpty.asDriver(), movieService: MovieStore.shared)

        movieSearchViewViewModel
            .movies.drive(onNext: {[unowned self] (_) in
                self.tableView.reloadData()
            }).disposed(by: disposeBag)

            movieSearchViewViewModel
             .isFetching
             .drive(activityIndicatorView.rx.isAnimating)
             .disposed(by: disposeBag)
             movieSearchViewViewModel.info.drive(onNext: {[unowned self] (info) in
            self.infoLabel.isHidden = !self.movieSearchViewViewModel.hasInfo
            self.infoLabel.text = info
        }).disposed(by: disposeBag)

        searchBar.rx.searchButtonClicked
            .asDriver(onErrorJustReturn: ())
            .drive(onNext: { [unowned searchBar] in
                searchBar.resignFirstResponder()
            }).disposed(by: disposeBag)
            searchBar.rx.cancelButtonClicked
            .asDriver(onErrorJustReturn: ())
            .drive(onNext: { [unowned searchBar] in
                searchBar.resignFirstResponder()
            }).disposed(by: disposeBag)

        setupTableView()
    }    ...
}
In here, it works almost the same with the MovieListViewController viewDidLoad method but instead of declaring MoveListViewViewModel , we declare MovieSearchViewViewModel . In the viewDidLoad , we instantiate it passing the search bar extension with RxCocoa that exposes the text property as driver. Also, we use are handling the search bar searchButtonClicked and cancelButtonClicked using RxCocoa to dismiss the on screen keyboard whenever new event is delivered.
At last, let’s update the table view data source implementation to use our new View Model.
extension MovieSearchViewController: UITableViewDataSource, UITableViewDelegate {

    func tableView(_ tableView: UITableView, numberOfRowsInSection section: Int) -> Int {
        return movieSearchViewViewModel.numberOfMovies
    }    func tableView(_ tableView: UITableView, cellForRowAt indexPath: IndexPath) -> UITableViewCell {    let cell = tableView.dequeueReusableCell(withIdentifier: "MovieCell", for: indexPath) as! MovieCell
        if let viewModel = movieSearchViewViewModel.viewModelForMovie(at: indexPath.row) {
        cell.configure(viewModel: viewModel)
        }
        return cell
    }
}
In here, we just need to update the numberOfRowsInSection method to just return the MovieSearchViewViewModel numberOfMovies property. In tableView(_:cellForRowAt:)we can use the MovieSearchViewViewModel viewModelForMovieAtIndex: to return the MovieViewViewModel on the respective indexPath row.
That’s all for the MovieSearchViewController refactoring to MVVM, you can also remove the implementation of Search Bar delegate as we already using RxCocoa to subscribe and handle those events from the search bar!.
That’s it!, try to build the app to make sure it runs properly with all the refactoring. You can check the project complete source code in the GitHub repository at alfianlosari/MovieInfoMVVMiOS.
Conclusion
Building an app with MVVM as an architecture is not really that complex. In the long run, ViewModel really helps the View Controller become more lightweight and encapsulate our data transformation. Testing on the View Model is also pretty simple and straightforward without worrying about the View Controller.
Although RxSwift can become quite complex and has steep learning curve for developers that has just exposed to reactive programming, it is also has powerful feature like throttle and many more to explore. Next time, let’s explore about how to perform unit testing on View Model with RxSwift’s RxTest & RxBlocking. So until then, let’s keep the lifelong learning, keep growing and building. Happy Swifting 😋.