Serverless Google App Engine with Custom Docker Runtime and Swift Vapor
Published at Oct 23, 2018
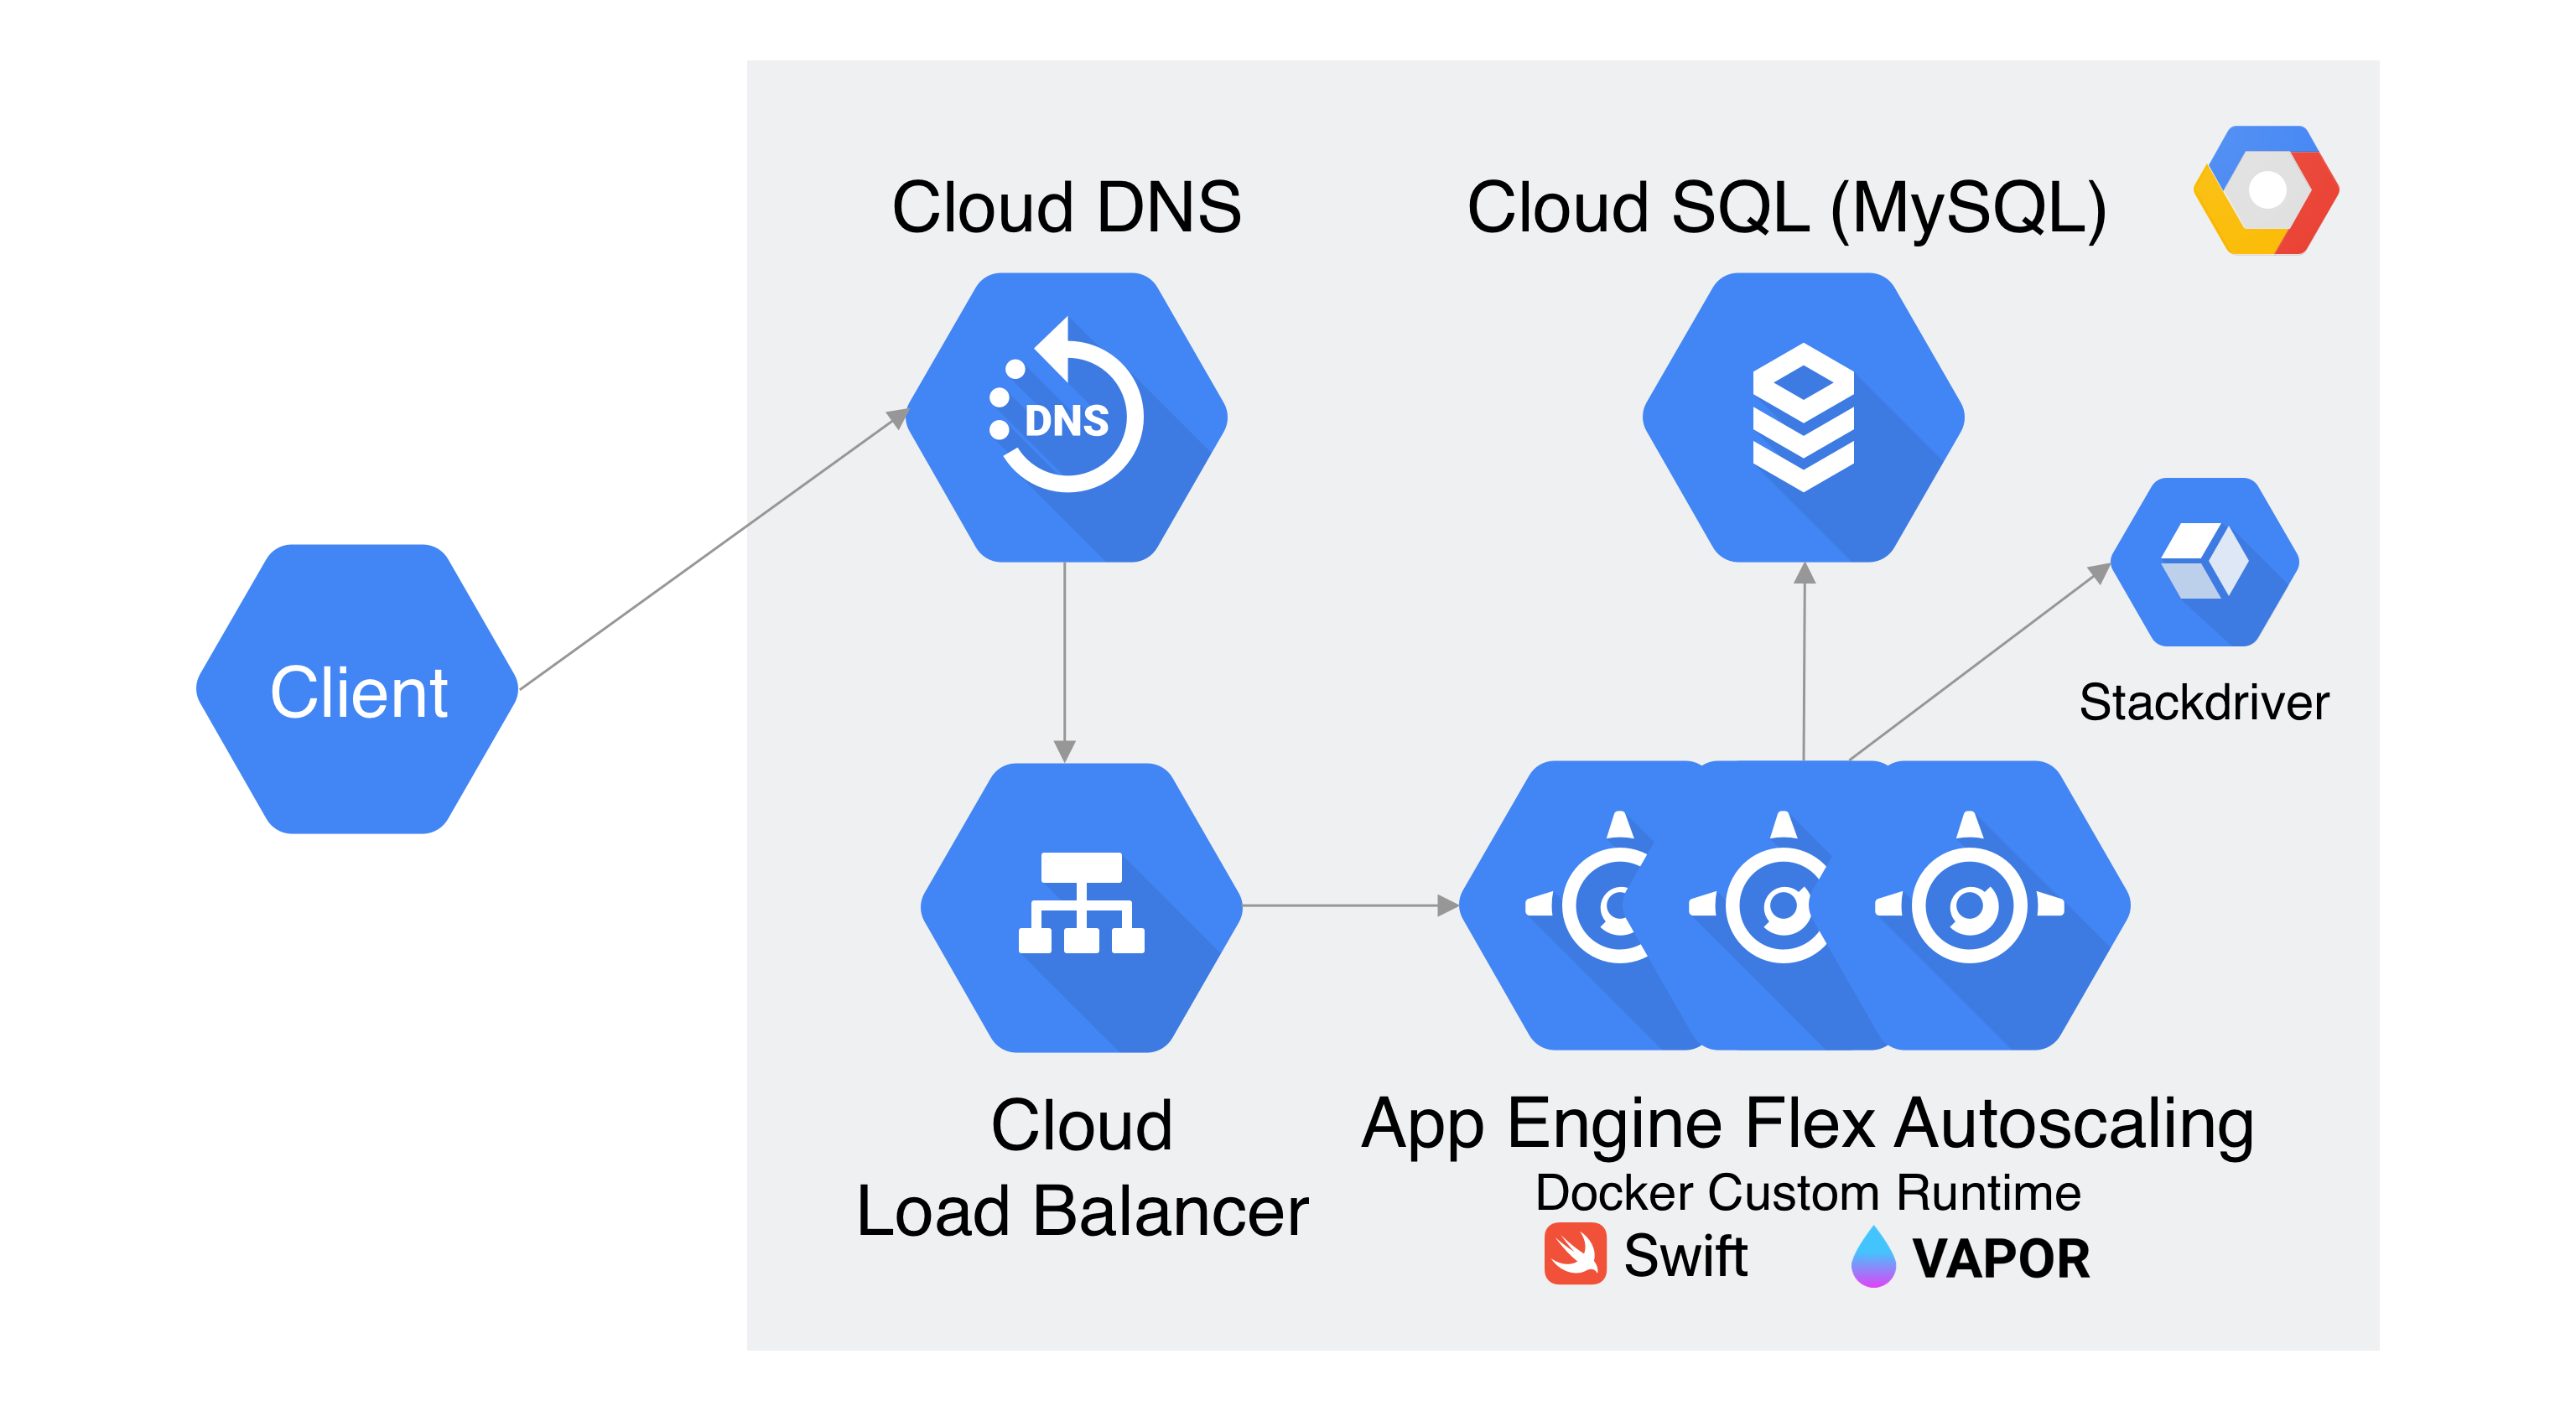
Google App Engine is a Platform as a Service (PaaS) solution provided by Google Cloud for customer to build scalable backend service without managing server deployment, load balancing, and scaling the infrastructure. As developers, we just need to focus on writing the code and deploy the code to the Cloud. App Engine handles all the process of infrastructure deployment automatically such as virtual machine instantiation, load balancing, autoscaling, Google Global DNS network, task queue, memcache, health check, Stackdriver Logging, and even traffic splitting different version of our backend application. The equivalent services of App Engine are AWS Beanstalk and Salesforce Heroku. Google Cloud App Engine.
A brief history and current state of Google App Engine
App Engine is the first PaaS solution provided by GCP when it was started in 2008. It had many limitations such as java only runtime language support, Google Datastore to store the application structured data, 1 minute timeout between request & response, and sandboxing with limited access to install custom dependencies into the virtual machine environment.
As of end of 2018, Google Cloud provides 2 environments to use App Engine, one is standard environment with constrained environments and support for languages such as Python, Go, node.js. The other one is the Flexible Environment where developers have more freedom such as running custom runtimes using docker, longer request & response timeout, and ability to install custom dependencies/software, and SSH into the virtual machine. The pricing between standard and flexible environment is also different, you can see how the pricing works by visiting the pricing documentation of each environment. Google Cloud App Engine Standard Environment Google Cloud App Engine Flexible and Environment.
In this article, we will use Google App Engine Flexible Custom Runtime to build a Swift Vapor Backend Web Framework server using Docker and deploy it live in the Cloud using Google Cloud SDK. It will also connect to Google Cloud SQL to store the todo app data of the application.
Requirements
Here are the requirements:
- Google Cloud Account.
- Google Cloud SDK and Authentication in local machine.
What we will build
Here are the components that we will be building on this article:
- Vapor Swift Application providing Todo CRUD API.
- Custom Dockerfile based on Ubuntu and preinstalled Swift runtime language.
- Cloud SQL instance in Google Cloud Configuration.
- Deploy to App Engine using Google Cloud SDK.
- Test the App.
- Monitor Application Log in Stackdriver monitor
Cloning Swift Vapor 3 Todo App from GitHub Repository
We are going to deploy a web API using Swift Vapor 3 Web Framework. Vapor 3 has several main features that are really awesome such as:
- Using Apple SwiftNIO to handle non blocking event driven architecture to achieve high performance low latency server.
- It’s written in Swift, the powerful multi paradigm programming language.
- Expressive protocol oriented design with type safety and high maintainability.
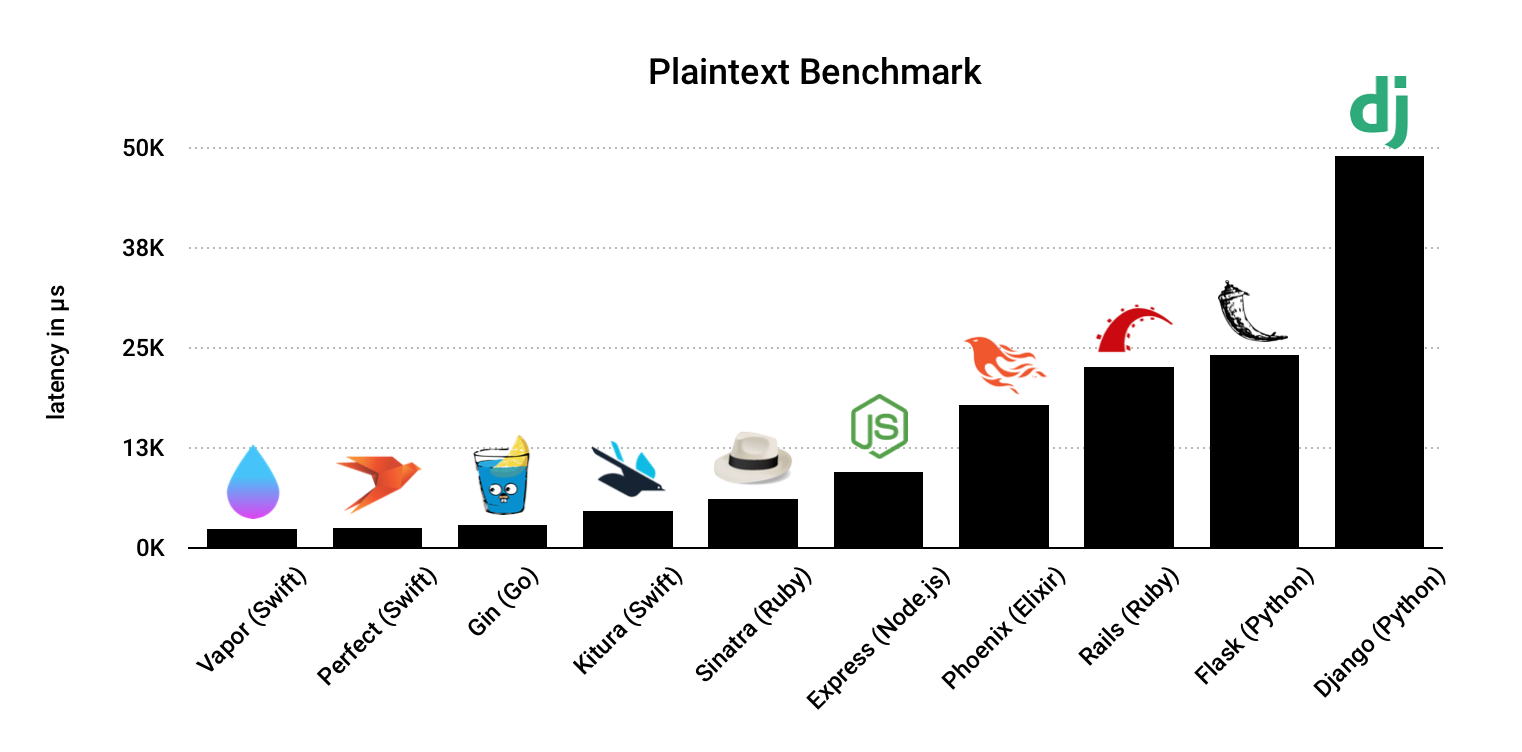
The performance of Vapor is also very promising by looking at the average latency performance using Plaintext benchmark from the graph below (taken from VAPOR medium article).
")
Clone or download the app from GitHub repository into your local machine by clicking on the link at alfianlosari/appengineflex-swift-vapor.
The app consists of many different components, inside Sources/App directory. Several of the key parts are:
- routes.swift. The routing setup of the app, here it uses the todo path to group the request into a CRUD structure. You can see the expressive request custom path parameter that uses Swift codable and parameter under the hood to convert the request into Swift object.
import Routing
import Vapor

public func routes(_ router: Router) throws {

    router.group("todo") { (router) in

        // Create Todo
        router.post(Todo.self) { req, todo -> Future<Todo> in
            return todo.save(on: req)
        }

        // Get single Todo
        router.get(Int.parameter) { req -> Future<Todo> in
            let id = try req.parameters.next(Int.self)
            return Todo.find(id, on: req).map { (todo) -> Todo in
                guard let todo = todo else {
                    throw Abort(.notFound)
                }
                return todo
            }
        }

        // Get All Todos
        router.get() { req -> Future<[Todo]> in
            return Todo.query(on: req).all()
        }

        // Update single todo
        router.put(Todo.self) { (req, updateTodo) -> Future<Todo> in

            guard let id = updateTodo.id else {
                throw Abort(.notFound)
            }

            return Todo.find(id, on: req).flatMap(to: Todo.self) { (todo) -> Future<Todo> in
                guard var todo = todo else {
                    throw Abort(.notFound)
                }
                todo = updateTodo
                return todo.save(on: req)
            }
        }
    }
}
- configure.swift. Configuration of the Application before it runs, inside here we get the environment variables from the system and using it to connect with MySQL database server and perform migration of the table using the Swift struct. (For testing purpose, we connect to Cloud SQL using tcp instead of App Engine Cloud SQL proxy Unix Socket because Vapor FluentSQL currently does not support Unix Socket for connection to MySQL server).
import Vapor
import Fluent
import FluentMySQL

public func configure(
    _ config: inout Config,
    _ env: inout Environment,
    _ services: inout Services
) throws {
    let router = EngineRouter.default()
    try routes(router)
    services.register(router, as: Router.self)

    try services.register(FluentMySQLProvider())

    let mySQLUser = Environment.get("MYSQL_USER") ?? ""
    let mySQLPassword = Environment.get("MYSQL_PASSWORD") ?? ""
    let mySQLDatabase = Environment.get("MYSQL_DATABASE") ?? ""
    let mySQLIP = Environment.get("MYSQL_IP") ?? ""
    let databaseConfig = MySQLDatabaseConfig(hostname: mySQLIP, port: 3306, username: mySQLUser, password: mySQLPassword, database: mySQLDatabase)
    services.register(databaseConfig)

    var migrationConfig = MigrationConfig()
    migrationConfig.add(model: Todo.self, database: .mysql)
    services.register(migrationConfig)
}
- todo.swift. A Swift struct that conforms to MySQLModel and migration so the database can perform migration from the object to the row in MySQL table. It also conforms to Content, which is like codable so Vapor can just return the object from the response and automatically convert it as JSON.
import Foundation
import FluentMySQL
import Vapor

struct Todo: Content, MySQLModel, Migration {

    var id: Int?
    var title: String
    var content: String
    var dueDate: Date

    public static func prepare(on connection: MySQLConnection) -> Future<Void> {
        return MySQLDatabase.create(self, on: connection, closure: { builder in
            builder.field(for: \.id,  isIdentifier: true)
            builder.field(for: \.title)
            builder.field(for: \.content, type: .text())
            builder.field(for: \.dueDate)
        })
    }

}
- Future object. To handle asynchronous operation and non blocking operation, Vapor uses Future that works like Promise in Javascript.
You can run the app locally, but before that you need to install and run MySQL server in your local machine, then create user, password, and database named todo. Make sure to export all the environment variables inside the configure.swift into your shell. Then run swift build and the compiled app inside the .build directory. Use cURL to perform the CRUD operation (see README.md for API specification inside the cloned project directory).
Using Dockerfile to build custom runtime in App Engine Flexible Environment
To deploy our app to Google App Engine Flexible custom runtime, we need to provide Dockerfile containing the docker image that we want to run inside the container. The Dockerfile is located in the cloned repository root directory. Open it and take a peek.
FROM ibmcom/swift-ubuntu:latest
LABEL Description="Docker image for Swift + Vapor on Google App Engine flexible environment."

# Expose default port for App Engine
EXPOSE 8080

# Add app source
ADD . /app
WORKDIR /app

# Build release
RUN swift build --configuration release

# Run the app
ENTRYPOINT [".build/release/Run", "--hostname", "0.0.0.0", "--port", "8080"]
Inside, we tell docker to use the IBM Swift image running latest Ubuntu from docker repository. Expose the port 8080 of the container to the host machine 8080 app engine default port. Copy the current folder into the app directory and set it as working directory. It also build the Swift package using the configuration release. Lastly, as the entry point of the container, it runs the application server from the build directory.
Create Cloud SQL Instance in Google Cloud Platform
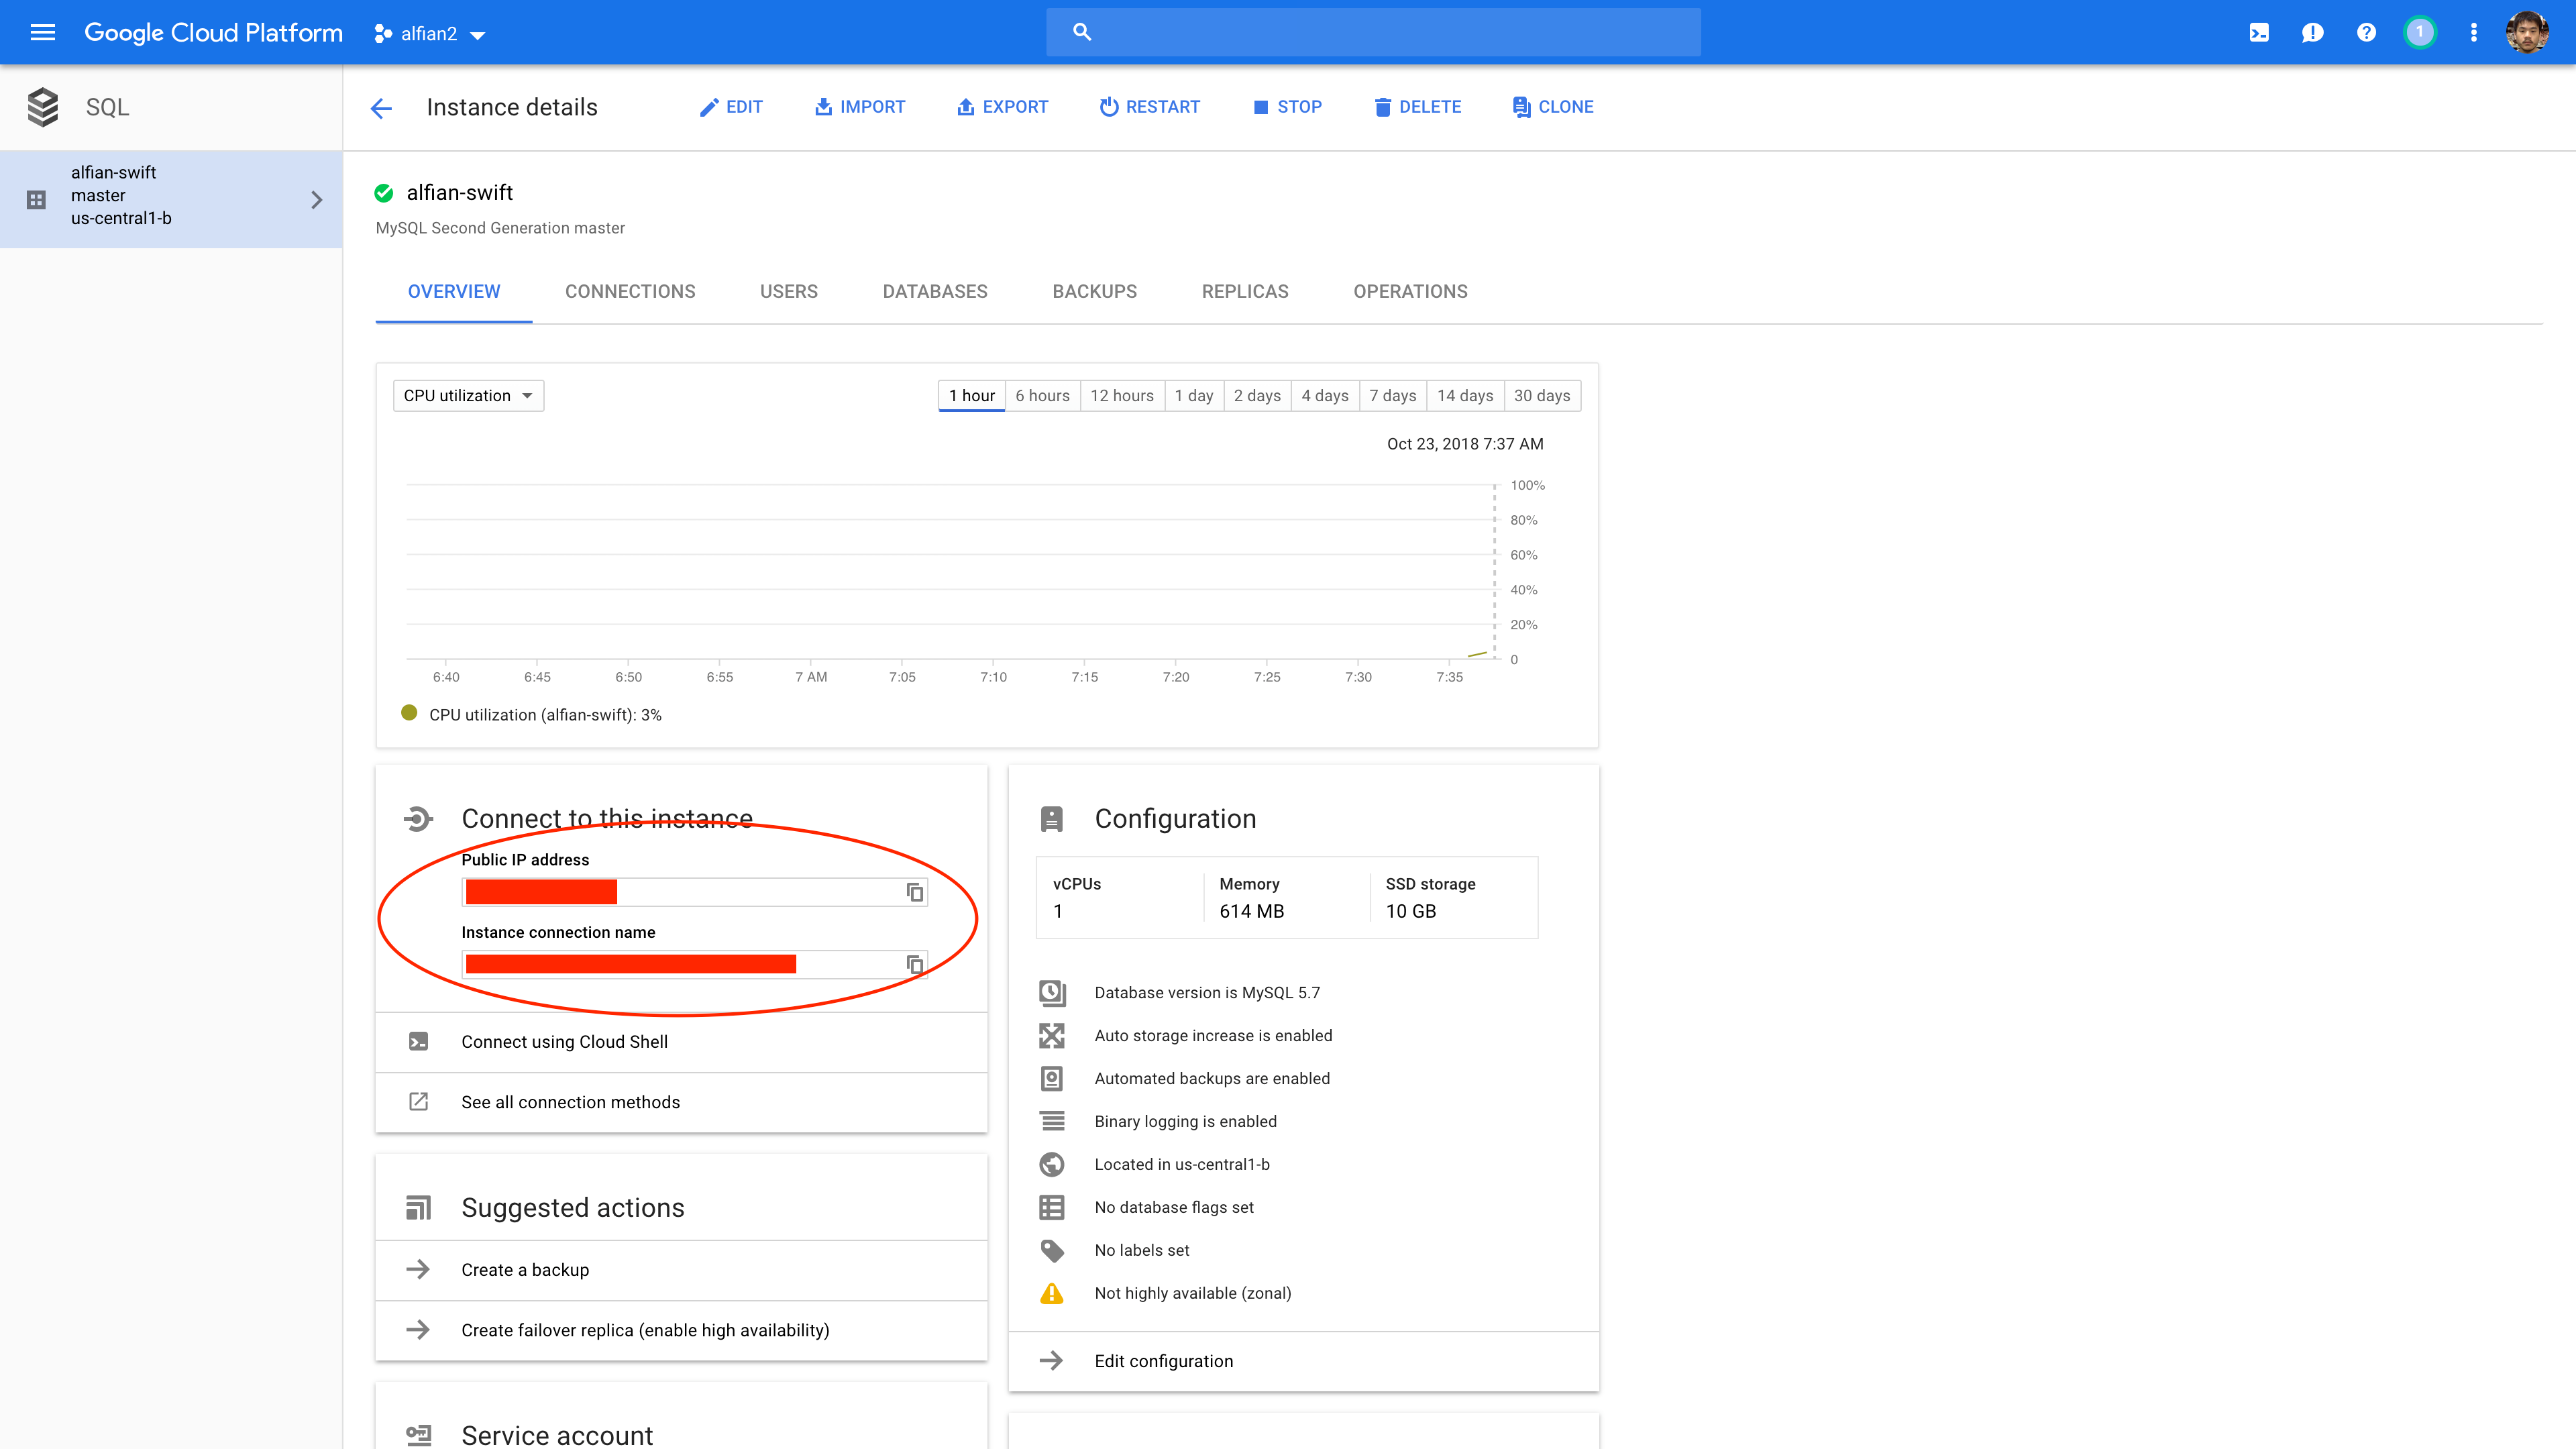
For the MySQL server hosting, we are going to use GCP Cloud SQL managed database solution. It provides 2 SQL database to use, MySQL and PostgreSQL. Our app is using the MySQL to store the todo list data. You need to create Google Cloud SQL instance by using either Google Cloud Console or using the SDK.
Here are the instructions if you prefer using the console to setup the instance:
- Go to Cloud SQL Console.
- Click create an instance.
- Choose MySQL as database engine.
- Choose MySQL Second Generation.
- Set the name and strong password for the root access for the instance.
- Choose region (us-central1).
- Click on show configuration options and set connectivity, check the public ip and click add network. Set the name to all and the network to 0.0.0.0/0 (!!! This is unsafe and only used for testing purpose because currently Vapor’s Fluent MySQL does not support Unix Socket to connect to Cloud SQL Proxy in App Engine Environment, for production you should use connection only from SSL by generating client certificate to avoid access from unsafe client !!!)
- Click on Configure machine type and storage, change into db-f1-micro and HDD.
- Click Create.
- After the database has successfully created, click on the instance to view the details.
- Go to Users tab, click create user account, then set your username and strong password. Click create.
- Go to Database tab, click create databases, set database name to todo. Click create
- Copy the public ip address and instance connection name.
Deploy to App Engine using Google Cloud SDK
To deploy the app from our local machine, we need to install Google Cloud SDK. Before that, we need to set the configuration and environment variables for the App Engine. Go to the cloned repository project directory and open app.yaml.
runtime: custom
env: flex
manual_scaling:
  instances: 1
skip_files:
- ^(.*/)?\.xcodeproj
- ^(.*/)?\.build
env_variables:
  MYSQL_USER:  [USERNAME]
  MYSQL_PASSWORD: [PASSWORD]
  MYSQL_DATABASE: [DATABASE_NAME]
  MYSQL_IP: [IP_ADDRESS]
beta_settings:
  cloud_sql_instances: [SQL_INSTANCE_NAME]
Inside we tell the App Engine to use the custom runtime and flexible environment. We also set the manual scaling and just 1 instance for testing purpose. In production, you can set the automatic scaling with the maximum number of machine to upscale. In environment variables, set the MySQL user, password, database, ip, instance name to your Cloud SQL instance configuration. There are many customization that we can configure such as machine type, memory, disk, network. You can visit the documentation to view all the configurations parameter.
To deploy the app, just type:
gcloud app deploy
Grab a coffee and take your time, it will take about 5–10 minutes for the deployment starting from uploading our code to Google Cloud Build Repository and setup it in App Engine.
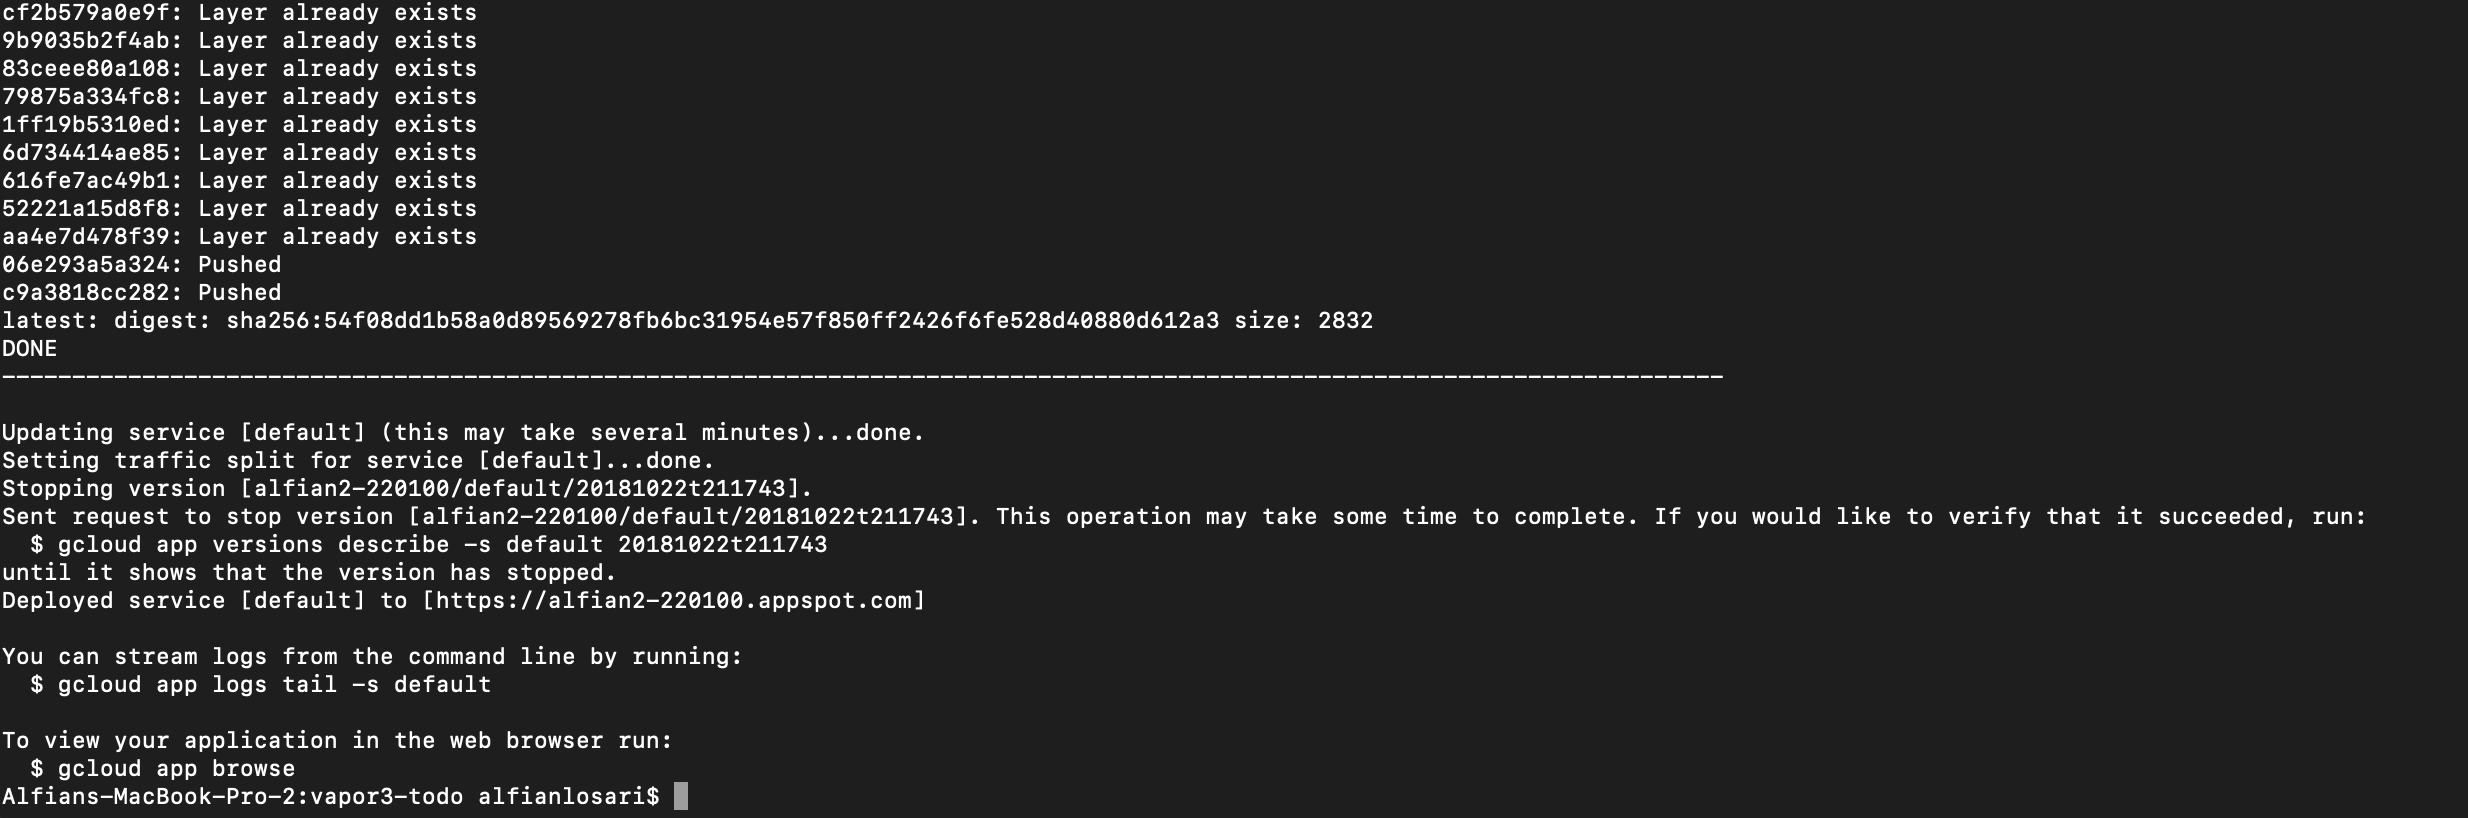
After it finished, type the command below to view the application http address. We are going to test the app using cURL in the next section.
gcloud app browse
Test the App with CRUD
Inside your shell, use cURL to perform following operations to test our API endpoint. Replace the ADDRESS placeholder with your app HTTP address.
Create a Todo
curl -X POST [ADDRESS]/todo \
-H "Content-Type: application/json" \
-d '{"title": "hello kitty", "content": "play it", "dueDate": "2018-10-28T12:39:00Z"}'
Get List of Todos
curl [ADDRESS]/todo
Get Single Todo
curl [ADDRESS]/todo/id
Update Todo
curl -X PUT [ADDRESS]/todo \
-H "Content-Type: application/json" \
-d '{"id": 1, "title": "hello world", "content": "hello Vapor X Swift X App Engine Flex", "dueDate": "2018-10-28T12:39:00Z"}'
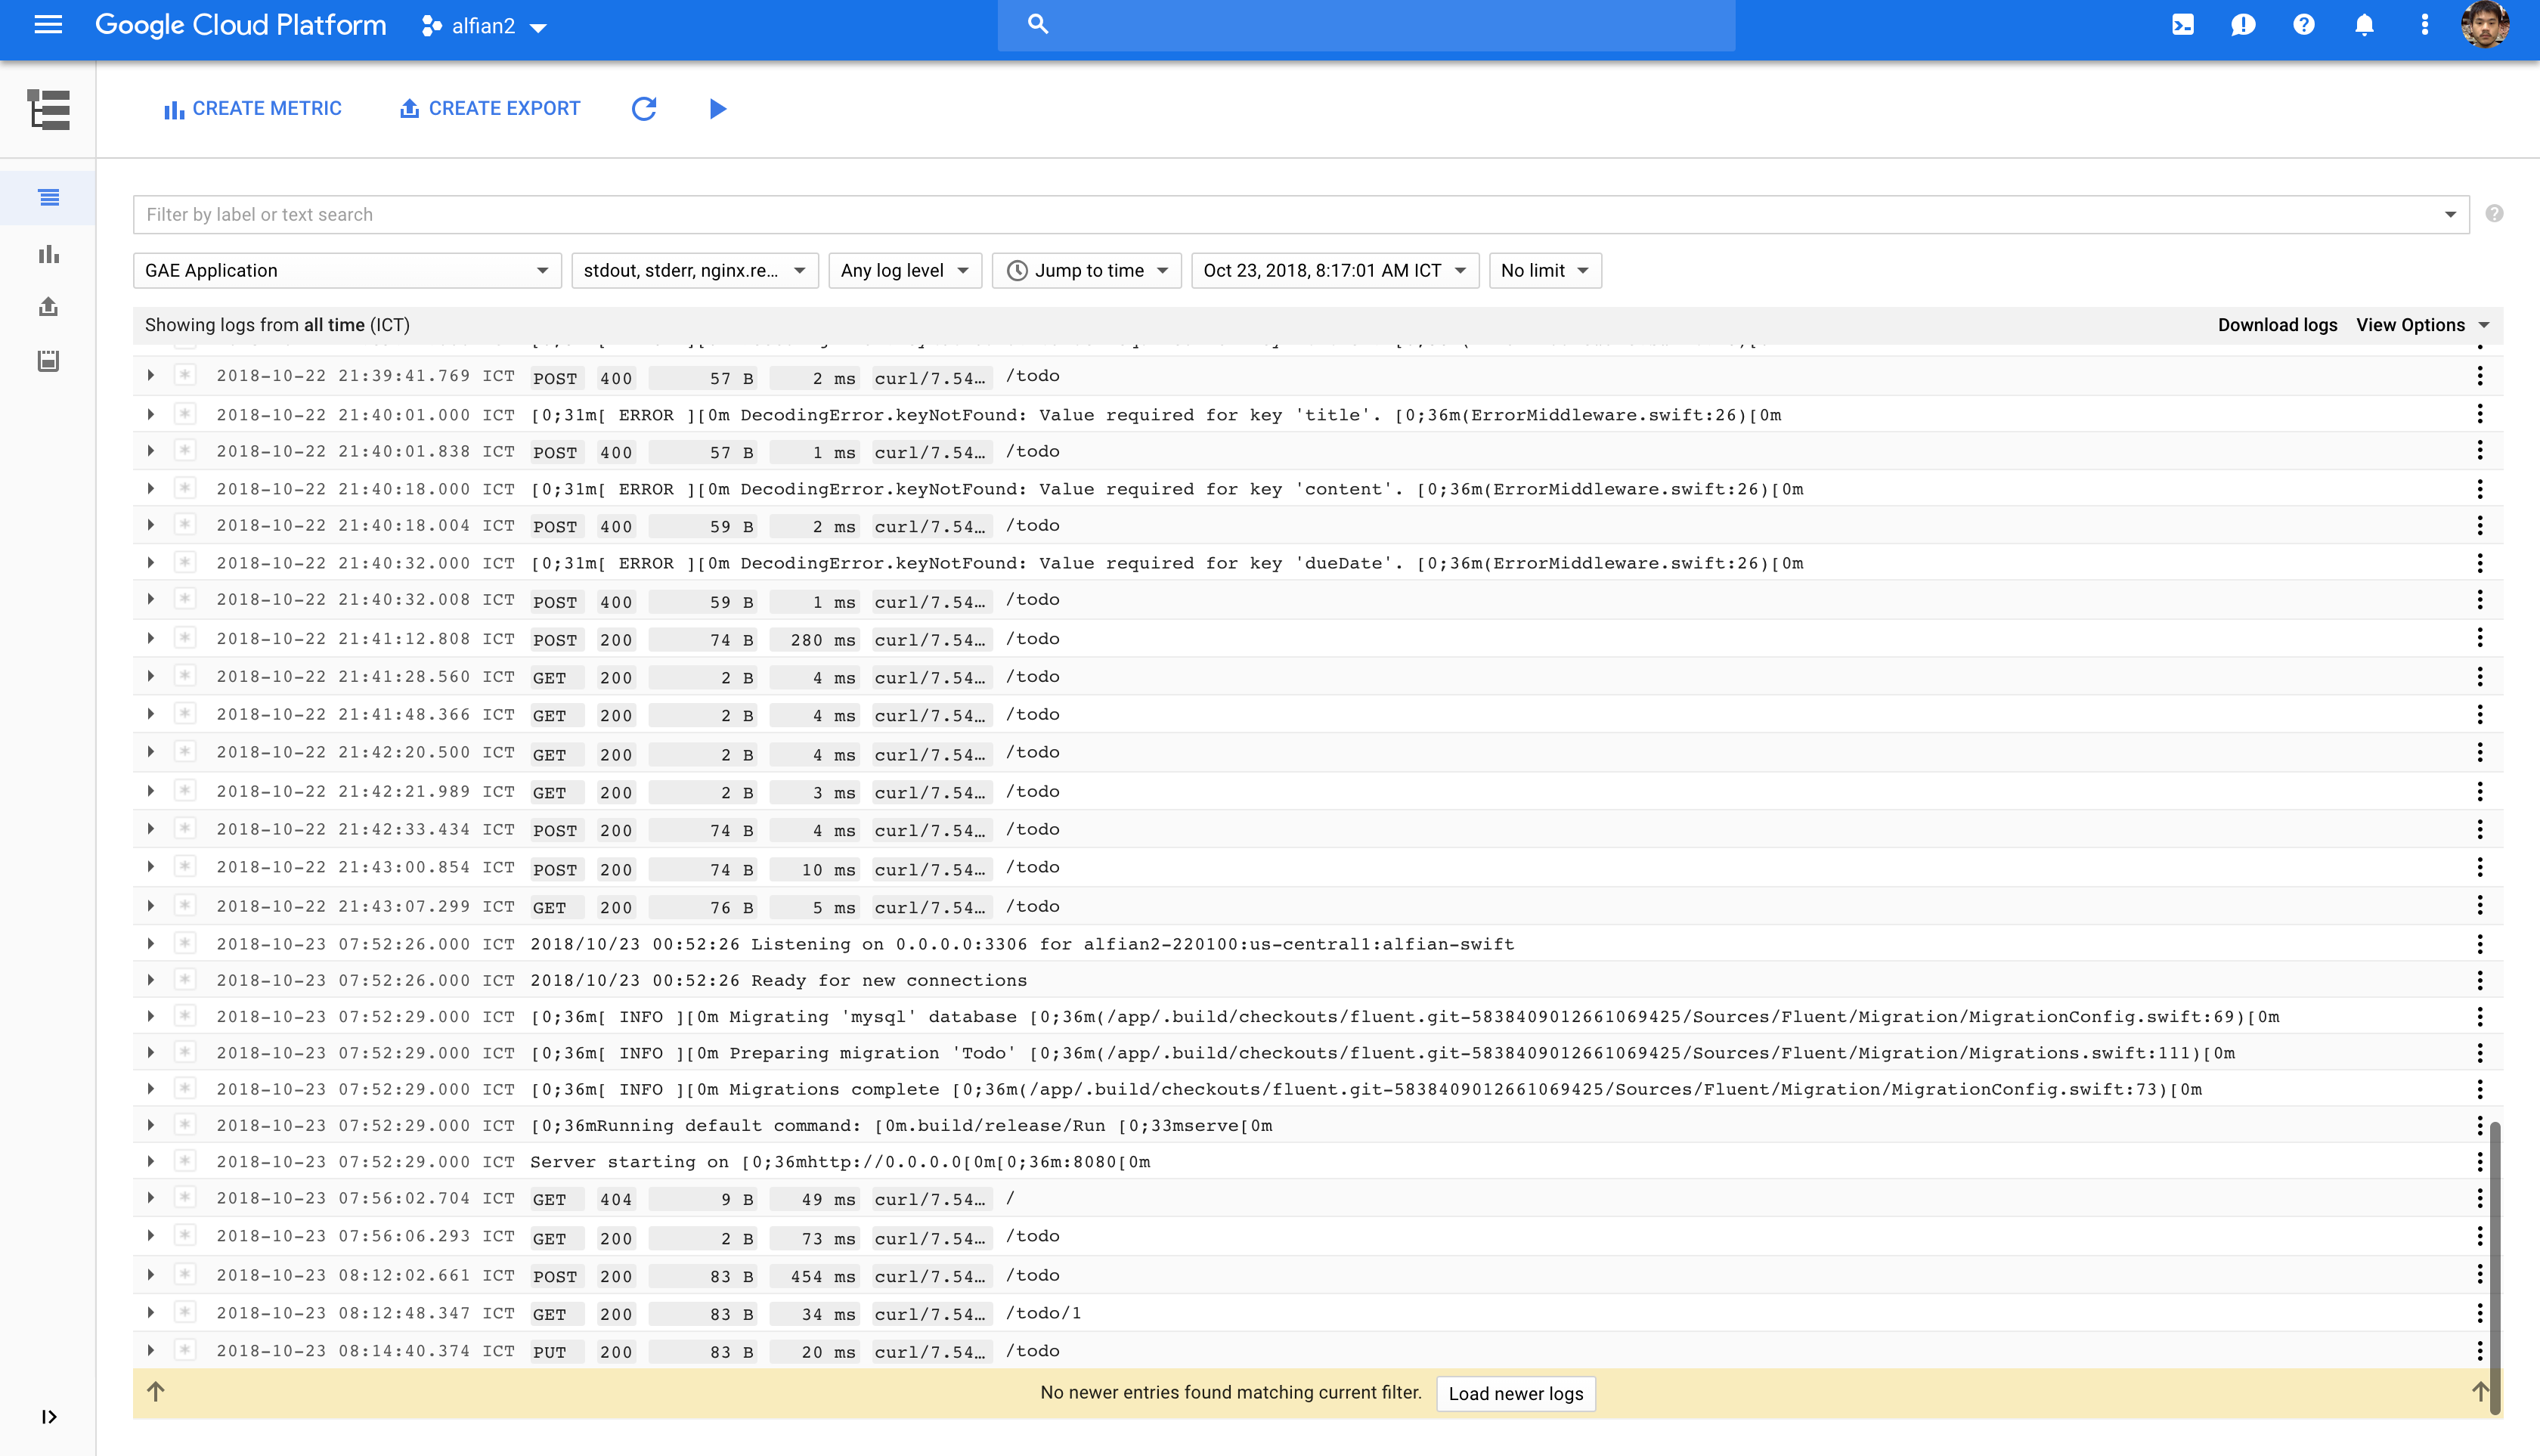
Monitor Application Log in Stackdriver monitor
App Engine Flex uses Stackdriver Logging under the hood to provide realtime log for all the server request and response that we can view inside the dashboard in Google Cloud Console.
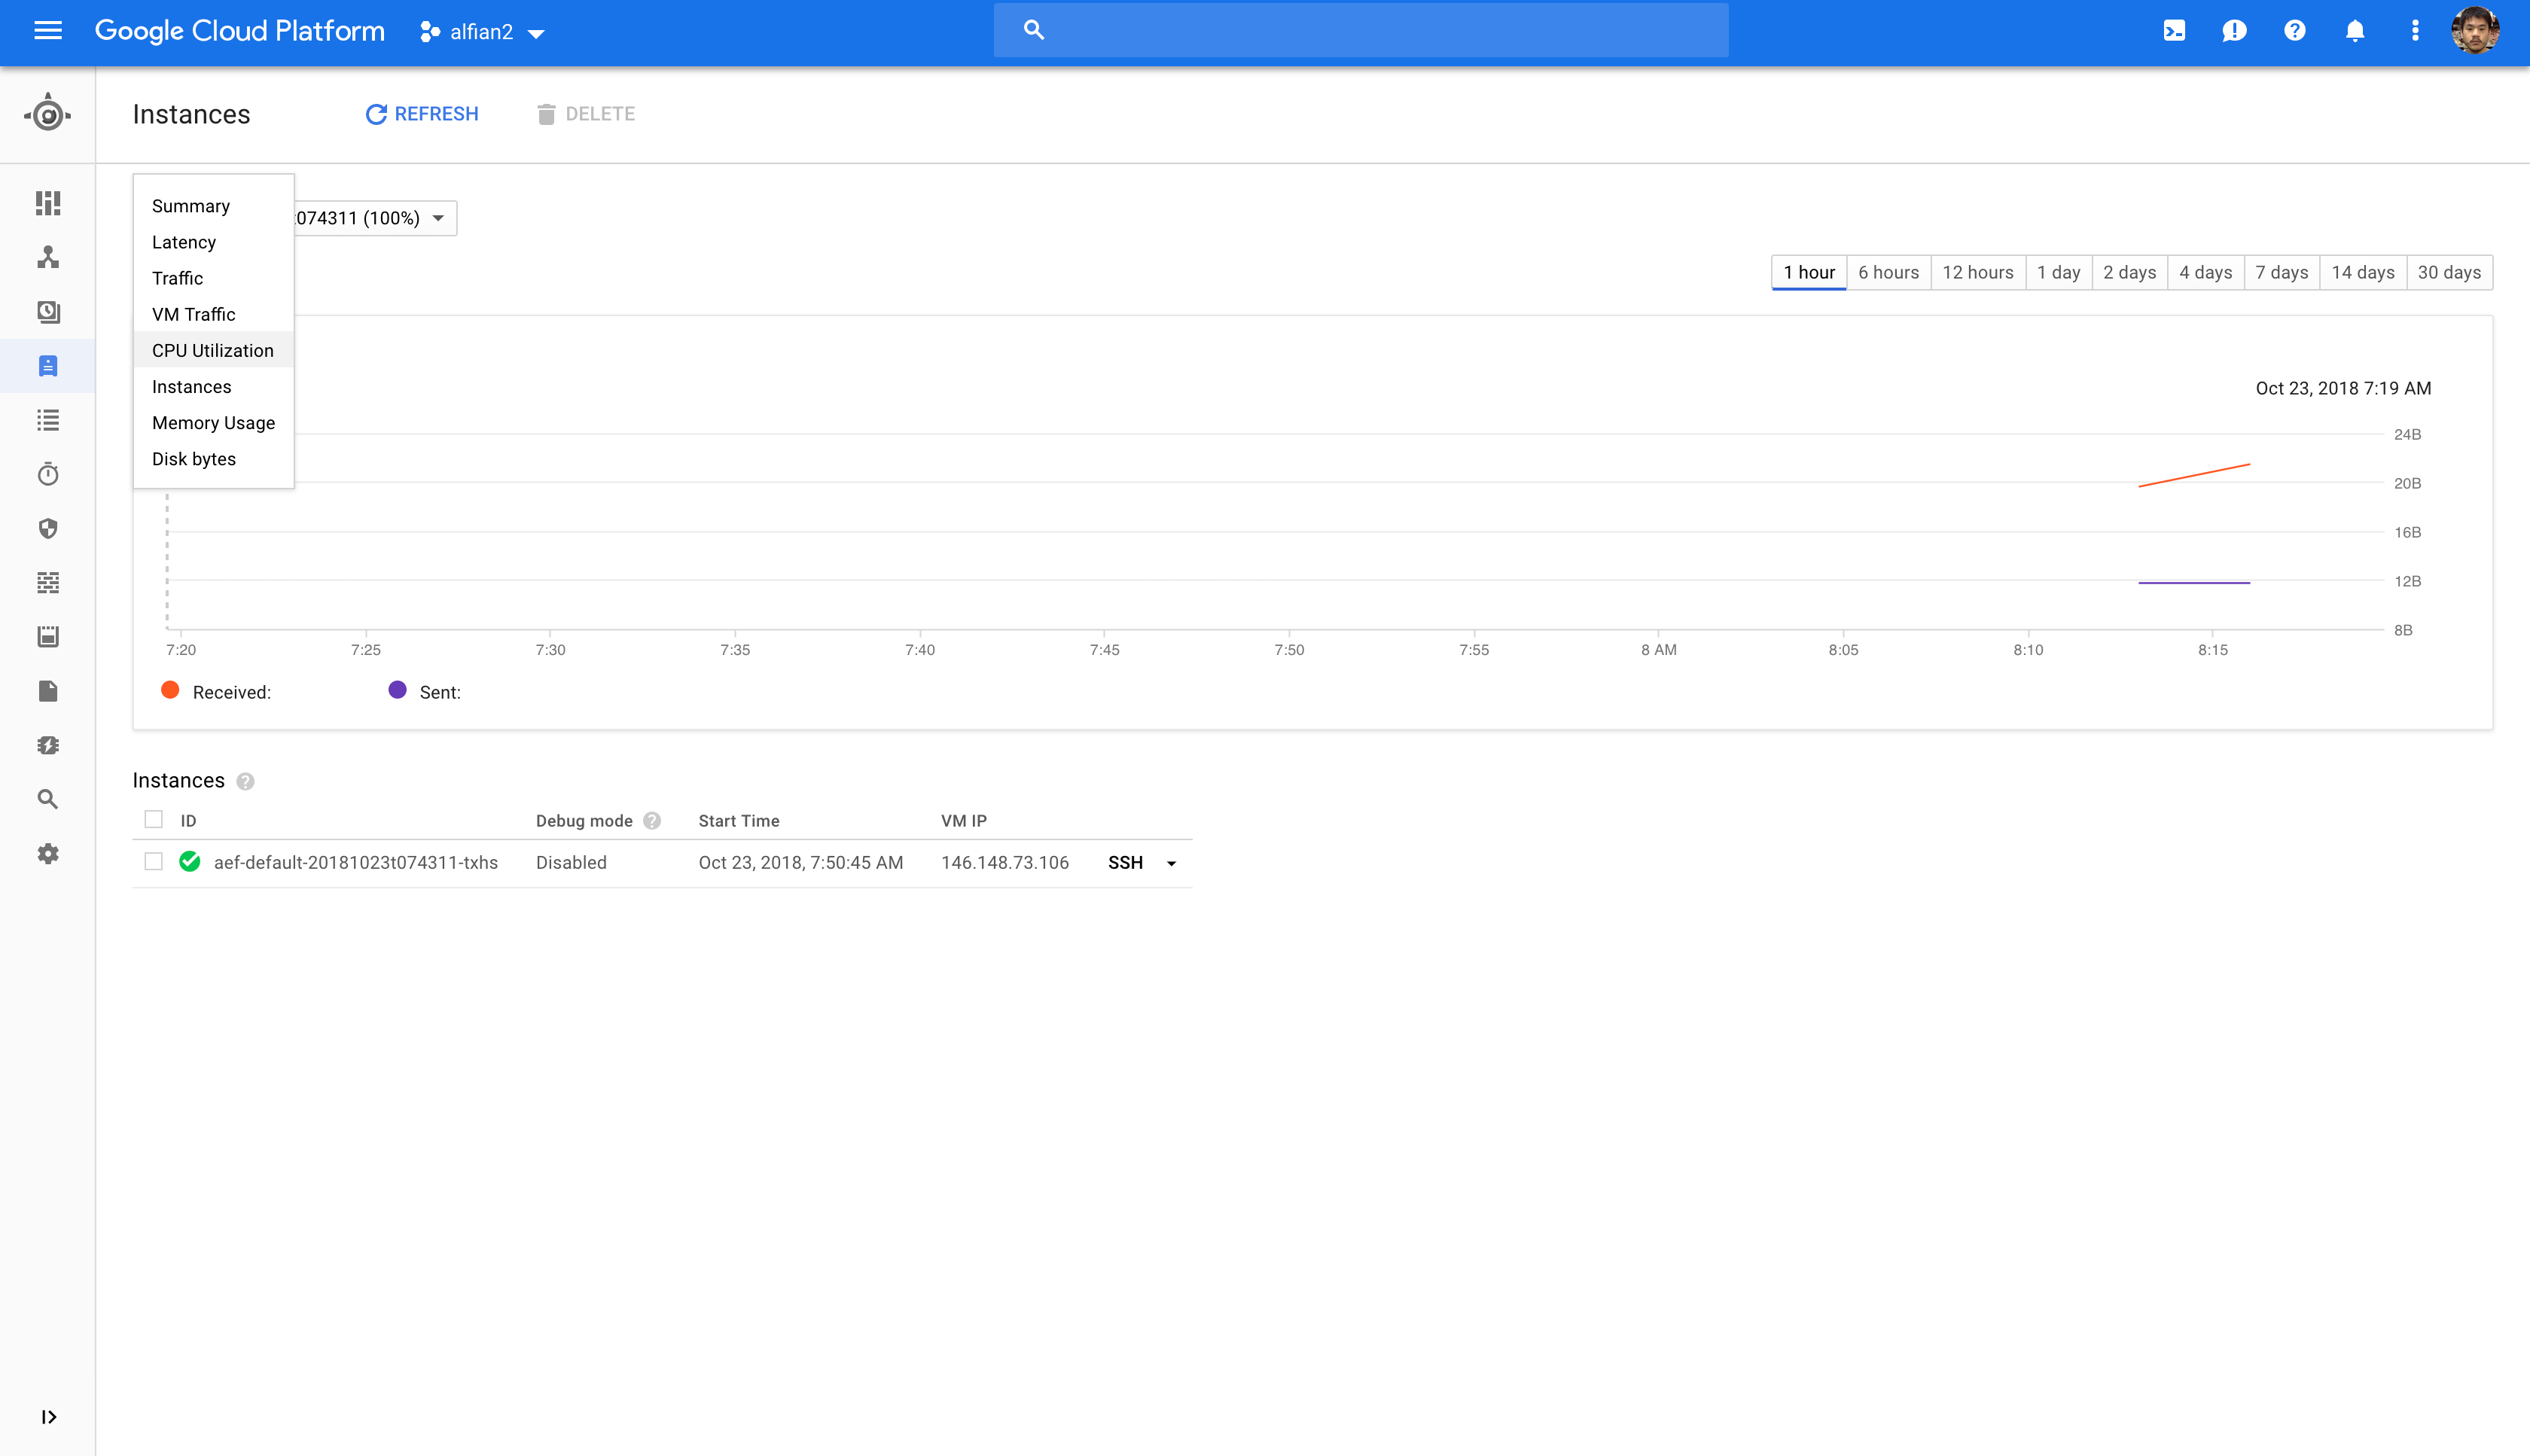
You can also view your App Engine instances by visiting the App Engine dashboard to monitor various metrics such as CPU utilization, memory, disk, latency, even SSH into your local machine using the dashboard.
!!! After finishing the project, make sure to disable the application from the App Engine Console and stop the Cloud SQL instance to avoid continuous billing!!!
Conclusion
Google App Engine Flexible Custom Runtime provides really powerful and also simple solution to deploy scalable backend sever without managing and worrying about the dev-ops configuration. We can even create microservices architecture by deploying different services of our application inside one project. While it’s very good for smaller startup that have limited human resources to manage the infrastructure, in longer term as our user base are growing, the computing cost can be quite high compared to using infrastructure as a service solution like Google Compute Engine.
In my personal opinion, when our application user base has become larger, company has more resources, and business logic become more complex, we can migrate to Google Kubernetes Engine or Google Compute Engine managed instance group for more flexibility and customization.