Serverless Daily Reporting Notification Service with Google Cloud Scheduler & Cloud Functions
Published at Nov 11, 2018
Task scheduling is a very important tools for developers to run various automated tasks in a system such as performing database maintenance, perform daily big data batch operations, and overall system maintenance.
Building the infrastructure to perform task scheduling are challenging tasks, there are several important things that need to be considered carefully such as:
- Scaling and managing the infrastructure.
- Monitoring current status of job state.
- Retrying failed jobs gracefully.
- Logging the job and monitor performance.
At the beginning of November 2018, Google Cloud Platform finally released Cloud Scheduler, a fully managed, scalable, and fault tolerant cron job scheduler that allows developer to automate all their scheduled tasks in one place. They provide many amazing features such as:
- Fully managed & guaranteed at least once delivery.
- Support many targets such as Cloud Pub Sub, App Engine, HTTP Endpoint.
- Stackdriver Logging to analyze performance.
- Configurable retry policy.
You can find more from the official website at Cloud Scheduler | Google Cloud.
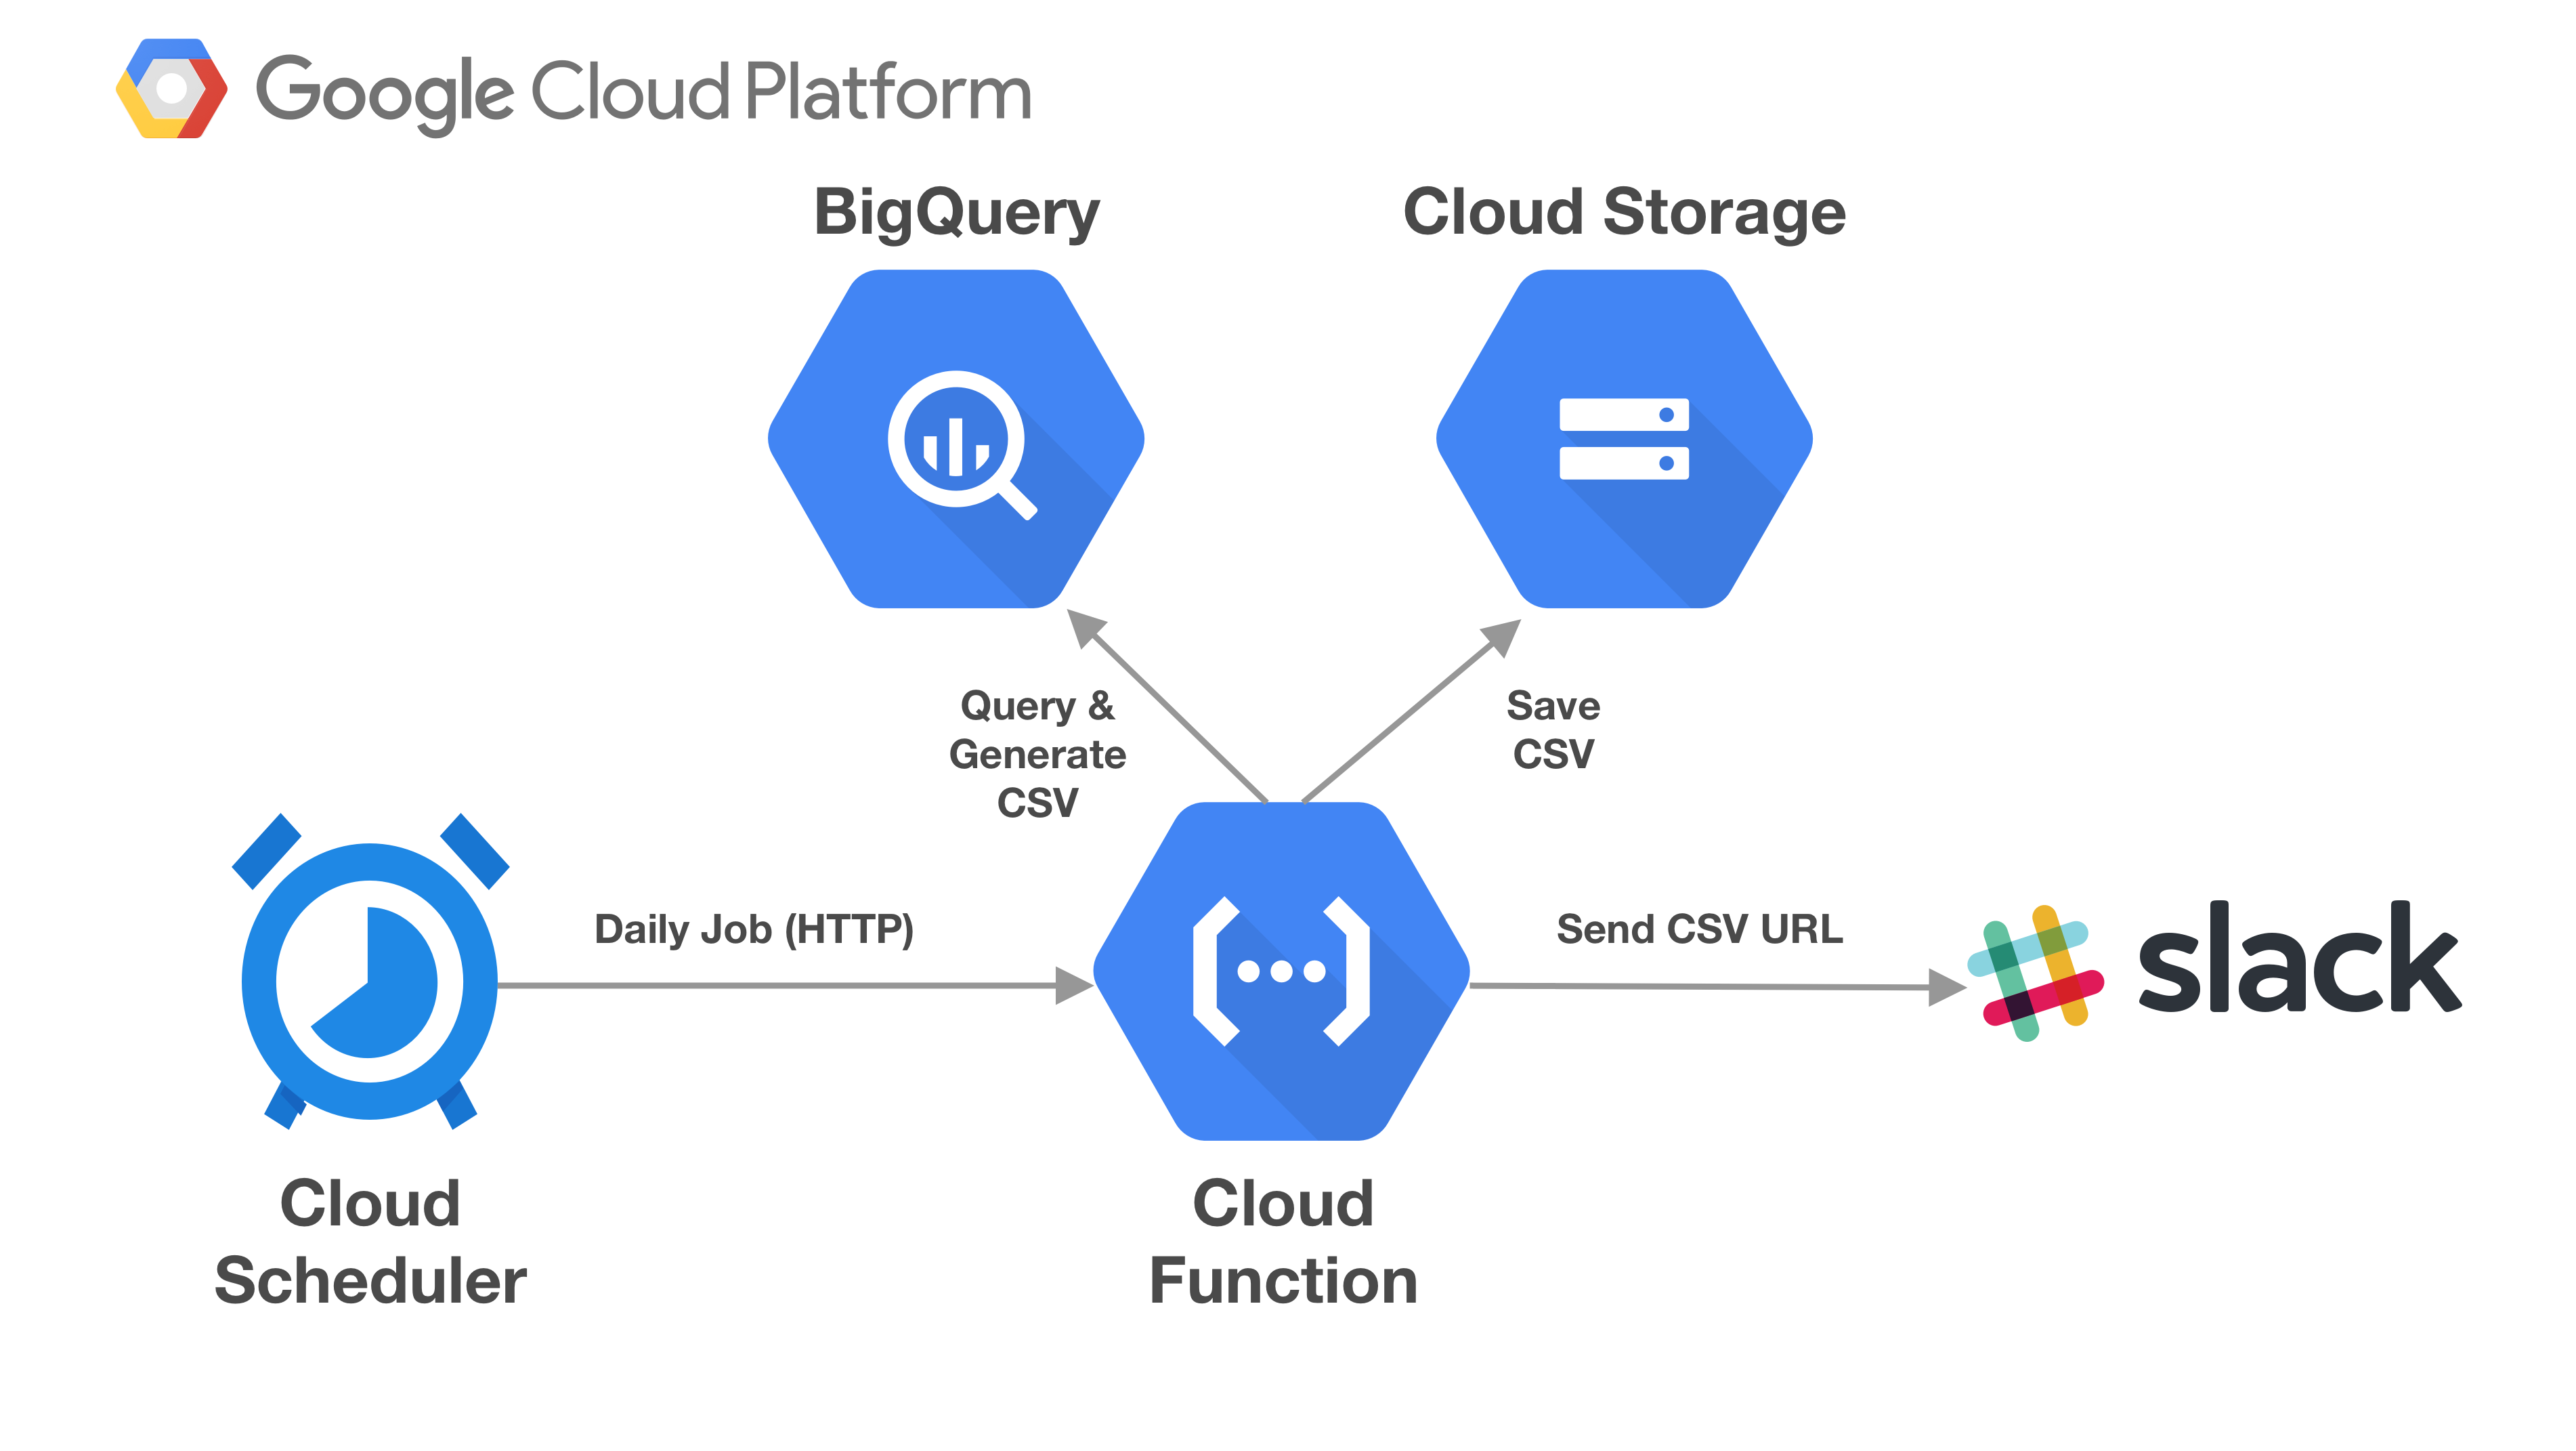
In this article, we will build a simple notification service to setup daily scheduled data reporting using several Google Cloud Services and notification using Slack HTTP Webhook.
What we will build
Here are the things that we will use on building the service:
- Google Cloud Storage: create bucket to save the generated CSV blob for public URL access.
- BigQuery: query for Global Historical Climate Network public datasets. Generate data for previous week maximum temperature within location radius around GHCN station in Jakarta sorted by distance in kilometers and max temperature.
- Google Cloud Functions: a node.js function to query data from BigQuery, transform it into CSV and save it into cloud, then notify Slack Channel via Webhook sending the URL.
- Google Cloud Scheduler: a scheduled job that will trigger Cloud Function endpoint daily at every midnight UTC.
!!! Make sure to clear and delete all of the created resources to avoid recurring cost in GCP after finishing the tutorial !!!
You can download the Project source code in the GitHub repository link at alfianlosari/gcp-serverless-cron-job.
Create Google Cloud Storage Bucket
First, we need to create a new bucket in Google Cloud Storage. This bucket will be used to store the CSV file for the data that we will be querying in BigQuery inside our Cloud Function later. We will be using the dashboard to create the bucket:
- Open the Google Cloud Storage console
- Type the name of the bucket
- Leave region to multi-regional and location to United States
- Click Create

Make sure to store the bucket name somewhere as it will be used later inside the Cloud Function to refer to the bucket when saving the CSV.
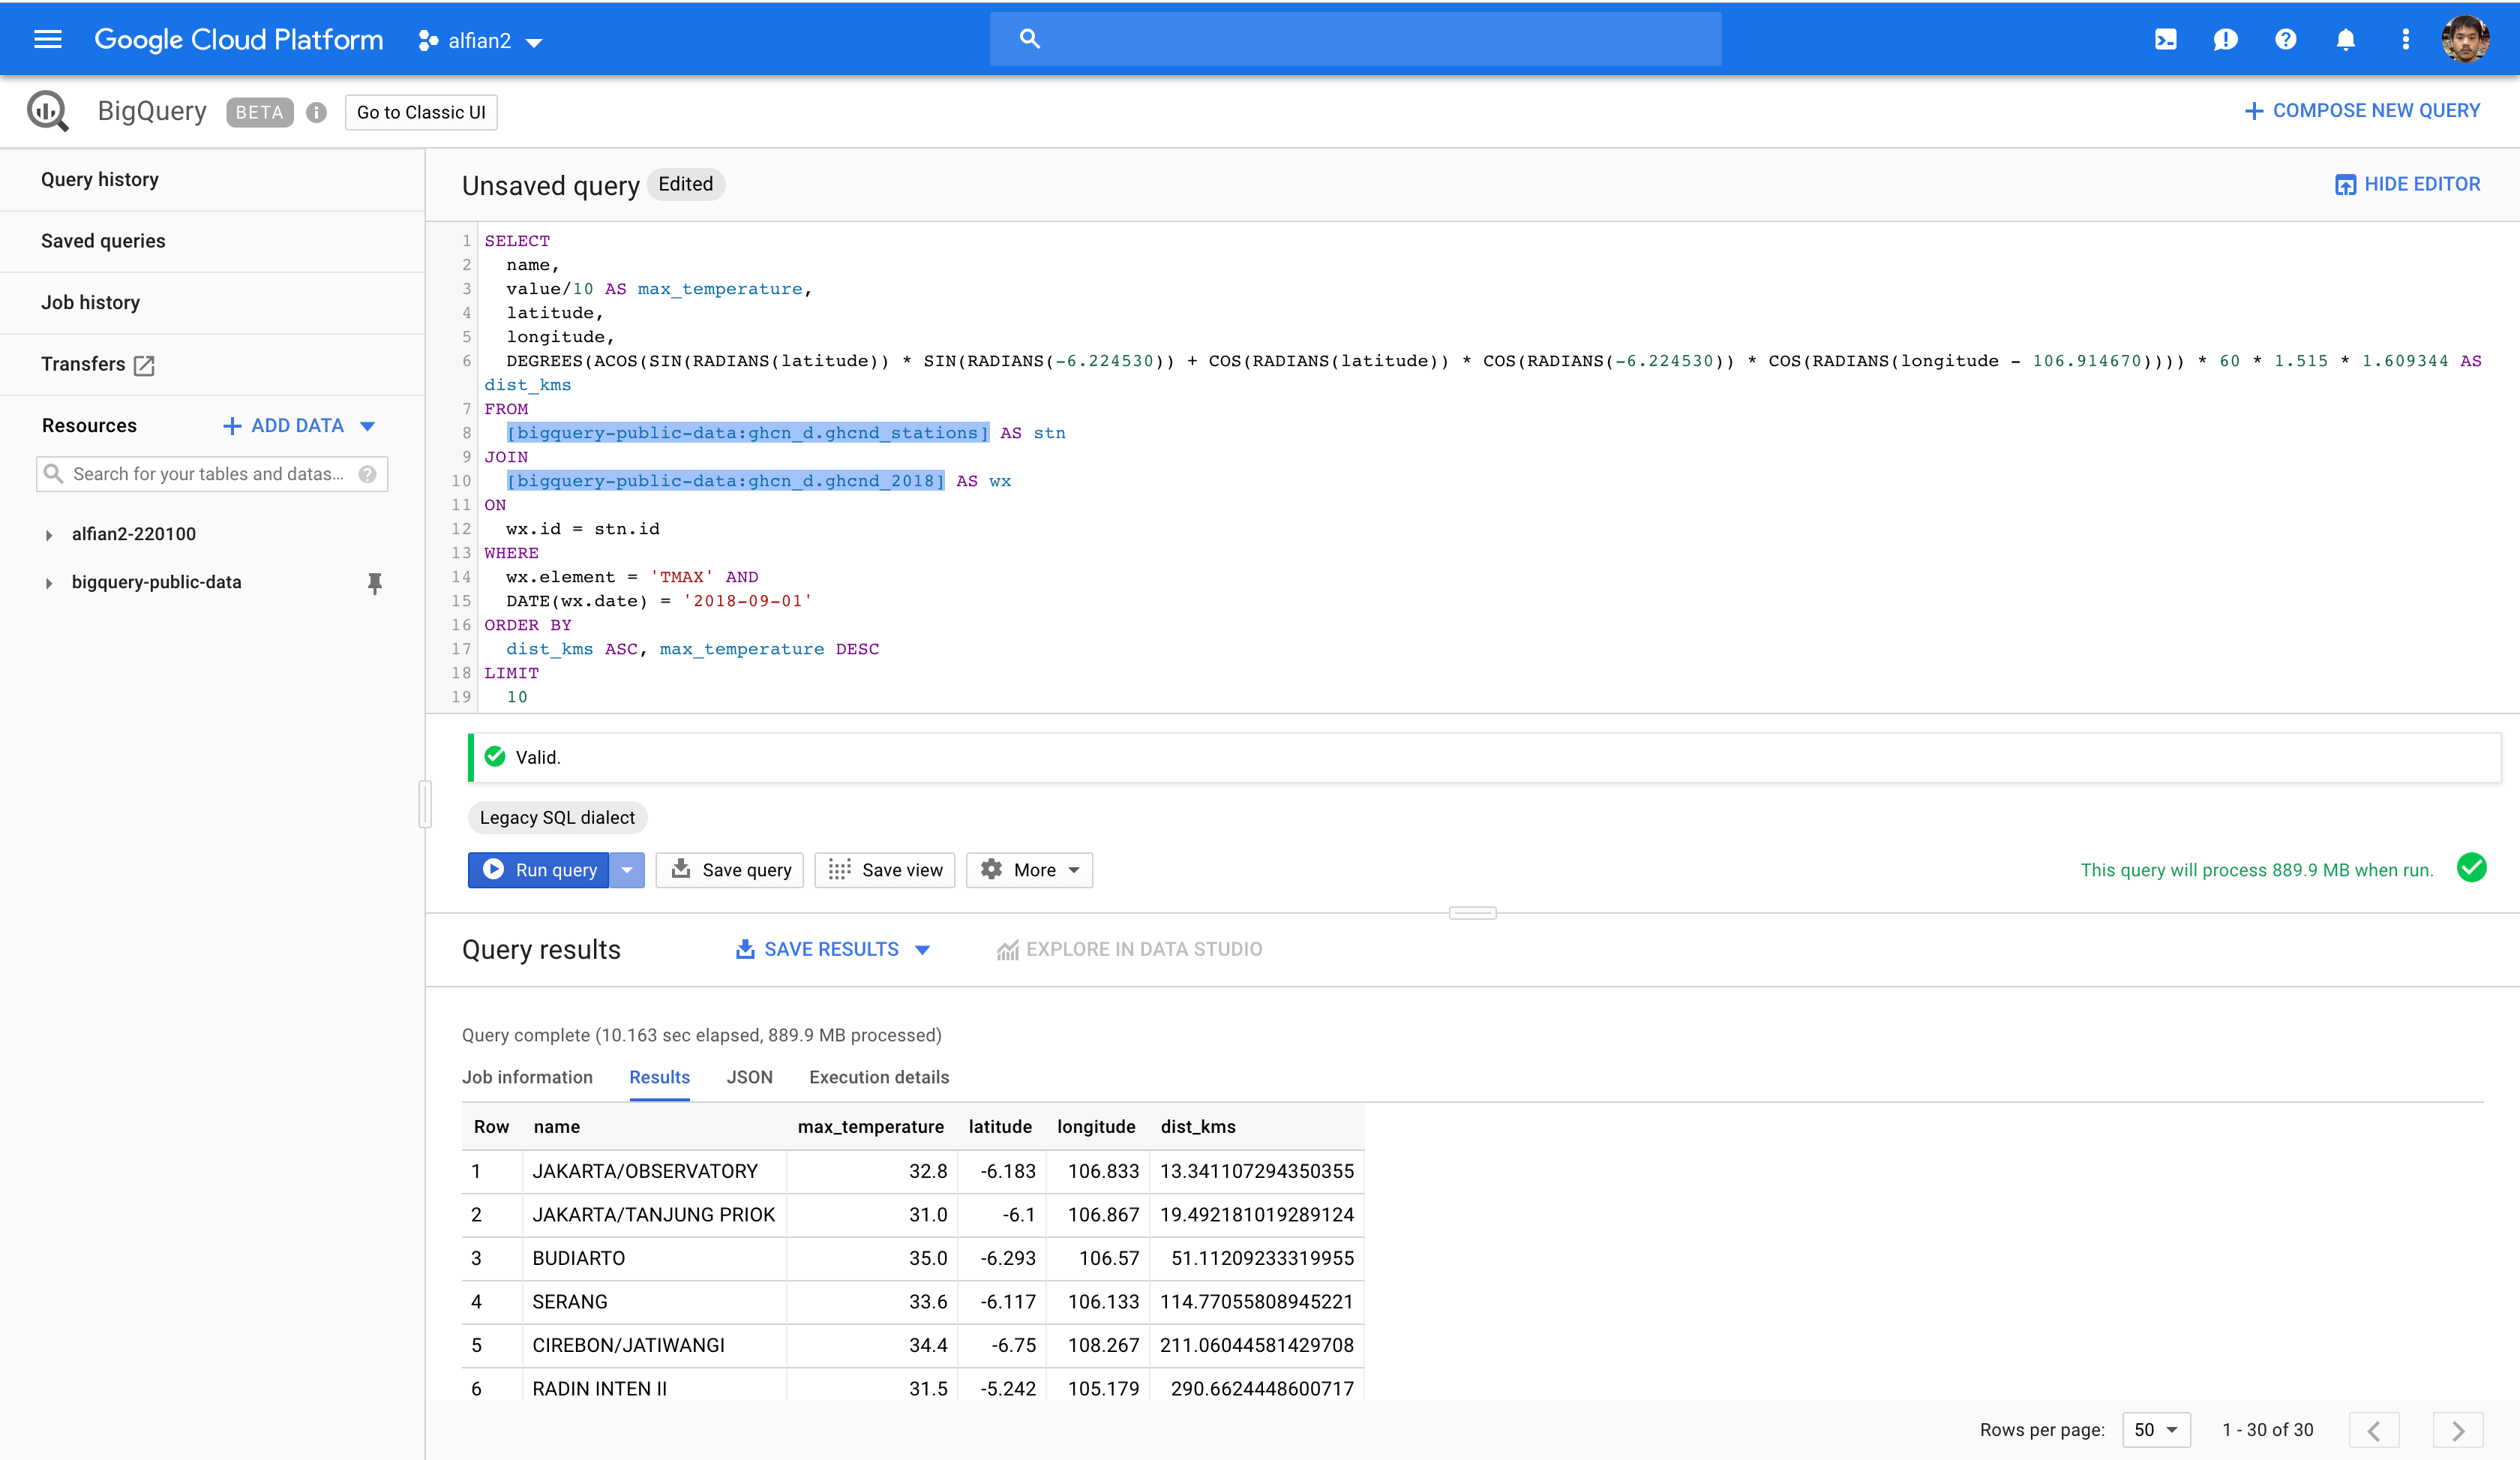
Query Public Global Historical Climate Network Dataset using BigQuery
The daily data that we will be using as daily report is the public dataset from Global Historical Climate Network (GHCN) inside the BigQuery. The query will retrieve the maximum temperature for GHCN stations in the radius area within the Blok M, Jakarta for previous week. You can try to query the data using the BigQuery dashboard and hardcoded values:
- Open BigQuery Console.
- In the query editor parse this query.
SELECT
  name,
  value/10 AS max_temperature,
  latitude,
  longitude,
  DEGREES(ACOS(SIN(RADIANS(latitude)) * SIN(RADIANS(-6.224530)) + COS(RADIANS(latitude)) * COS(RADIANS(-6.224530)) * COS(RADIANS(longitude - 106.914670)))) * 60 * 1.515 * 1.609344 AS dist_kms
FROM
  [bigquery-public-data:ghcn_d.ghcnd_stations] AS stn
JOIN
  [bigquery-public-data:ghcn_d.ghcnd_2018] AS wx
ON
  wx.id = stn.id
WHERE
  wx.element = 'TMAX' AND
  DATE(wx.date) = '2018-11-09'
ORDER BY
  dist_kms ASC, max_temperature DESC
LIMIT
  10
- Click on more and query settings.
- Set SQL dialect to legacy.
- Run the query.
Compute with Google Cloud Functions
Make sure to create your own Slack Workspace, channel, and app before. Then, create an incoming webhook URL associated with the workspace channel. You can follow the documentation at Slack API.
This is the most interesting part, we will create Cloud Functions running node.js 8. There are several npm dependencies we will use:
- @google-cloud/bigquery: BigQuery node.js client we use to query the public GHCN dataset.
- @google-cloud/storage: Cloud Storage node.js client we use to store the CSV file into the bucket we created earlier.
- json2csv: Transform the json data we retrieve from the BigQuery into CSV.
- node-fetch: Used to make a POST HTTP request to the Slack Webhook endpoint containing the URL of the CSV and trigger the notification inside a channel.
{
  "name": "cloud_scheduler_daily_report",
  "version": "1.0.0",
  "dependencies": {
    "@google-cloud/bigquery": "^2.0.1",
    "@google-cloud/storage": "^2.3.0",
    "json2csv": "^4.3.0",
    "node-fetch": "^2.2.1"
  }
}
Inside our index.js file, here are the key important things we will perform:
- Import all the required modules.
- Declare all the require constants for bucket name, slack url endpoint, latitude, longitude, and secret key. (Please use environment variable to initialize this variable in production instead of hardcoding 😋).
- Export a function that will be invoked using HTTP trigger. Check the request url param secret and match it with the secret key. (This is used to secure our http endpoint to make sure we trigger it by ourselves).
- Get current date and subtract the day by 7 to get the previous week. Create variables to store the year, month, day text.
- Create SQL Query for BigQuery, inside here we provide the date and the latitude, longitude from the variables. Query the BigQuery with SQL Legacy Option set to true asynchronously using await
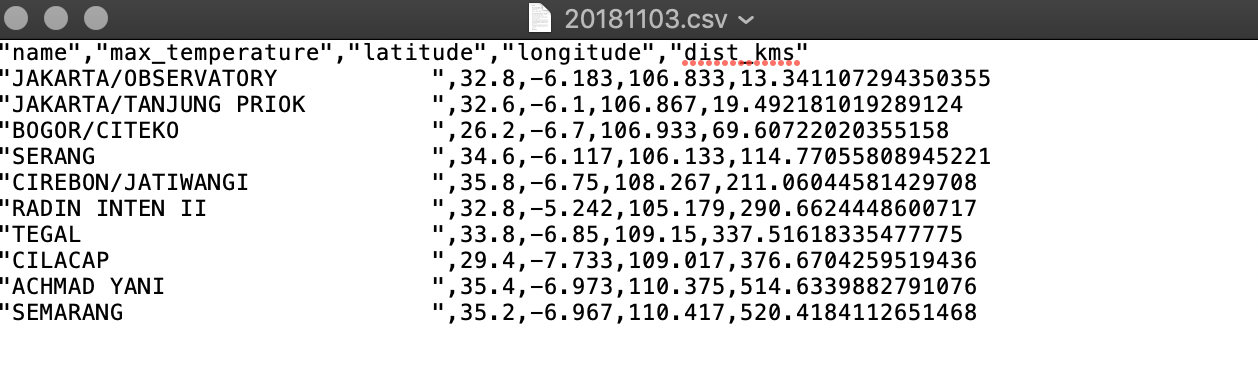
- Convert the rows json array into the CSV using json2csv passing the fields we want to retrieve.
- Create a filename using YYYYMMDD format, then use Cloud Storage passing the bucket name and filename. Save the CSV and make it public in Cloud Storage.
- Create Slack Webhook HTTP JSON request containing the text and link that we want to deliver in the channel.
- Use fetch to perform HTTP POST containing the JSON as the HTTP Body. End request successfully by sending 200 as the HTTP Status response.
const fetch = require('node-fetch');
const Json2csvParser = require('json2csv').Parser;

const { Storage } = require('@google-cloud/storage');
const storage = new Storage();

const { BigQuery } = require('@google-cloud/bigquery');
const bigquery = new BigQuery();
const fields = ['name', 'max_temperature', 'latitude', 'longitude', 'dist_kms']
const latitude = -6.224530
const longitude = 106.914670

const bucketName = 'BUCKET_NAME'
const slackNotificationURL = "SLACK_WEBHOOK_URL"
const secret = "GENERATE_YOUR_OWN_SECRET_KEY"

exports.dailyReportNotification = async (req, res) => {
    if (req.query.secret !== secret) {
        res.status(403).send("Unauthorized Access")
        return
    }

    try {
        const date = new Date()
        date.setDate(date.getDate() - 7);
        const year = date.getFullYear()
        const month = (date.getMonth() + 1) < 10 ? `0${date.getMonth() + 1}` : `${date.getMonth() + 1}`
        const day = (date.getDate()) < 10 ? `0${date.getDate()}` : `${date.getDate()})`;

        const sqlQuery = `
        SELECT
            name,
            value/10 AS max_temperature,
            latitude,
            longitude,
            DEGREES(ACOS(SIN(RADIANS(latitude)) * SIN(RADIANS(${latitude})) + COS(RADIANS(latitude)) * COS(RADIANS(${latitude})) * COS(RADIANS(longitude - ${longitude})))) * 60 * 1.515 * 1.609344 AS dist_kms
        FROM
            [bigquery-public-data:ghcn_d.ghcnd_stations] AS stn
        JOIN
            [bigquery-public-data:ghcn_d.ghcnd_${year}] AS wx
        ON
            wx.id = stn.id
        WHERE
            wx.element = 'TMAX' AND
            DATE(wx.date) = '${year}-${month}-${day}'
        ORDER BY
            dist_kms ASC, max_temperature DESC
        LIMIT
            10
        `
        const options = {
            query: sqlQuery,
            location: 'US',
            useLegacySql: true
        };
        const [rows] = await bigquery.query(options);

        const json2csvParser = new Json2csvParser({ fields });
        const csv = json2csvParser.parse(rows);

        const filename = `${year}${month}${day}.csv`
        const file = storage.bucket(bucketName).file(filename);
        await file.save(csv);
        await file.makePublic()

        const body = {
            'text': "Notification From Cloud Scheduler & Cloud Function",
            "attachments": [
                {
                    "title": "Daily Historical Climate Report Jakarta Area (CSV)",
                    "title_link": `https://storage.googleapis.com/${bucketName}/${filename}`,
                    "text": `Climate Report For ${date.toUTCString()}`,
                    "color": "#764FA5"
                }
            ]
        }

        await fetch(slackNotificationURL, {
            method: 'post',
            body: JSON.stringify(body),
            headers: { 'Content-Type': 'application/json' },
        })

        res.status(200).send("Successfully deliver notification to slack channel")
    } catch (e) {
        res.status(400)
            .send(e.message)
    }
};
To deploy the function to the Cloud Function, we will use the Cloud Function Dashboard:
- Open the Cloud Function Console.
- Click Create Function.
- Type the name.
- Leave 256 MB for memory allocation.
- Set Trigger to HTTP, Source Code to Inline editor, Runtime to node.js 8 Beta.
- Copy your index.js to the index.js tab textarea & package.json to the package.json tab textarea.
- Type the name of the exported function to execute
- Click more, leave region to us-central1, then set timeout to 120
- Click Create.
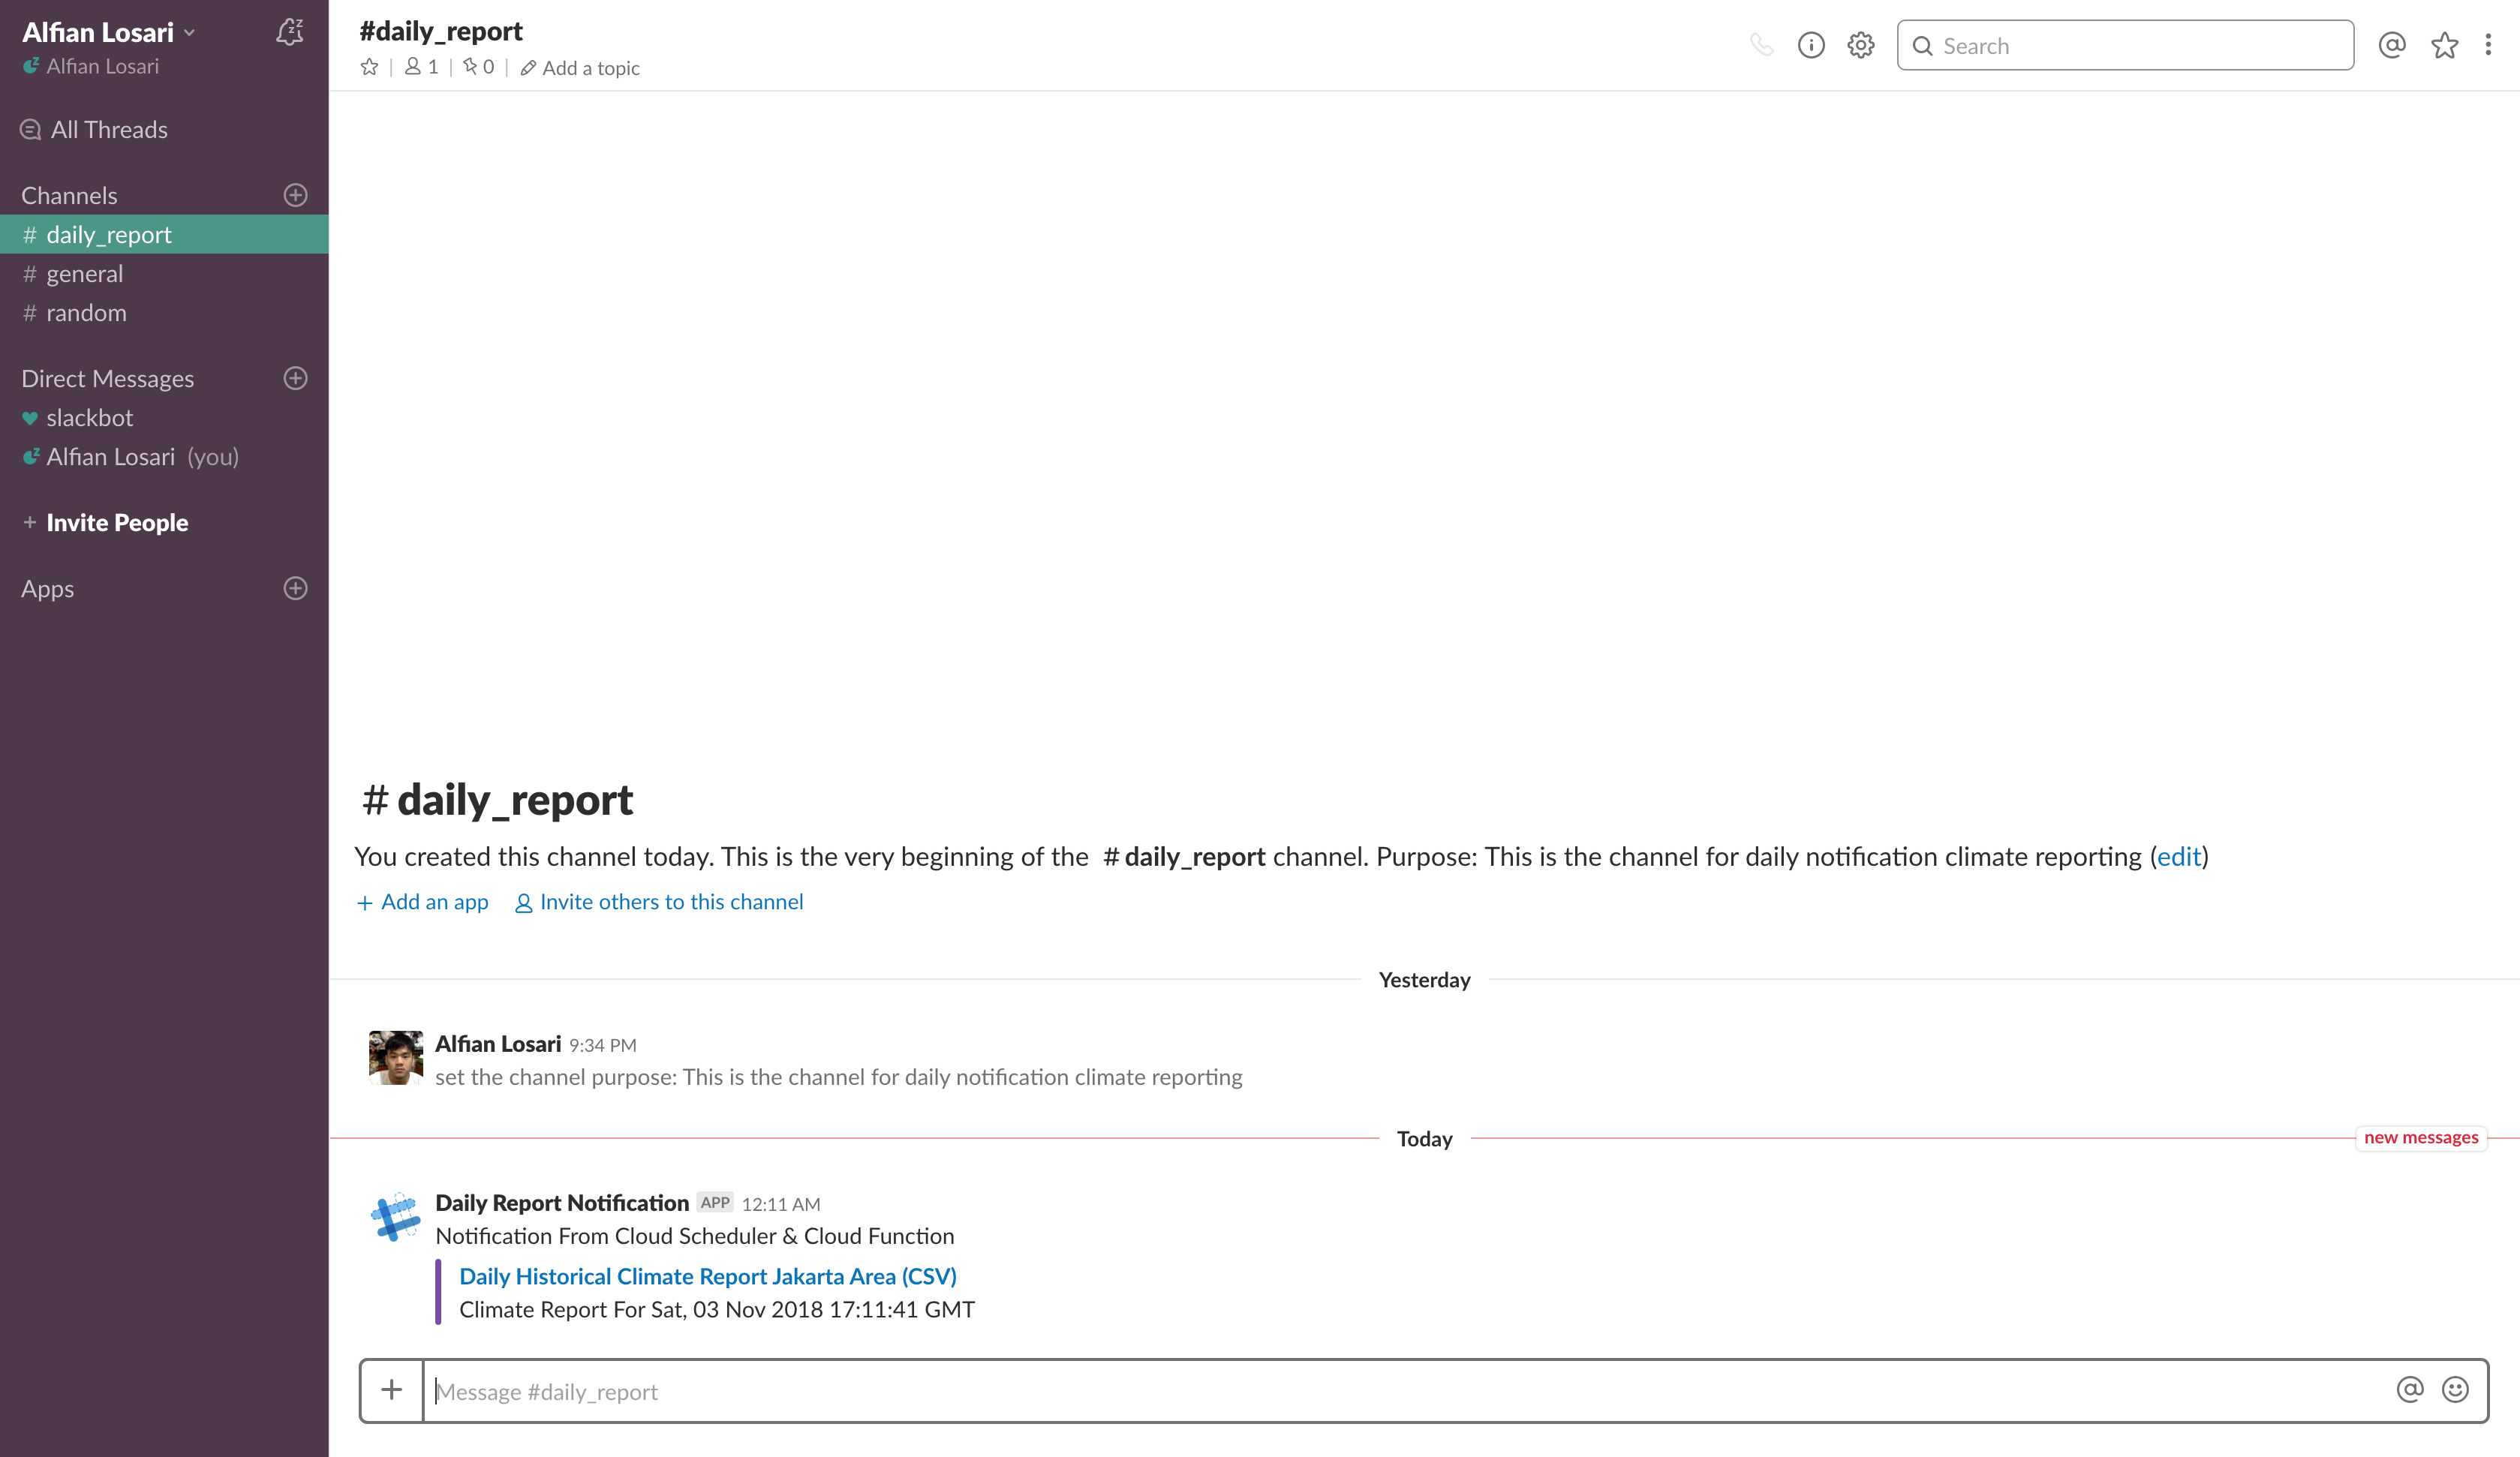
Copy the endpoint of the url deployed, then open your browser or terminal to navigate to the url providing the secret key as the url parameter
https://YOUR_CLOUD_FUNCTION_URL/dailyReportNotification?secret=YOUR_SECRET_KEY
This will trigger the function and send the notification to the Slack Channel!. You can open the CSV url link to download the CSV.
Automate and Schedule with Google Cloud Scheduler
At last, we will create a Cloud Scheduler job that will be scheduled to run daily at 00:00:00 UTC to hit our Cloud Function endpoint.
- Open Cloud Scheduler Console.
- Click Create Job.
- Type the name.
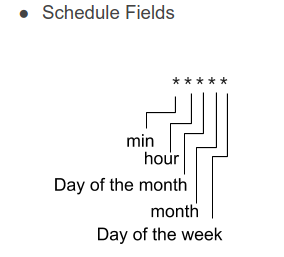
- Set the frequency to 0 0 *.
- Set the Timezone to World Greenwich Mean Time.
- Set target to HTTP.
- Set HTTP method to GET
- Set the URL with your Cloud Function URL and Secret Key as the URL param
- Click Create
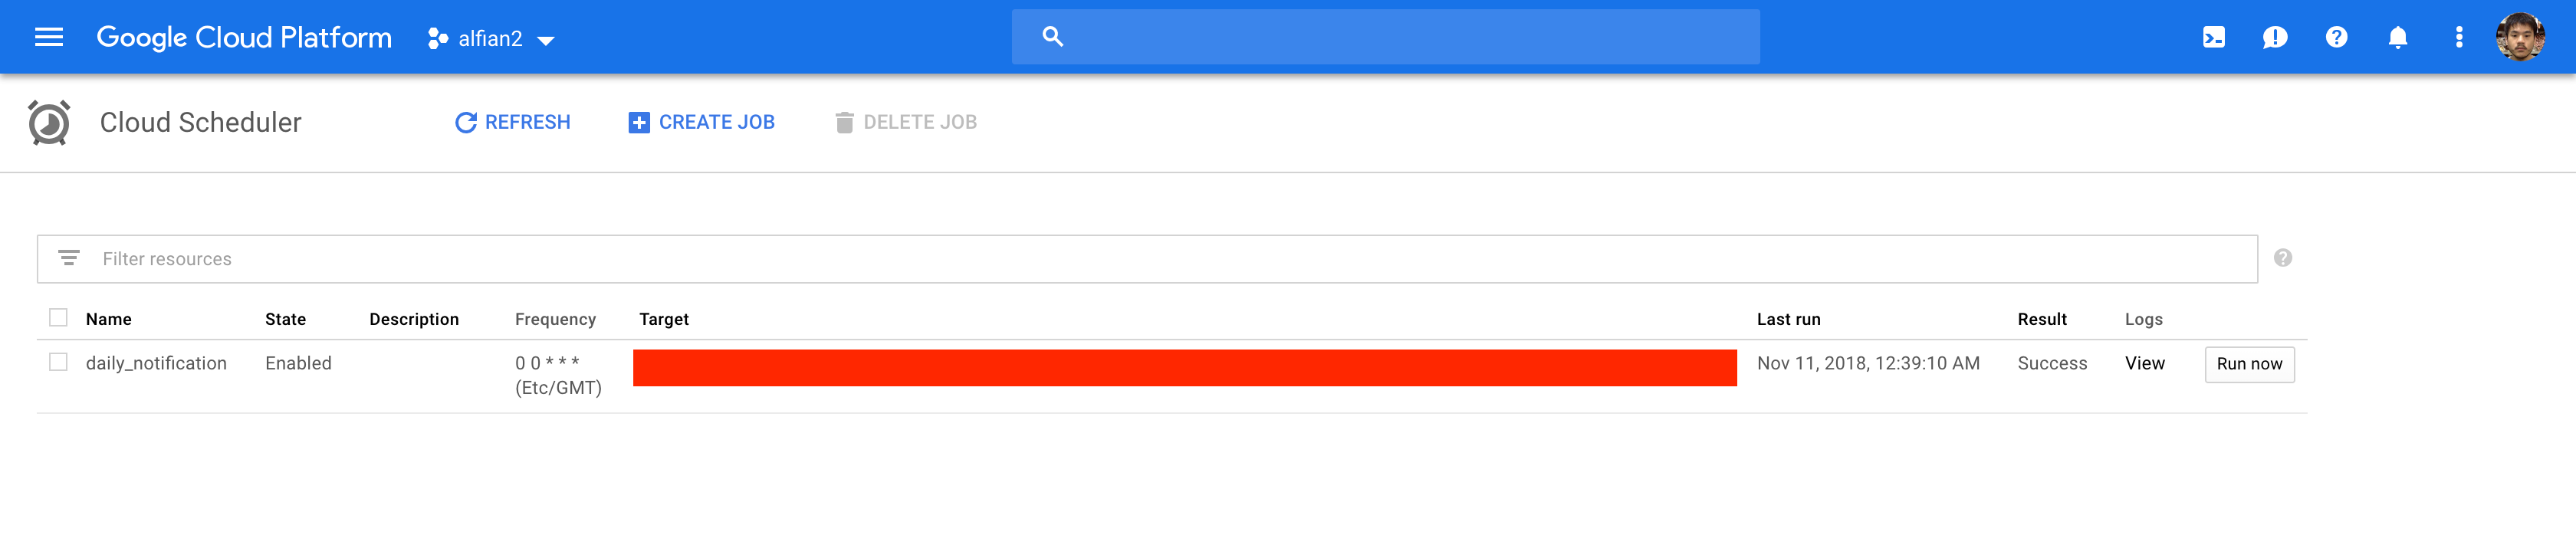
After the job is created, click on the Run now button to test the job manually. You can customize the schedule frequency of the job using the unix cron syntax.
!!! Make sure to clear and delete all of the created resources to avoid recurring cost in GCP after finishing the tutorial !!!
Conclusion
We finally build and deploy serverless daily reporting notification service without managing the infrastructure by ourselves. As developer, i really love serverless because it abstracts all the infrastructure management into an interface that we can automate easily to deploy our app without worrying about scalability and distribution. We can just focus on what we love, writing code and solving problem. This is really the beginning of a new era for Cloud computing and i am pretty pumped up to create solution that solve problem in real world with all of this technologies 😋.