Slim UIViewController through UITableView DataSource & Delegate Encapsulation
Published at Aug 5, 2018
UITableView and UICollectionView are two of the main user interface elements that drives an iOS app when presenting list of data. They are very performant and efficient, because Apple has put many optimisations such as efficient memory usage by enqueue/dequeque mechanism of Cell when the user scrolls through the list. Recently, Apple also adds Cell prefetching to improve the performance when user performs fast scrolling.
MVC (Model View Controller) is the basic architecture that Apple recommends to start with when building an iOS app. When we have a UITableView in our UIViewController class, we usually just make our UIViewController conforms to the UITableViewDataSource and UITableViewDelegate protocols and assign it as the datasource and delegate of the UITableView. This pattern can make our View Controller become so bloated and became very massive because of the data source and delegate methods implementation.
View Controller that has too many responsibilites to handle creates tight coupling between components, this tight coupling make testing become harder to create. Based on the SRP (Single Responsibility Principle), a Class should only has one responsibility, and we should move other responsibilities to another classes so our system become modular that make unit test of a component is easier to create and test.
So what can we do to improve our View Controller, avoid Massive View Controller, and create less coupling between components in our app to make Unit Testing become easier to create?.
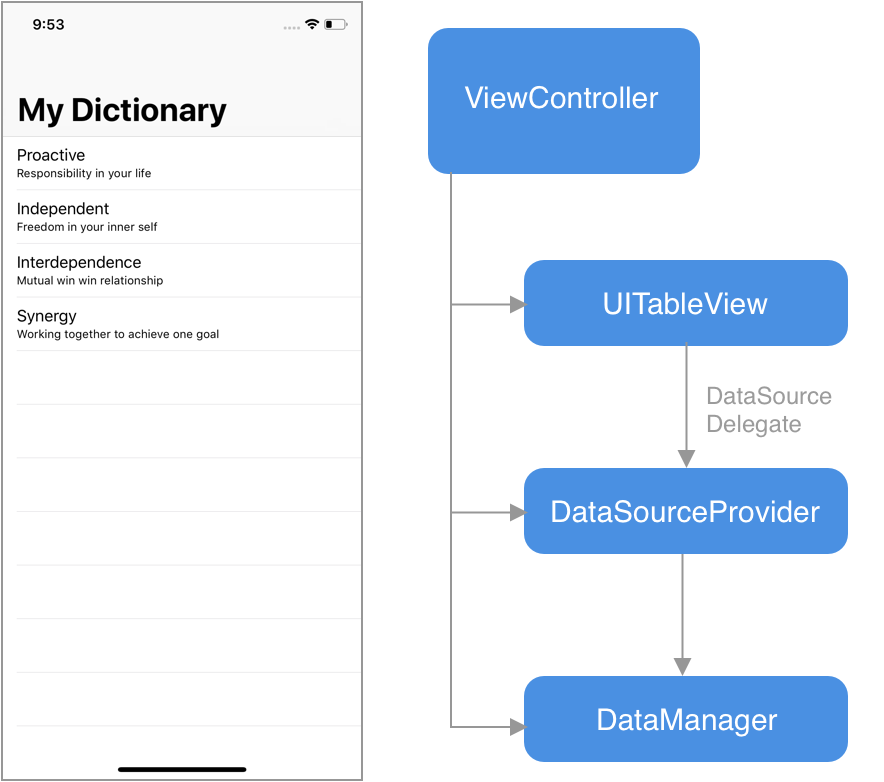
One of the thing we can use is by encapsulating the UITableViewDataSource and UITableViewDelegate into separate DataSourceProvider Class. The DataSourceProvider conforms to the UITableViewDataSource and UITableViewDelegate protocols. We also passed a DataManager object as an instance property for the DataSourceProvider when we initialise it. The DataManager encapsulates the Model for the application. The DataManager provides method to get list of items, add item, delete item, or update item. The backing store for the data can be a plist file, Core Data, or even in memory array.
import Foundation

public struct Item {
    public let title: String
    public let desc: String
}
import Foundation

public class DataManager {

    public private(set) var items = [
        Item(title: "Proactive", desc: "Responsibility in your life"),
        Item(title: "Independent", desc: "Freedom in your inner self"),
        Item(title: "Interdependence", desc: "Mutual win win relationship"),
        Item(title: "Synergy", desc: "Working together to achieve one goal")
    ]

    public var itemsCount: Int {
        return items.count
    }

    public func item(at index: Int) -> Item {
        return items[index]
    }

    public func add(item: Item) {
        items.append(item)
    }

    public func delete(at index: Int) {
        items.remove(at: index)
    }

    public func edit(item: Item, at index: Int) {
        items[index] = item
    }

}
import UIKit

public class DataSourceProvider: NSObject, UITableViewDataSource, UITableViewDelegate {

    private let dataManager: DataManager

    init(dataManager: DataManager) {
        self.dataManager = dataManager
        super.init()
    }

    public func tableView(_ tableView: UITableView, numberOfRowsInSection section: Int) -> Int {
        return dataManager.itemsCount
    }

    public func tableView(_ tableView: UITableView, cellForRowAt indexPath: IndexPath) -> UITableViewCell {
        let cell = tableView.dequeueReusableCell(withIdentifier: "ItemCell", for: indexPath) as! ItemCell
        let item = dataManager.item(at: indexPath.row)
        cell.config(with: item)
        return cell
    }

    public func tableView(_ tableView: UITableView, commit editingStyle: UITableViewCellEditingStyle, forRowAt indexPath: IndexPath) {
        if editingStyle == .delete {
            dataManager.delete(at: indexPath.row)
            tableView.reloadData()
        }
    }

}
The DataSourceProvider implements the UITableViewDatasource methods such as providing number of section, number of rows in a section, cell dequeue and configuration at specific indexPath. The DataSourceProvider then asks the DataManager for the number of items and getting specific item properties to display in a UITableViewCell.
import UIKit

public class ItemCell: UITableViewCell {

    func config(with item: Item) {
        textLabel?.text = item.title
        detailTextLabel?.text = item.desc
    }

}
To integrate with the ViewController, we store the DataSourceProvider and ItemManager as instance properties in ViewController. When ViewDidLoad is invoked we instantiate the DataManager and DataSourceProvider, then we assign the DataSourceProvider object as table view data source and delegate property.
import UIKit

class ViewController: UIViewController {

    @IBOutlet var tableView: UITableView!
    private var dataManager = DataManager()
    private lazy var dataSourceProvider = DataSourceProvider(dataManager: dataManager)

    override func viewDidLoad() {
        super.viewDidLoad()
        navigationController?.navigationBar.prefersLargeTitles = true
        navigationItem.largeTitleDisplayMode = .always
        tableView.dataSource = dataSourceProvider
        tableView.delegate = dataSourceProvider
    }

}
Using this pattern, we have separated the responsibilities for the ViewController into separate objects, DataProvider class that handles the displaying the cell and responding to user action in a cell inside UITableView, DataManager class that encapsulates the model for the application. With this, we can create separate Unit Test for the ViewController, DataSourceProvider, and DataManager class and keep our View Controller slim and less coupled that leads to a much clean code in our application. To see all the code for this article, you can visit the project GitHub page.