Understanding Property Wrappers in Swift By Examples
Published at Nov 11, 2019
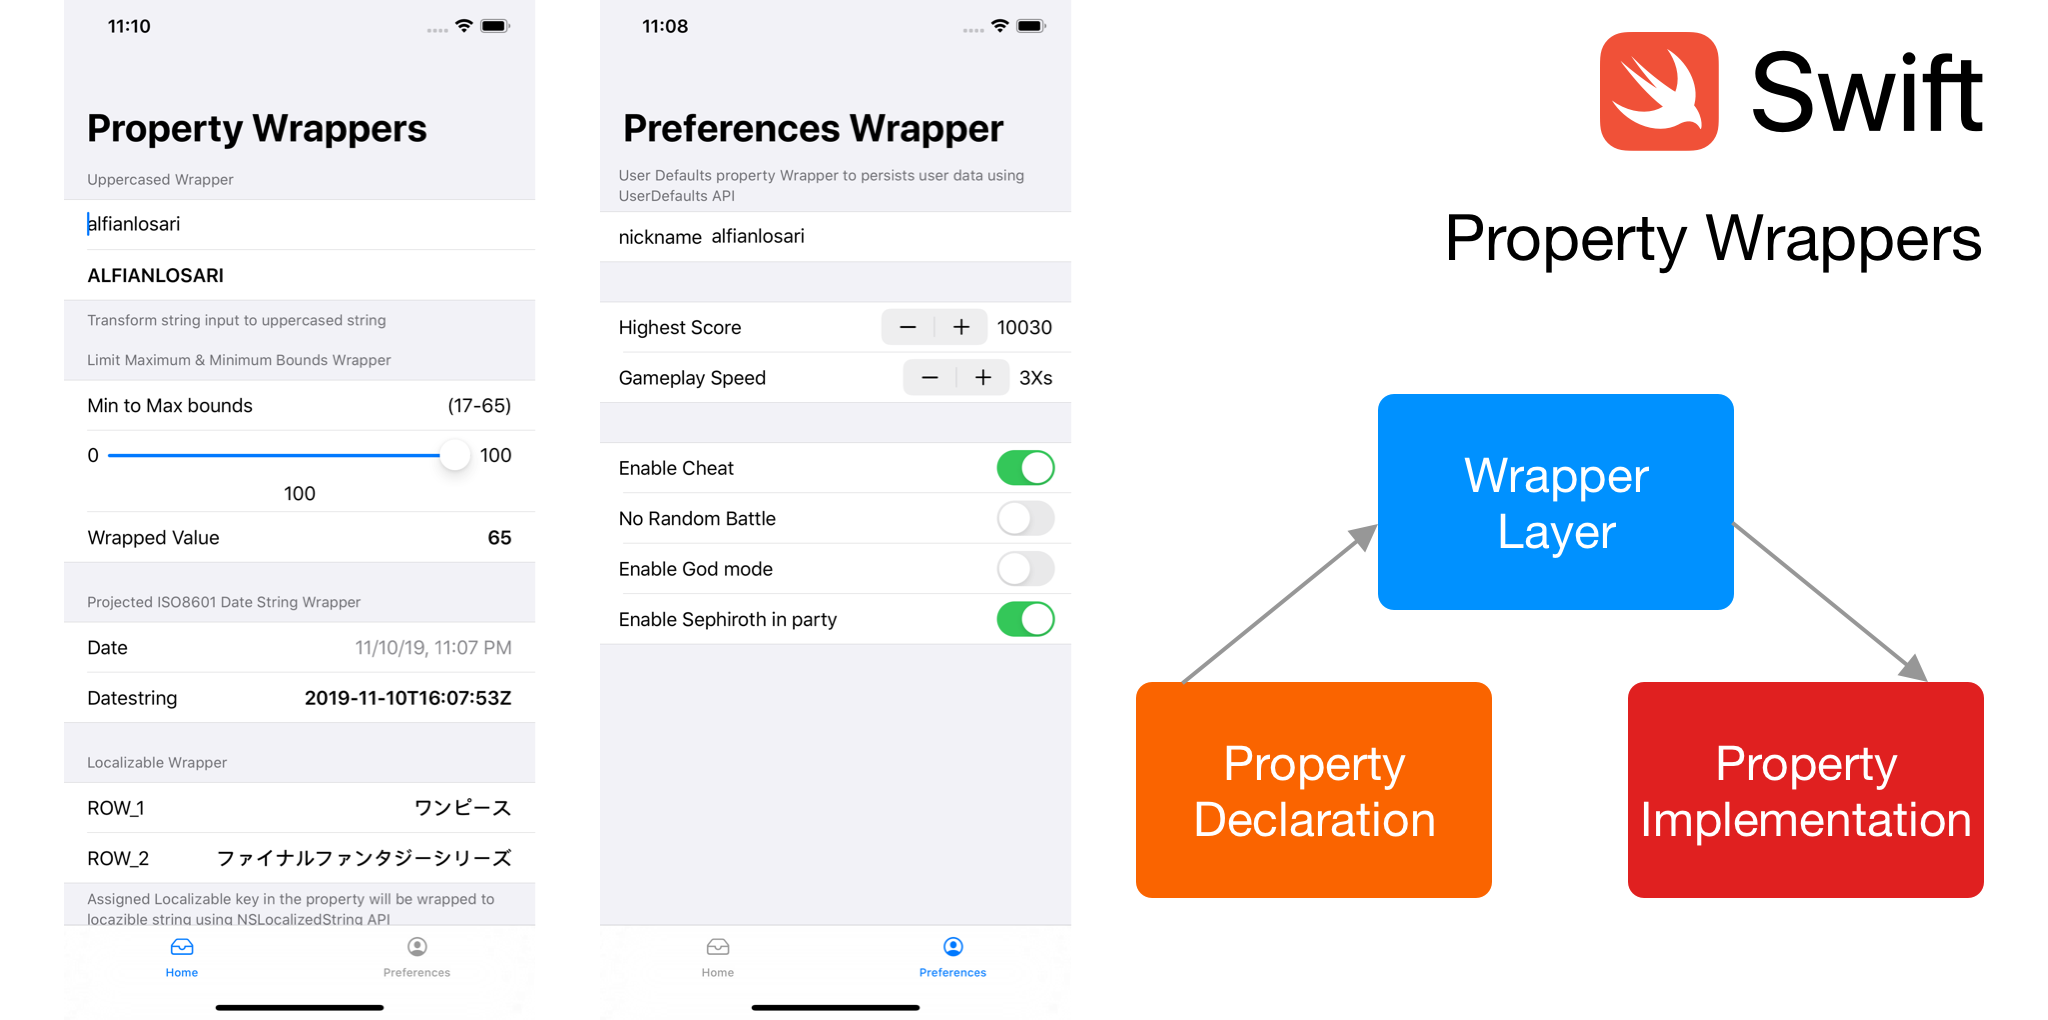
Alongside many new feature that come with the Swift 5.1, one of the most interesting feature is Property wrappers. Basically, it’s a layer/delegate that sits in the middle between how the declared property should behave and how the property will be stored. Property wrappers can be defined by using struct, class, or enum. It can be used when we declare properties inside of those types also.
Swift has already provided several built in wrappers before Swift 5.1 such as lazy, @NSCopying, but with the introduction of Property Wrappers, developer can now also implement custom wrappers without making the language become more complex. You can read the reasoning behind this proposal (SE-258) in the Swift Evolution link.
There are property implementation patterns that come up repeatedly. Rather than hardcode a fixed set of patterns into the compiler (as we have done for lazy and @NSCopying), we should provide a general "property wrapper" mechanism to allow these patterns to be defined as libraries.
Property Wrappers is also heavily used in SwiftUI. There are many wrappers provided by the framework such as:
@State. A property wrapper which value binds to the view where it’s declared in.
@Binding. It’s a property that is passed down from the view parent’sStateproperty using$projected value.
@ObservedObject. Similar like@State, but used for a property which conforms toObservableObjectprotocol. AnObservableObjectneeds to be aclasstype and will update the View whenever the properties that are marked with@Publishedchanges.
@Published. It’s a wrapper that can be used for properties that are declared inObservableObject. Whenever the value changes, it will invokeobjectWillChangemethod so View can react to the changes published.
@EnvironmentObject. Similar like@ObservedObject, but it can be used to share data across many views from top to bottom of view hierarchy without passing down the property explicitly to child view.
@Environment. It is used to inject and override system wide configuration such as system color scheme, layout direction, content size category into a View.
Property wrappers is not exclusively limited to SwiftUI, with Swift 5.1 we can create our own custom property wrapper!. Here are some of the things we can do by creating our own custom wrappers:
- Transforming a value after it’s being assigned.
- Limiting the value to minimum and maximum bounds.
- Provide extra projected value on a property.
- A Wrapper that act as delegate to hide implementation details of an API.
Those are just small examples of the wrappers that we can create, the possibilities ahead are endless!. Next, let’s implement some of those property wrappers and see how we can use them to simplify our code!.
You can download sample SwiftUI application of using the custom property wrappers that we are going to create. Check the project GitHub repository below at
Using Property Wrapper in a nutshell
Creating a new property wrapper it’s pretty simple. Here are some of the steps to create it:
- Declare
@propertyWrapperkeyword before we declare the type that we want to use as property wrapper. It can bestruct,class, orenum.
- We are required to implement the
wrappedValueproperty. Most of the time we declare customsetterandgetterin this property. This property can be acomputedorstoredproperty.
- Initializer will pass the
wrappedValuewhen we assigning the property a value when we declare it. We can also create our own custom initializer with additional properties. We’ll see more on this later in the examples of@Rangedwrapper.
- We can also declare an optional
projectedValueproperty of any type. This can be accessed using$from the property.
- To use it we simply put the property wrapper with
@as the prefix when we declare the property in our type.
Next, let’s begin implementing custom property wrappers!.
Transforming value of a property
@propertyWrapper
struct Uppercased {
    private var text: String
    var wrappedValue: String {
        get { text.uppercased() }
        set { text = newValue }
    }
    init(wrappedValue: String)  {
        self.text = wrappedValue
    }
}

struct User {
    @Uppercased var username: String
}

let user = User(username: "alfianlo")
print(user.username) // ALFIANLO
For this @Uppercased wrapper, we want to make sure the String is uppercased anytime a value is assigned into the property. Here are the things that we do to implement this:
- We store the actual string inside a private stored property named text.
- The required wrappedValue property is a computed property, whenever we assign a value, it will be stored in text property and whenever we get the property, text value will be returned by applying uppercased method.
- We create a wrappedValue initializer and then assign it to text property the first time the wrapper is initialized.
- To use it, we just add the
@Uppercasedkeyword in front of the property.
Limit the minimum and maximum bounds of a number value
@propertyWrapper
struct Ranged<T: Comparable> {
    private var minimum: T
    private var maximum: T
    private var value: T
    var wrappedValue: T {
        get { value }
        set {
            if newValue > maximum {
                value = maximum
            } else if newValue < minimum {
                value = minimum
            } else {
                value = newValue
            }
        }
    }
    init(wrappedValue: T, minimum: T, maximum: T) {
        self.minimum = minimum
        self.maximum = maximum
        self.value = wrappedValue
        self.wrappedValue = wrappedValue
    }
}

struct Form {
    @Ranged(minimum: 17, maximum: 65) var age: Int = 0
}

var form = Form()
form.age = 100 // 65
form.age = 2 // 17
@Ranged wrapper can be used to clamp value of number by providing maximum and minimum value. Whenever the value is assigned, comparison will be performed and value will be assigned based on these conditions:
- If new value assigned is larger than maximum bounds, the maximum value will be used to store the property.
- If new value assigned is smaller than minimum bounds, the minimum value will be used to store the property.
- If both of these conditions are not met, new value will be used to store the property.
To accept minimum and maximum parameter, a custom initializer is created. When we declare the property, we also need to pass the maximum and minimum value after the @Ranged declaration.
Project Date property to ISO8601 formatted String
@propertyWrapper
struct ISO8601DateFormatted {
    static private let formatter = ISO8601DateFormatter()
    var projectedValue: String { ISO8601DateFormatted.formatter.string(from: wrappedValue) }
    var wrappedValue: Date
}

struct Form {
    @ISO8601DateFormatted var lastLoginAt: Date
}

let user = Form(lastLoginAt: Date())
print(user.$lastLoginAt) // "dd-mm-yyTHH:mm:ssZ"
Property wrappers can also be used to project another value of any type using the projectedValue property, it can be accessed using the $ operator by prefixing the property. For ISO8601DateFormatter , a static private ISO8601DateFormatter is used whenever projectedValue is read to convert the date from the wrappedValue stored property.
Wrapping NSLocalizedString API with property wrapper
@propertyWrapper
struct Localizable {
    private var key: String
    var wrappedValue: String {
        get { NSLocalizedString(key, comment: "") }
        set { key = newValue }
    }
    init(wrappedValue: String) {
        self.key = wrappedValue
    }
}

struct HomeViewModel {
    @Localizable var headerTitle: String
    @Localizable var headerSubtitle: String
}

let homeViewModel = HomeViewModel(headerTitle: "HOME_HEADER_TITLE", headerSubtitle: "HOME_HEADER_SUBTITLE")
print(homeViewModel.headerTitle) // "Title"
print(homeViewModel.headerSubtitle) // "Subtitle"
The @Localizable property wrapper is used to wrap the NSLocalizedString API, when a property declared using @Localizable keyword, the value assigned will be stored in the private key property and will be used whenever the wrappedValue is accessed by passing it to NSLocalizedString(key:comment:) initializer to get the localized string from the app.
Wrapping UserDefaults API with property wrapper
@propertyWrapper
struct UserDefault<T> {
    var key: String
    var initialValue: T
    var wrappedValue: T {
        set { UserDefaults.standard.set(newValue, forKey: key) }
        get { UserDefaults.standard.object(forKey: key) as? T ?? initialValue }
    }
}

enum UserPreferences {
    @UserDefault(key: "isCheatModeEnabled", initialValue: false) static var isCheatModeEnabled: Bool
    @UserDefault(key: "highestScore", initialValue: 10000) static var highestScore: Int
    @UserDefault(key: "nickname", initialValue: "cloudstrife97") static var nickname: String
}

UserPreferences.isCheatModeEnabled = true
UserPreferences.highestScore = 25000
UserPreferences.nickname = "squallleonhart"
UserDefaults API can be very cumbersome for us, everytime we want to persist and retrieve value from user defaults. We can simplify this by creating a simple property wrapper that will hide the implementation of those API calls for whenever we assign and retrieve value from a property.
The @UserDefault wrapper accepts 2 parameter in the initializer, the key and initialValue in case of the value for the key is not available in UserDefaults . The wrappedValue itself is a computed property, whenever a value is assigned, it will set the value using the key stored. And whenever the property is read, the key is used to retrieve the value as cast it using generic . If the value is not available, the initialValue will be returned instead.
Conclusion
Property Wrappers is a really amazing feature that we can use to provide custom shared patterns and behaviour in properties that we declare in our type to simplify our code. I really hope in the future there will be many great wrappers created and shared by the community.
At last, keep on learning and evolving to become a more better coder to build insanely great things through technology. Let’s keep the lifelong learning goes on and happy Swifting!.